Introduction
To begin this blog, let's better understand the Sharepoint Rest API and its application in facilitating the Check-In and Check-Out of documents stored in the Document Library for our Custom solutions. In this Blog, we will demonstrate how we can Check-In and Check-Out the Document Stored in the Library of the SharePoint Site using SharePoint Rest API.
What is the SharePoint Rest API?
SharePoint Rest API allows developers to communicate with SharePoint Server using HTTP request and response and allows developers to work with SharePoint Lists, Document Libraries, and sites.
By adjusting the EndPoint used in the SharePoint REST API, we can carry out numerous operations beyond Create, Read, Update, and Delete (CRUD).
Why Do We Need to Check-In and Check-Out the Document?
Firstly checking-in and checking-out documents are necessary to manage the Version History so that if there happens to be a conflict between two users editing the same document at the same time.
When the user has performed the Editing, then the user can Check-Out the document so that others can view the Changes or can modify the Changes.
Overall, checking in and checking out documents in SharePoint helps ensure that edits are managed appropriately, and document versions are properly tracked and maintained.
Let's see how we can Perform the Check-In Procedure for a Document using SharePoint Rest API.
Check-In Document Using Rest API
Firstly we have a SitePages Library in SharePoint Site, and in that, we have a SitePage as Out Document we will be Checking-In that Using the Rest API
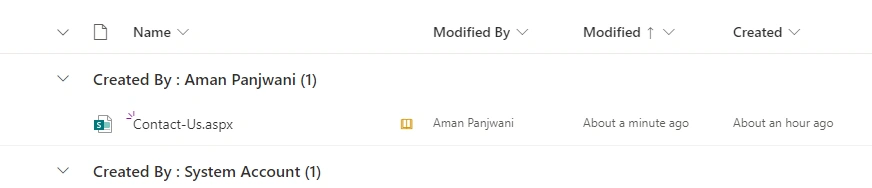
Here in the Below Figure, we can see that Contact-Us Page is Currently Checked-Out for the Edit.

Now Let's Build a Rest API to Check this In.
We will be using GetFileByServerRelativeUrl in our Rest API in order to retrieve Our file from a document library based on the file's server-relative URL.
And then, we will use CheckIn() EndPoint to CheckIn the Document.
Remember, while using the CheckIn(), we need to Pass two things in the Parameter i.e.
- Comment- we add while we CheckIn the Document that Represents the Changes we made to the File.
- Checkintype- i.e., which type of Version do we need to CheckIn as we can CheckIn the Minor Version or Major Version of the Document?
If we need to CheckIn the Minor Version, we can set the checkintype = 1 in the Parameter. Else, we can set the checkintype = 2 for Major CheckIn.
So, Our Rest API with EndPoint will look something Like this.
<<your SharePoint Site URL>>/_api/web/getfilebyserverrelativeurl('/sites/AmanSite/SitePages/Contact-Us.aspx')/CheckIn(comment='',checkintype=0)
Note. ServerRelativeURL of your File Differs in your case.
Now in Order to Let this Rest API Call, we will need to Execute a POST Request with the FormDigest Token.
Generally, FormDigest is a hidden form field that contains a unique value that is generated by SharePoint for each session. This value is used to verify that the user making the request has permission to modify the data and that the request is not a forgery or a malicious attack.
In order to Get the FormDigest for the Particular Site, we can Execute the REST API with the ContextInfo EndPoint.
Here is the Example of the FetchRequest for Getting the Form Digest.
fetch(`<<your SharePoint Site URL>>/_api/contextinfo`, {
        method: "POST",
        headers: {
          "Accept": "application/json;odata=verbose",
          "Content-Type": "application/json;odata=verbose"
        }
      }).then(response => response.json())
        .then(result => {
			console.log("FormDigest",result.d.GetContextWebInformation.FormDigestValue)
		});
Now we will Execute the Post Request with this Form Digest and with CheckIn EndPoint in the Rest API using Fetch.
fetch(`<<your SharePoint Site URL>>/_api/contextinfo`, {
        method: "POST",
        headers: {
          "Accept": "application/json;odata=verbose",
          "Content-Type": "application/json;odata=verbose"
        }
      }).then(response => response.json())
        .then(result => {
			let formdigest = result.d.GetContextWebInformation.FormDigestValue
			fetch(`<<your SharePoint Site URL>>/_api/web/getfilebyserverrelativeurl('/sites/AmanSite/SitePages/Contact-Us.aspx')/CheckIn(comment='',checkintype=0)`, {
			  method: "POST",
			  headers: {
				"Accept": "application/json;odata=verbose",
				"Content-Type": "application/json;odata=verbose",
				"X-RequestDigest": formdigest,
				"IF-MATCH": "*",
				"X-HTTP-Method": "MERGE"
			  }
			}).then(response => response.json())
			  .then(result => {
				console.log(result)
				});
		});
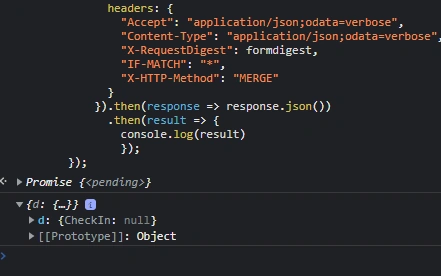
We will Get the Response Like this if Executed in the Console Window.
And now we can see that the Document is Checked-In with the Minor Version as it is yet to Publish.
Now if we need to Check-In this Document with the Major Version, then we need to Check-Out this Document and then Set the checkintype = 1 in the CheckIn Parameter and Execute the Fetch Call again.
fetch(`<<your SharePoint Site URL>>/_api/contextinfo`, {
        method: "POST",
        headers: {
          "Accept": "application/json;odata=verbose",
          "Content-Type": "application/json;odata=verbose"
        }
      }).then(response => response.json())
        .then(result => {
			let formdigest = result.d.GetContextWebInformation.FormDigestValue
			fetch(`<<your SharePoint Site URL>>/_api/web/getfilebyserverrelativeurl('/sites/AmanSite/SitePages/Contact-Us.aspx')/CheckIn(comment='',checkintype=1)`, {
			  method: "POST",
			  headers: {
				"Accept": "application/json;odata=verbose",
				"Content-Type": "application/json;odata=verbose",
				"X-RequestDigest": formdigest,
				"IF-MATCH": "*",
				"X-HTTP-Method": "MERGE"
			  }
			}).then(response => response.json())
			  .then(result => {
				console.log(result)
				});
		});
And now, if we see the Version History, we can see that this Document is Published with the Major Version.
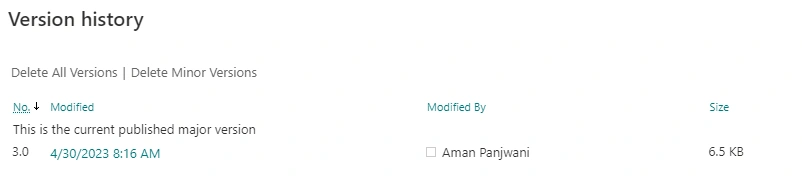
So this is how we can Check-In Different types of Versions for the Document Using the Power of SharePoint Rest API.
Now, we will see how we can Check-Out the Current Published Version using Rest API.
Check-Out Document Using Rest API
We will be Using Almost the same Procedure that we used while Checking-In the Document. Only Change will be in the EndPoint used to Check-Out the Document.
Here for Checking-out the Document, we will be using CheckOut() as Our EndPoint in the API.
So, Our Rest API with EndPoint will look something Like this.
<<your SharePoint Site URL >>/_api/web/getfilebyserverrelativeurl('/sites/AmanSite/SitePages/Contact-Us.aspx')/CheckOut()
Let's Execute this with the FormDigest Using Fetch Method.
fetch(`<<your SharePoint Site URL>>/_api/contextinfo`, {
        method: "POST",
        headers: {
          "Accept": "application/json;odata=verbose",
          "Content-Type": "application/json;odata=verbose"
        }
      }).then(response => response.json())
        .then(result => {
			let formdigest = result.d.GetContextWebInformation.FormDigestValue
			fetch(`<<your SharePoint Site URL>>/_api/web/getfilebyserverrelativeurl('/sites/AmanSite/SitePages/Contact-Us.aspx')/CheckOut()`, {
			  method: "POST",
			  headers: {
				"Accept": "application/json;odata=verbose",
				"Content-Type": "application/json;odata=verbose",
				"X-RequestDigest": formdigest,
				"IF-MATCH": "*",
				"X-HTTP-Method": "MERGE"
			  }
			}).then(response => response.json())
			  .then(result => {
				console.log(result)
				});
		});
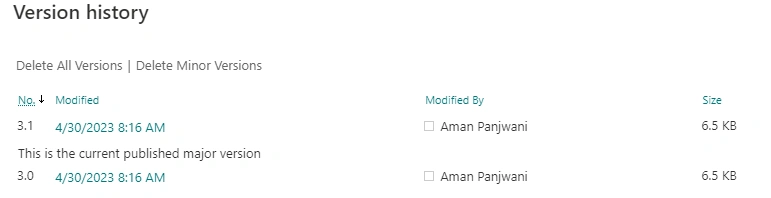
After the Execution of this Fetch Request, if we again see the Version History of the Page, then we can see that the Page is Checked Out.
Summary
So this is how we can Check-In and Check-Out the Document Residing in the Library using SharePoint Rest API.
Hope this Blog has provided insight into how to CheckIn and CheckOut Pages using SharePoint Rest API. You can Join me on LinkedIn to follow my learning journey and stay updated with my latest insights and discoveries.


Join the conversation! Your thoughts help the community grow.