Form Authentication in ASP.NET:
When we don't want to use Windows Credentials to validate a user, we can utilize the ASP.NET infrastructure to implement our own authentication infrastructure which includes a custom login page that validates a user against credentials such as a database and later established security context on each request. ASP.NET leverages it's framework to support cookies and establishes the security context for each web request; this is called form authentication.
Points to remember:
- Form authentication follows a ticket system in which a user gets an Authentication Ticket at the time of login with other basic information attached to it. This is accomplished by assigning an authentication ticket in a cookie to the client which is also called "cookie authentication".
- When a request comes from an anonymous user for a web page, ASP.NET checks for this ticket, when it is not found, the request is redirected to a login page.
- When ASP.NET detects the authentication ticket, and the user is validated, then the runtime automatically sets an authentication cookie, which will contain an authentication ticket and then redirect the user to a requested page. This is accomplishing by calling the FormAuthentication class method.
Why to choose Form authentication:
- You have full control over the authentication code.
- You have full control over the appearance of the login form.
- It works with any browser.
- It allows you to decide how to store user information.
How to implement Form Authentication:
Step 1: Configure forms authentication in the web.config file:
The following is the default that Visual Studio provides; change it to form authentication.
<authentication mode="Windows" />
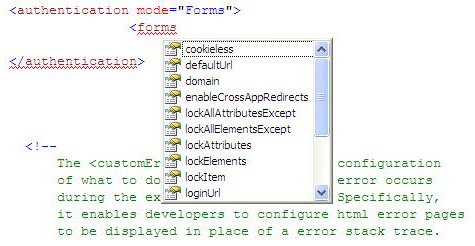
<!--
The <customErrors> section enables configuration
of what to do if/when an unhandled error occurs
during the execution of a request. Specifically,
it enables developers to configure html error pages
to be displayed in place of a error stack trace.
Change it to form:
<authentication mode="Forms">
We have many attributes for configuring form authentication such as below:
For this example, we will keep it simple as in the following:
<authentication mode="Forms">
<forms name="MyCookieName" timeout="20" loginUrl="dbLogin.aspx">
<credentials passwordFormat="SHA1">
<user name="vishal" password="123"/>
<user name="nayan" password="321"/>
</credentials>
</forms>
</authentication>
Notice here that we are storing credentials in the web config file itself. We can store them anywhere we wish to, including a database.
<credentials passwordFormat="SHA1">
<user name="vishal" password="123"/>
<user name="nayan" password="321"/>
</credentials>
Step 2: Next we have to deny anonymous user:
<authorization >
<deny users="?"/>
</authorization>
The question mark (?) is a wildcard character that matches all anonymous users. By including
this rule in your web.config file, you specify that anonymous users are not allowed. They all should be authenticated.
Step 3: Now we have to create custom login page which takes user username and password credential and validate them against credential store which is web.config file.
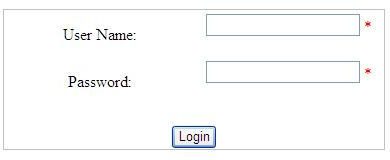
The HTML for this is as below:
<asp:Panel ID="MainPanel" runat="server" Width="380px"
BorderColor="Silver" BorderStyle="Solid" BorderWidth="1px">
<table>
<tr>
<td width="30%" style="height: 43px">
User Name:</td>
<td width="30%" style="height: 43px">
<asp:TextBox ID="UsernameText" runat="server" Width="80%">
</asp:TextBox>
<asp:RequiredFieldValidator ID="UsernameRequiredValidator"
ControlToValidate="UsernameText" ErrorMessage="*" runat="server">
</asp:RequiredFieldValidator>
<asp:RegularExpressionValidator ID="UsernameValidator"
runat="server" ControlToValidate="UsernameText"
ValidationExpression="[\w| ] *"
ErrorMessage="Invalid Username">
</asp:RegularExpressionValidator>
</td>
</tr>
<tr>
<td width="30%" style="height: 26px">
Password:</td>
<td width="30%" style="height: 43px">
<asp:TextBox id="PasswordText" runat="server" TextMode=Password
Width="80%"></asp:TextBox>
<asp:RequiredFieldValidator id="PwdRequiredValidator"
ErrorMessage="*" runat="server"
ControlToValidate="PasswordText"></asp:RequiredFieldValidator>
<asp:RegularExpressionValidator ID="PwdValidator"
ControlToValidate="PasswordText" runat="server"
ErrorMessage="Invalid Password"
ValidationExpression='[\w| !"§$%&/()=\-?\*]*'>
</asp:RegularExpressionValidator>
</td>
</tr>
</table>
<br />
<asp:Button ID="LoginAction" runat="server"
Text="Login" /><br />
<asp:Label ID="LegendStatus" runat="server"
EnableViewState="false" Text="" /></asp:Panel>
</asp:Panel>
You see here we have used a Validation control for each of username and password textbox.
Username: ValidationExpression="[\w| ] *"
It may contain letters, digits, and spaces only. Therefore, the validation expression looks like this:
Password: ValidationExpression='[\w| !"§$%&/()=\-?\*]*'>
To support special characters only
Step 4: Now we have to write code for validating user agains credential store, which in our case is web.config file.
There are multiple ways to handle the login of user i.e. using web config credential, using data store credential , using persistence cookie for authentication and sometime without it, then creating your own credential store in web config.
So let us try out each of them.
A. Simple login using credential stored in web config and validating username and password against it using Authenticate method.
protected void LoginAction_Click(object sender, EventArgs e)
{
Page.Validate();
if (!Page.IsValid)
{
return;
}
if (FormsAuthentication.Authenticate(UsernameText.Text, PasswordText.Text))
{
// Create the ticket, add the cookie to the response
// and redirect to the originally requested page
FormsAuthentication.RedirectFromLoginPage(UsernameText.Text, false);
}
else
{
// Username and password are not correct
LegendStatus.Text = "Invalid username or password!";
}
}
Point to remember here:
-
We have used Page.Validate because validation controls by default use JavaScript for client-side validation. When calling Page.Validate(), the validation takes place on the server.
-
FormsAuthentication.Authenticate does the following for us:
- Create authentication ticket
- encrypt this authentication ticket information.
- create a cookie to persist the encrypted information.
- Add this cookie to HTTP response, sending it to client.
- Redirect the user to requested page
B. How to create credential store in web.config file manually for user registration.
Step1 : Create an Interface which wil have two methods , one for creating user and other for authenticating user.
public interface ICredentialStore
{
bool Authenticate(string username, string password);
void CreateUser(string username, string password);
}
Step 2: Write another class which wil implement this interface and here we will write implementation for these two methods.
public class DefaultCredentialStore:ICredentialStore
{
#region ICredentialStore Members
public bool Authenticate(string username, string password)
{
return FormsAuthentication.Authenticate(username, password);
}
public void CreateUser(string username, string password)
{
Configuration MyConfig = WebConfigurationManager.OpenWebConfiguration("~/");
ConfigurationSectionGroup SystemWeb = MyConfig.SectionGroups["system.web"];
AuthenticationSection AuthSec = (AuthenticationSection)SystemWeb.Sections["authentication"];
AuthSec.Forms.Credentials.Users.Add(
new FormsAuthenticationUser(username,
FormsAuthentication.HashPasswordForStoringInConfigFile(username, "SHA1")));
MyConfig.Save();
}
#endregion
}
Notice this line here:
AuthSec.Forms.Credentials.Users.Add(
new FormsAuthenticationUser(username,
FormsAuthentication.HashPasswordForStoringInConfigFile(username, "SHA1")));
We are applying a hashing algorithm to encrypt the password, this is important because values
Step 3: Create a Register button and on Click of it write below code;
protected void RegisterAction_Click(object sender, EventArgs e)
{
Page.Validate();
if (Page.IsValid)
{
ICredentialStore cred = this.CreateStore();
cred.CreateUser(UsernameText.Text, PasswordText.Text);
LegendStatus.Text = "User created successfully, you can log in now!";
}
else
{
}
}
Here we are creating Credential store manually at runtime.
private ICredentialStore CreateStore()
{
string ConfigEntry = WebConfigurationManager.AppSettings["CredentialStoreClass"];
string[] ConfigParts = ConfigEntry.Split(new char[] { ',' });
Assembly CurrentAsm = Assembly.Load(ConfigParts[0].Trim());
ICredentialStore Store = (ICredentialStore)CurrentAsm.CreateInstance(ConfigParts[1].Trim());
if (Store == null)
throw new Exception("Invalid credential store configuration!");
else
return Store;
}
Step 4: Run the application and try to register.
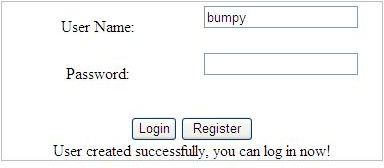
Now check in web.config
<credentials passwordFormat="Clear">
<credentials passwordFormat="SHA1">
<user name="bumpy" password="9912C8866306C0B968BCF017AD29FCF3E50CBACA" />
</credentials>
Here you can see we have created username as bumpy with a password which is hashed now.
Step 5: Now we try to login with this newly created login detail. On the OnClick for login button write the following code:
protected void LoginAction_Click(object sender, EventArgs e)
{
Page.Validate();
if (!Page.IsValid) return;
ICredentialStore cred = this.CreateStore();
if (cred.Authenticate(UsernameText.Text, PasswordText.Text))
{
FormsAuthentication.RedirectFromLoginPage(UsernameText.Text, false);
}
else
{
LegendStatus.Text = "Invalid username or password!";
}
}
C. Relation Between Cookie and Form Authentication: In the beginning of this article, we discussed how a user gets an authentication ticket, which is actually a cookie. So while configuring form authentication, we have the option to configure the cookie behavior, when we don't want the runtime to use a cookie.
So we have four ways to configure cookieless form authentication.
-
UseCookies: Using this setting actually make its compulsory to use cookies when working with forms authentication. This requires the client browser to support cookies. If the browser does not support cookies, forms authentication will simply not work with that setting activated. As it will never receive a valid authentication cookie from the browser, ASP.NET redirects back to the login page over and over again, and you end up in an endless loop of presented login pages.
-
UseURI: If this configuration option is selected, cookies will not be used for authentication.
Instead, the runtime encodes the forms authentication ticket into the requested URL, and the infrastructure processes this specific portion of the URL for establishing the security context.
-
AutoDetect: Results in the use of cookies if the client browser supports cookies. Otherwise,
URL encoding of the ticket will be used. This is established through a probing mechanism.
-
UseDeviceProfile: Results in the use of cookies or URL encoding based on a device profile configuration stored on the web server.
D. What is persistence and non-persistence cookies in Form authentication.
Non-Persistence cookie : If a user closes the browser the cookie is immediately removed. From a security point of view this is important.
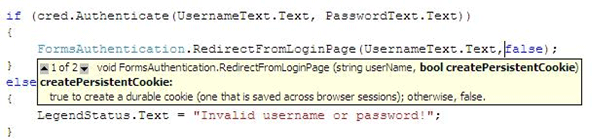
i.e. passing false for createPersistenceCookie.
Persistence cookie: If you are performing authentication for personalization rather than for controlling access to restricted resources, you may decide that the usability advantages of not requiring users to log in on every visit outweighs the increased danger of unauthorized use. In such scenarios, a persistence cookie is used.
Point to remember here:
-
A Persistence cookie does not expire unless FormAuthentication.SignOut() is not called.
-
Persistence cookies are not affected by timeout value in <form> element in web.config.
-
If we want a persistence cookie to expire, we have to handle this manually.
So let us create an another login page which will have persistence cookie support and we will manually set a time for signout.
protected void LoginAction_Click(object sender, EventArgs e)
{
Page.Validate();
if (!Page.IsValid) return;
if (FormsAuthentication.Authenticate(UsernameText.Text, PasswordText.Text))
{
HttpCookie AuthCookie;
AuthCookie = FormsAuthentication.GetAuthCookie(UsernameText.Text, true);
AuthCookie.Expires = DateTime.Now.AddMinutes(5);
Response.Cookies.Add(AuthCookie);
Response.Redirect(FormsAuthentication.GetRedirectUrl(UsernameText.Text, true));
}
else
{
// Username and password are not correct
LegendStatus.Text = "Invalid username or password!";
}
}
Now, we will write code for the default.aspx page that the user is requesting. This page will have a signout button.
Open default.aspx and put a button for signout. Open default.aspx.cs and write the code below.
protected void SignOutAction_Click(object sender, EventArgs e) {
FormsAuthentication.SignOut();
FormsAuthentication.RedirectToLoginPage();
}
For the sake of greater understanding, I have written a few informative code. These information are available irresepective of type of authentication we use.
And when you click to sign-out, you will be redirected to the login page.
Hope you enjoyed reading about this simple but interesting topic of form authentication.
Cheers