Introduction
In my previous article here, we looked at how to group elements into a panel, grid etc. Actually this is a nice feature of Blend but sometimes we expect a little more reuseability of a group of elements in an application. Surely you can copy and paste the grouped element but this is not very satisfactory when we have a huge number of elements. It would be nice if each instance of the group could get a code-behind file to provide some extra portability. Not to worry, because UserControl is with us in Blend.
By default when we create a Silverlight application, it's top container is in fact a UserControl and this provides a nice model. This UserControl contains XAML elements and controls.
Default Markup of new Blend Project
<UserControl
xmlns="http://schemas.microsoft.com/winfx/2006/xaml/presentation"
xmlns:x="http://schemas.microsoft.com/winfx/2006/xaml"
x:Class="SilverlightApplication2.MainPage"
Width="640" Height="480">
<!--Place elements and controls here-->
</UserControl>
Let's place some controls inside a new Grid.
<UserControl
xmlns="http://schemas.microsoft.com/winfx/2006/xaml/presentation"
xmlns:x="http://schemas.microsoft.com/winfx/2006/xaml"
x:Class="SilverlightApplication2.MainPage"
Width="640" Height="480">
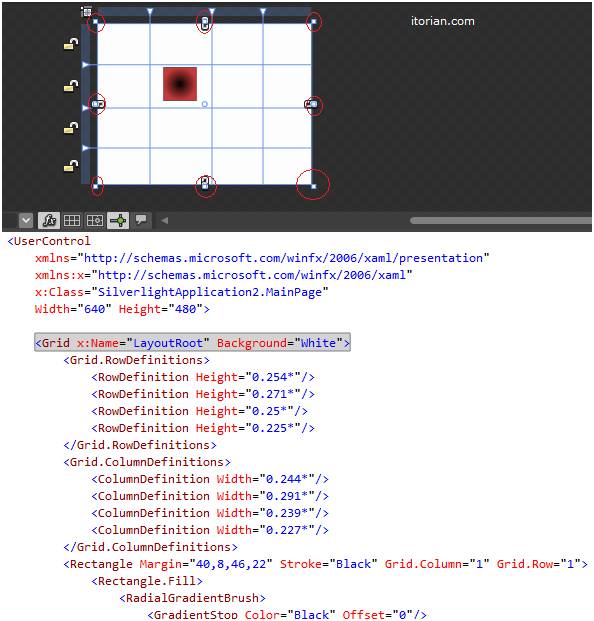
<Grid x:Name="LayoutRoot" Background="White">
<Grid.RowDefinitions>
<RowDefinition Height="0.254*"/>
<RowDefinition Height="0.271*"/>
<RowDefinition Height="0.25*"/>
<RowDefinition Height="0.225*"/>
</Grid.RowDefinitions>
<Grid.ColumnDefinitions>
<ColumnDefinition Width="0.244*"/>
<ColumnDefinition Width="0.291*"/>
<ColumnDefinition Width="0.239*"/>
<ColumnDefinition Width="0.227*"/>
</Grid.ColumnDefinitions>
<Rectangle Margin="40,8,46,22" Stroke="Black" Grid.Column="1" Grid.Row="1">
<Rectangle.Fill>
<RadialGradientBrush>
<GradientStop Color="Black" Offset="0"/>
<GradientStop Color="#FFC83A3A" Offset="1"/>
</RadialGradientBrush>
</Rectangle.Fill>
</Rectangle>
</Grid>
</UserControl>
In the above code, I used some rows and columns and a Rectangle inside a Grid. Column = 1 and Grid.Row = 1.
When you are done, select the Grid named "LayoutRoot"; when you select it, it will show 8 selectors (small points) around the art.
Keep the "LayoutRoot" selected and navigate to Tool > Make Into UserControl… (click this) and now a window will appear for asking the name of the new UserControl.
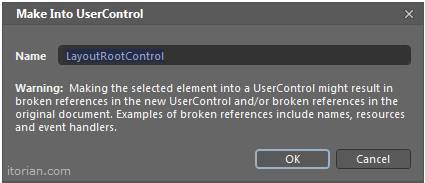
Enter the desired name in the above window and click the OK button. I'm using the default name here. This will create two new pages named "LayoutRootControl.xaml" and "LyoutRootControl.xaml.cs". Even on the MainPage.xaml a newly UserControl is placed automatically.
However in this UserControl we have not developed good functionality.
That's all about the creation of a new UserControl. Now, let's move to use it.
Using UserControl
There are many ways to do this.
1st Way
Follow the steps:
Step 1
Place the namespace; I am using:
xmlns:local="clr-namespace:SilverlightApplication2"
Step 2
And then use the following code to call the user control:
<local:LayoutRootControl Margin="24,8,112,124"/>
2nd Way
Follow the steps:
Step 1
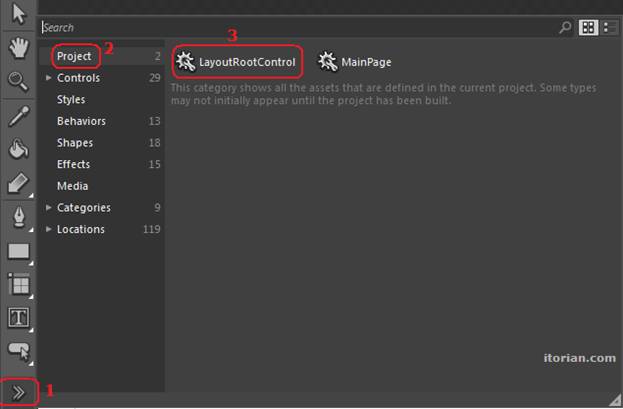
Add a new XAML page and navigate to Asset Library > Project > Select your control here. Look at the screenshot below.
Step 2
Now draw the control onto page, it adds the namespace automatically.
HAVE A HAPPY CODING!!