The ASP.NET MVC Framework is Microsoft's Web Application development framework. The framework was built to make it easier to implement software design principles. Secondly the framework at its very core supports building unit tests so the MVC applications are highly testable. And as the the applications are highly testable, the framework is suited for Test Driven Development.
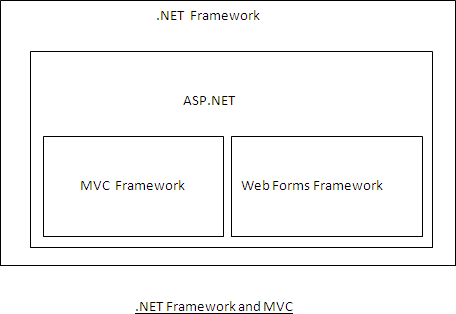
.NET Framework and MVC
The above diagram shows the relationship between the MVC framework and the .NET Framework. Observe that the Web Forms and MVC Framework are both built on top of ASP.NET framework.
While building the web applications developers can either choose the web forms model or the MVC model depending on the requirement of the application.
A MVC application consists of Model,View,Controller:
- Model: Consists of the data access logic and the classes that represents the objects in the application domain.
- View: A view contains HTML and view logic.
- Controller: Consists of application flow logic.
This separation of Concerns between Model, View and Controller has proven to be useful in the design of web applications. Keeping the view separate from the rest of the application means that we can easily change the view in the future without affecting the rest of the application.
Similarly if we want to change the flow of execution in the future we just need to change the controller.
Let's start with creating a simple MVC application to understand the basics of a MVC application. We will start by creating a blank ASP.NET MVC application.
Once the web application is created we will add the corresponding controllers, model and views so that we get to know the flow of the application.
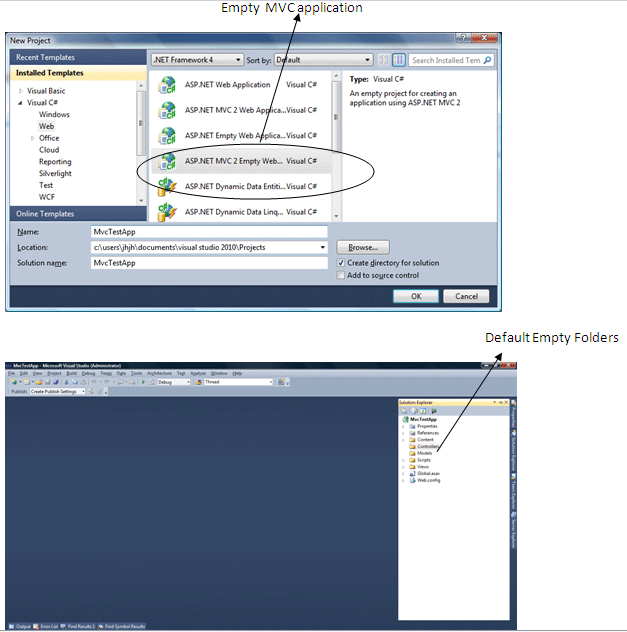
Creating an Empty ASP.NET MVC Application
Adding the controller For adding the controller we will right click the controllers folder and right click Add ->Controller. We will type the name NamesController in the controller name dialog. Doing so creates a controller with the code shown below.
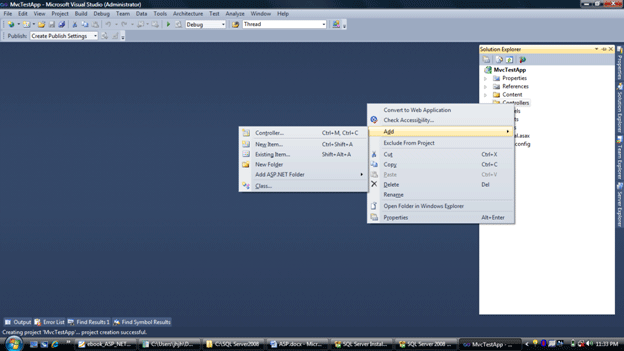
Adding a new controller
namespace MvcTestApp.Controllers
{
public class NamesController : Controller
{
//
// GET: /Names/
public ActionResult Index()
{
ViewData["Message"] = "Welcome to ASP.NET MVC ";
return View();
}
}
}
Here NamesController is the name of our Controller. It inherits from System.Web.Mvc.Controller.
Note that the Controller name must end with Suffix Controller. Controller is just a normal class that contains action methods. Any non-static public method defined in the Controller class is an action.
We will see later how URLs map to the Actions defined in the controller class.
A controller action always returns an action result which determines the response returned to the browser. In the above code the action returns viewresult which represents an ASP.Net view.
A few of the action results are:
|
ViewResult |
Represents the HTML for the view. |
|
RedirectResult |
Represents Redirect to another controller action. |
|
ContentResult |
Represents RAW url sent to the browser. |
|
EmptyResult |
Represents that no result is returned by the action.
|
Typically we call the method whose return type is the appropriate view instead of directly returning the action result from the action as View().
To invoke the above action we just need to type the following in the browser Names/Index.
If we want to add another action to the controller we just need to add another public method to the controller. We can also specify the name of the view explicitly as
return View("index");
The above code will return the index view instead of returning the default view (which in this case is also index). Now that we have our controller in place let us create our first view.
Views
Views are responsible for rendering the Interface on the browser. To create a view we right click on the action and click Add View.
We will leave the default options selected in the create new view dialog. This creates a new view with two content elements. In the first content we place the content we want to appear in the title while in the second content we place the content we want to appear in the body of the HTML page.
We will replace the second content control with the following:
<asp:Content ID="Content2" ContentPlaceHolderID="MainContent" runat="server">
<h2> <%=ViewData["Message"] %></h2>
</asp:Content>
Here we are using the view data property to display the message in the view. Remember that we have assigned the ViewData property in the Controller's Index action method. View data is used to pass the information between the controller and the view.
Routing
Routing decides the mapping between the URL and the controller action that is invoked in response to the request. We normally define the routes in the global.asax file since it contains the application life cycle events. By default routes are defined in the RegisterRoutes method which is called from Application_Start event.

The second parameter in the MapRoute method matches all the URLs that satisfy the above pattern for example
{Controller}/{Action}/{id} and the appropriate Controllers action method is called for the matched URL.