This article has been excerpted from book "Graphics Programming with GDI+".
We often see a semitransparent date and place name on a photo. You can draw transparent graphics shapes on images using the same method: Create a graphics shape using semi- or non-opaque colors, and then draw on the image.
Listing 9.32 draws graphics shapes on an image. First we create an Image object and call DrawImage to draw an image. Then we create transparent pens and brushes and call fill and draw methods to draw graphics shapes. You can add the code in Listing 9.32 to any menu item or button click event handler.
LISTING 9.32: Drawing semitransparent graphics shapes on an image
using System;
using System.Collections.Generic;
using System.ComponentModel;
using System.Data;
using System.Drawing;
using System.Linq;
using System.Text;
using System.Windows.Forms;
namespace Alpha_Blending_and_Images_in_GDI_
{
public partial class Form1 : Form
{
public Form1()
{
InitializeComponent();
}
private void Form1_Paint(object sender, PaintEventArgs e)
{
Graphics g = this.CreateGraphics();
g.Clear(this.BackColor);
// Draw an image
Image curImage =
Image.FromFile("C:/Documents and Settings/Administrator/Desktop/16864z.bmp");
g.DrawImage(curImage, 0, 0,
curImage.Width, curImage.Height);
// Create pens and a rectangle
Rectangle rect =
new Rectangle(220, 30, 100, 50);
Pen opqPen =
new Pen(Color.FromArgb(128, 255, 255, 255), 10);
Pen transpen =
new Pen(Color.FromArgb(128, 255, 255, 255), 10);
Pen totTransPen =
new Pen(Color.FromArgb(40, 0, 255, 0), 10);
// Draw lines, rectangle, ellipse, and string using
g.DrawLine(opqPen, 10, 10, 200, 10);
g.DrawLine(transpen, 10, 30, 200, 30);
g.DrawLine(totTransPen, 10, 50, 200, 50);
g.FillRectangle(new SolidBrush(
Color.FromArgb(140, 0, 0, 255)), rect);
rect.Y += 60;
g.FillEllipse(new SolidBrush(
Color.FromArgb(150, 255, 255, 255)), rect);
SolidBrush semiTransBrush =
new SolidBrush(Color.FromArgb(90, 255, 255, 50));
g.DrawString("Some Photo \nDate: 04/09/2001",
new Font("Verdana", 14), semiTransBrush,
new RectangleF(20, 100, 300, 100));
// Dispose of object
g.Dispose();
}
}
}
Figure 9.43 shows the output from Listing 9.32. Lines, text, a rectangle, and an ellipse are drawn on top of the image, but you can see through them because these shapes are semitransparent.
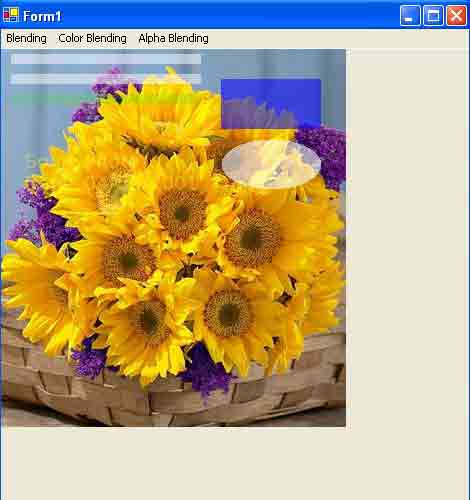
FIGURE 9.43: Drawing semitransparent shapes on an image
Conclusion
Hope the article would have helped you in understanding Alpha Blending and Images in GDI+. Read other articles on GDI+ on the website.
 |
This book teaches .NET developers how to work with GDI+ as they develop applications that include graphics, or that interact with monitors or printers. It begins by explaining the difference between GDI and GDI+, and covering the basic concepts of graphics programming in Windows. |