Polygon in Silverlight using C# and XAML
A polygon is a series of connected lines which is a closed shape. A closed shape is a shape that has same start point and end point. This article demonstrates how to create and use a Polygon control in Silverlight using XAML and C#.
The Polygon object represents a polygon shape and draws a polygon for the given connected points. The Fill property fills the interior of an ellipse. The Stroke property sets the color and StrokeThickness represents the width of the outer line of an ellipse. The Points property of the Polygon represents a collection of Point that defines the points in a polygon. The FillRule property represents how the interior of the polygon is determined.
Creating a Polygon
The Polygon element in XAML creates a polygon shape. The code snippet in Listing 1 creates a polygon by setting its Points property to the connected points in a polygon. The code also sets the black stroke of width 4 and fills it with yellow color.
<Polygon Points="50, 100 200, 100 200, 200 300, 30"
Stroke="Black" StrokeThickness="4"
Fill="Yellow" />
Listing 1
The output looks like Figure 1.

Figure 1
The CreateAPolygon method listed in Listing 2 draws same polygon in Figure 1 dynamically.
private void CreateAPolygon()
{
// Create a blue and a black Brush
SolidColorBrush yellowBrush = new SolidColorBrush();
yellowBrush.Color = Colors.Yellow;
SolidColorBrush blackBrush = new SolidColorBrush();
blackBrush.Color = Colors.Black;
// Create a Polygon
Polygon yellowPolygon = new Polygon();
yellowPolygon.Stroke = blackBrush;
yellowPolygon.Fill = yellowBrush;
yellowPolygon.StrokeThickness = 4;
// Create a collection of points for a polygon
System.Windows.Point Point1 = new System.Windows.Point(50, 100);
System.Windows.Point Point2 = new System.Windows.Point(200, 100);
System.Windows.Point Point3 = new System.Windows.Point(200, 200);
System.Windows.Point Point4 = new System.Windows.Point(300, 30);
PointCollection polygonPoints = new PointCollection();
polygonPoints.Add(Point1);
polygonPoints.Add(Point2);
polygonPoints.Add(Point3);
polygonPoints.Add(Point4);
// Set Polygon.Points properties
yellowPolygon.Points = polygonPoints;
// Add Polygon to the page
LayoutRoot.Children.Add(yellowPolygon);
}
Listing 2
Formatting a Polygon
We can use the Fill property of the Polygon to draw a Polygon with any kind of brush including a solid brush, linear gradient brush, radial gradient brush, or an image brush. The code in Listing 3 uses linear gradient brushes to draw the background and foreground of a Polygon.
<Polygon Points="50, 100 200, 100 200, 200 300, 30"
Stroke="Black" StrokeThickness="4" Opacity="0.5" >
<Polygon.Fill>
<LinearGradientBrush StartPoint="0,0" EndPoint="1,1" >
<GradientStop Color="Blue" Offset="0.25" />
<GradientStop Color="Green" Offset="0.50" />
<GradientStop Color="Red" Offset="0.75" />
</LinearGradientBrush>
</Polygon.Fill>
</Polygon>
Listing 3
The new Polygon looks like Figure 2.
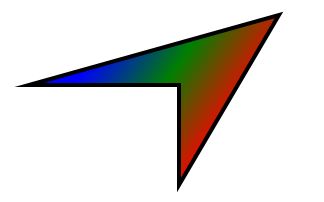
Figure 2
Setting Image as Background of a Polygon
To set an image as background of a Polygon, we can set an image brush as the Fill of the Polygon. The code in Listing 4 sets fills the Polygon with an image.
<Polygon.Fill >
<ImageBrush ImageSource="dock.jpg" />
</Polygon.Fill >
Listing 4
The new output looks like Figure 3.

Figure 3
Drawing a Semi-transparent Polygon
The Opacity property represents the transparency of a Polygon. The value of Opacity is between 0 and 1, where 0 is fully transparent and 1 is fully opaque. The code listed in Listing 5 generates a semi-transparent shape.
<Polygon Points="50, 100 200, 100 200, 200 300, 30"
Stroke="Black" StrokeThickness="4" Opacity="0.5" >
Listing 5
The new output looks like Figure 4

Figure 4
Summary
In this article, I discussed how we can create a Polygon control in Silverlight at design-time using XAML and at run-time using C#. We also saw how we can format a Polygon by setting its fill property. After that, we saw you to set an image as the background of a Polygon. In the end, we saw how to draw a semi-transparent Polygon.