Tip 1:
Mapping namespaces and assemblies in XAML
When you add a control from the Toolbox in a Silverlight application, normally, Silverlight automatically adds namespace references in the XAML code to map to the assemblies and namespaces in the .NET Framework library. For example, when you drag and drop the DatePicker control, the following entry appears in your XAML code:
xmlns:controls="clr-namespace:System.Windows.Controls;assembly=System.Windows.Controls" x:Class="YourApplicationName.MainPage"
and where the control has been added, it appears like this:
<controls:DatePicker></controls:DatePicker>
So you don't need to bother about the hassle of mapping the namespaces to the .NET namespaces and assemblies in XAML code.
But what if you want to manually do this? What if you wanted greater control over which namespace and assemblies to import or reference?
Here's a tip for that situation:
Look for the namespace and assembly names in the MSDN library. They may not be identical to one another. For example, to work with the DataGrid control, you need to reference the System.Windows.Controls namespace and the System.Windows.Controls.Data assembly. Once you have identified the namespace and assembly names, you can add them using the xmlns: prefix in the first few lines of your code. The prefix that you use to map to the namespace should be used with the control when you are defining the control. In the above example, controls is the prefix name.
Tip 2:
Choose Your Browser
You don't have to be stuck with Internet Explorer or for that matter any other fixed browser for testing/running your Silverlight applications. Within Visual Web Developer, you can change the settings such that some other browser of your choice is used each time to test/run your Silverlight applications. How do you do this? Simple. In the Solution Explorer pane, right click on the HTML page name which is going to be your start page (for example, LayoutDemoTestPage.html). After right clicking the HTML page, in the context menu, select Browse With…. This will open a dialog box. Select your browser name and click Set as Default. That's it!
Tip 3:
Use LineBreak tags in TextBlock controls
The <LineBreak></LineBreak> tags allow you to insert line breaks at desired location of content inside a TextBlock. Take the following example,
<UserControl x:Class="Demo.MainPage"
xmlns="http://schemas.microsoft.com/winfx/2006/xaml/presentation"
xmlns:x="http://schemas.microsoft.com/winfx/2006/xaml"
xmlns:d="http://schemas.microsoft.com/expression/blend/2008" xmlns:mc="http://schemas.openxmlformats.org/markup-compatibility/2006"
mc:Ignorable="d" d:DesignWidth="640" d:DesignHeight="480">
<Grid x:Name="LayoutRoot" >
<TextBlock>The function of the DescriptionViewer
<LineBreak></LineBreak> control
Silverlight 3 is to displays some
<LineBreak></LineBreak>information as a description and
<LineBreak></LineBreak>track error state for an associated
<LineBreak></LineBreak> control.</TextBlock></Grid>
</UserControl>
It would render the TextBlock as shown below:
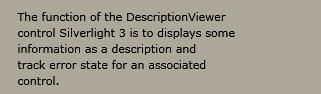
Figure 1: Design View of the XAML file
To see how the LineBreak tags work, test the above code without the Linereaks. Then you will understand the difference.
Tip 4:
Setting the password character in a password box
This one is really simple. If you don't want to use the standard * symbol for passwords, you can change it to the character of your choice. Use the PasswordChar property as follows.
<PasswordBox PasswordChar="?"></PasswordBox>
Tip 5:
Gone are the days when people would pore over a book for months to learn a new technology. In this fast-paced age, people now have little time to learn slowly. Take advantage of Web 2.0 to speed up your Silverlight learning. Today, there are a variety of sources from where to gain knowledge. Blogs, podcasts, webcasts, twitter tips, video tutorials, …the list is endless. Make the best use of as many sources as you can.
More tips to come...keep watching this space!