Introduction
Recently I was relieved to hear that Silverlight is here to stay<Hefty Sigh of Relief!!>. MVVM is a big part of the Silverlight features in Silverlight 5 (it's good to see that Microsoft is paying close attention to developer feedback). In this article we'll talk about using MVVM architecture for a confirmation dialog box. You probably know that you can do a confirmation dialogs using the following code:
if (System.Windows.Browser.HtmlPage.Window.Confirm("Are you sure?"))
{
// Do stuff...
}
The problem with this approach is that it lacks flexibility with styling and features. How can we create a Confirmation Dialog in Silverlight with our own window and give it that whole MVVM look and feel?
Let's begin by creating a new Silverlight ChildWindow and editing it in Blend. We'll change it to say yes and no and add a textblock for our message:
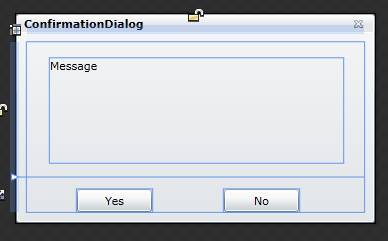
Figure 1 - Child Window changed in Blend
Now we'll use MVVM Light to bind EventCommands to both buttons. The commands will execute code for confirmation and denial in the ViewModel. We'll add the references for MVVM Light to our project so it will pick up the EventToCommand in the project and in Blend.

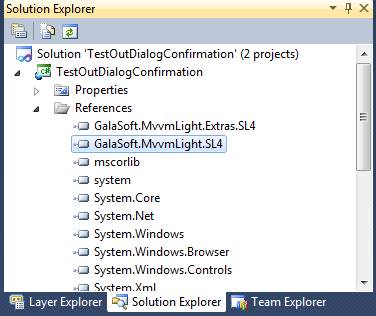
Figure 2 - References for MVVM Light
We can now drag the EventToCommand onto each of our yes and no buttons. Now we'll bind to commands that we'll need to create in our view model. The XAML ends up looking like this:
Listing 1 – XAML for Buttons using EventToCommand
<Button x:Name="YesButton" Content="Yes" Click="OKButton_Click" Height="23" Margin="50,12,0,0" Grid.Row="1" HorizontalAlignment="Left" Width="75" >
<i:Interaction.Triggers>
<i:EventTrigger EventName="Click">
<GalaSoft_MvvmLight_Command:EventToCommand Command="{Binding ConfirmCommand}"/>
</i:EventTrigger>
</i:Interaction.Triggers>
</Button>
<Button x:Name="NoButton" Content="No" Click="CancelButton_Click" Height="23" Margin="0,12,65,0" Grid.Row="1" HorizontalAlignment="Right" Width="75" >
<i:Interaction.Triggers>
<i:EventTrigger EventName="Click" >
<GalaSoft_MvvmLight_Command:EventToCommand Command="{Binding DenyCommand}"/>
</i:EventTrigger>
</i:Interaction.Triggers>
</Button>
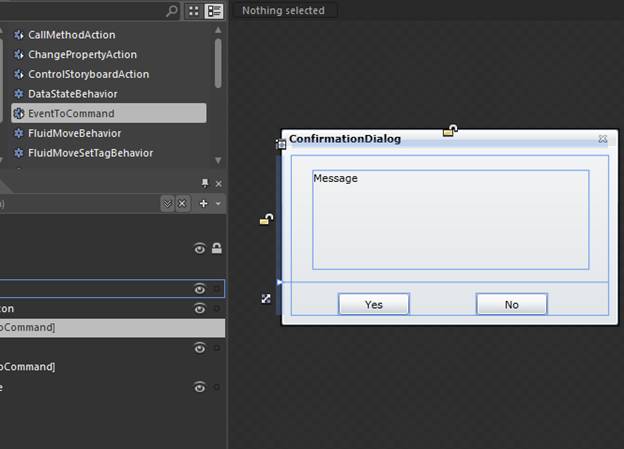
Figure 3 - Choosing EventToCommand from Blend
If we look at our XAML code, we can see the additional EventToCommand markup that was added to each of our buttons. The Command for Yes binds to the ConfirmCommand and for No binds to the DenyCommand. Let's create a ViewModel for our application called ConfirmationDialogViewModel.cs so we can implement these commands. As an aside, I'd like to talk about how I layout my project for Silverlight. I like to organize my solution into separate folders that reflect the whole MVVM concept. I create a View folder for Views, a Model folder for any model behavior, and a ViewModel folder for all my ViewModels binding to the Views. Then I use ReSharper to rename all my namespaces to reflect the appropriate folders so I don't forget anything.
Also let's say a few words about naming convention. When using MVVM, I like to suffix all my View classes with the word View and all my ViewModel classes with the word ViewModel. It just makes it easier to identify their purpose. For our Confirmation Dialog, I named the view ConfirmationDialogView and for our Confirmation Dialog ViewModel I called the class ConfirmationDialogViewModel. ConfirmationDialogView may seem a bit redundant, but there is something to say for being consistent in naming your classes.
My first step in coding is that I'll need to hook up the ViewModel to the DataContext of my dialog. Because we want to pass a parameter into our dialog to tell it the message to display, we'll hook up the ViewModel in code behind. We also want to pass a callback to our confirmation dialog, so after the user clicks okay, the callback can get executed. The reason we need to pass a callback is because the Silverlight world is asynchronous. You can't display ShowDialog and stop Silverlight from going to the next line of code like you can with HtmlPage.Window.Confirm. To be really thorough, we'll pass 2 callbacks: One for confirm and one for deny.
Listing 2 – The Confirmation Dialog code behind
public partial class ConfirmationDialog : ChildWindow
{
public ConfirmationDialog(string confirmationQuestion, Action<object> confirmCallback, Action<object> denyCallback, object confirmPayload, object denyPayload)
{
InitializeComponent();
DataContext = new ConfirmationDialogViewModel(confirmationQuestion, confirmCallback, denyCallback, confirmPayload, denyPayload);
}
private void OkButtonClick(object sender, RoutedEventArgs e)
{
this.DialogResult = true;
}
private void CancelButtonClick(object sender, RoutedEventArgs e)
{
this.DialogResult = false;
}
}
In our ViewModel, we'll let the RelayCommand bound to EventToCommand on the Yes and No button trigger the confirmation callbacks.
Listing 3 – The ViewModel for the Confirmation Dialog
using System;
using GalaSoft.MvvmLight;
using GalaSoft.MvvmLight.Command;
namespace TestOutDialogConfirmation.ViewModel
{
public class ConfirmationDialogViewModel : ViewModelBase
{
public RelayCommand ConfirmCommand { get; private set; }
public RelayCommand DenyCommand { get; private set; }
private string _confirmationQuestion;
public string ConfirmationQuestion
{
get { return _confirmationQuestion; }
set { _confirmationQuestion = value; RaisePropertyChanged("ConfirmationQuestion");}
}
public Action<object> ConfirmCallback { get; set; }
public Action<object> DenyCallback { get; set; }
public object ConfirmPayload { get; set; }
public object DenyPayload { get; set; }
public ConfirmationDialogViewModel(string confirmationQuestion, Action<object> confirmCallback, Action<object> denyCallback, object confirmPayload, object denyPayload)
{
ConfirmationQuestion = confirmationQuestion;
ConfirmCallback = confirmCallback ?? (obj =>{obj = obj;}); // null coalesce to do nothing
DenyCallback = denyCallback ?? (obj => { obj = obj; }); // null coalesce to do nothing
ConfirmPayload = confirmPayload;
DenyPayload = denyPayload;
// set up relay commands to trigger the callbacks once a button has been pressed
ConfirmCommand = new RelayCommand(() => ConfirmCallback(ConfirmPayload));
DenyCommand = new RelayCommand(() => DenyCallback(DenyPayload));
}
}
}
Admittedly the dialog looks a bit bulky in the constructor. If you want, you can create a constructor that just takes a confirm callback, because 90% of the time, you'll do nothing if they hit the no button. And you may not need to pass a payload to act upon.
Listing 4 – An easier constructor for the confirmation dialog
public ConfirmationDialogViewModel(string confirmationQuestion, Action<object> confirmCallback)
{
ConfirmationQuestion = confirmationQuestion;
ConfirmCallback = confirmCallback ?? (obj => { obj = obj; }); // null coalesce to do nothing
DenyCallback = (obj => { obj = obj; }); // do nothing
// set up relay commands to trigger the callbacks once a button has been pressed
ConfirmCommand = new RelayCommand(() => ConfirmCallback(null));
DenyCommand = new RelayCommand(() => DenyCallback(null));
}
The following code shows the MVVM Confirm dialog in action from the main page. Pressing a button on the page will bring up the dialog. If the user clicks Yes, they wish to continue, the messagebox will show let's play again through the confirm callback.
Listing 5 – The Confirmation Dialog in Action
using System.Windows;
using System.Windows.Controls;
namespace TestOutDialogConfirmation.View
{
public partial class MainPage : UserControl
{
public MainPage()
{
InitializeComponent();
}
private void button1_Click(object sender, System.Windows.RoutedEventArgs e)
{
ConfirmationDialog dlg = new ConfirmationDialog("Do you wish to continue?", o => MessageBox.Show("let's play again"), null, null, null);
dlg.Show();
}
}
}
The results are shown in figure 3 below. Always keep in mind that when using your ConfirmationDialog, all code after dlg.Show will be executed because of the asynchronouse behavior of Silverlight. Therefore, you want to always put any code that you want executed after the user confirms in the callback you pass into the constructor of the Confirmation Dialog. Callbacks give you a way to control the temporal flow of execution inside of a Silverlight application. (Callbacks are especially significant when doing client/server calls from the Silverlight client).
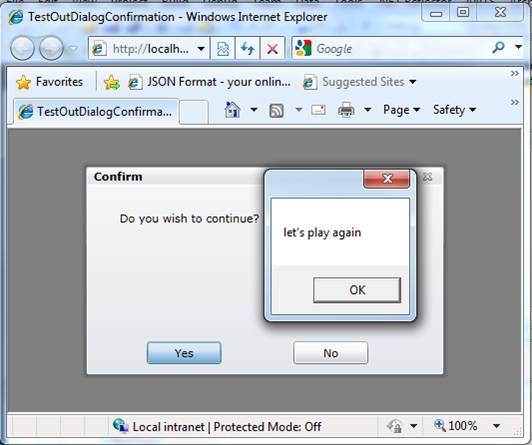
Figure 4 - Results of Hitting a Yes Confirmation
Conclusion
The thing I love about Silverlight is that it gives you the flexibility to create controls the way you wish to behave. Dialogs are an example of a control that you can get to act the way you want. In an asynchronous world, you may wish that the dialog react to some code that is not part of the OnClick event handler inside your window. Callbacks provide a convenient way to tell the dialog what code you want executed once the okay button is pressed. If you are using an MVVM architecture, you probably want your dialog to call code inside your ViewModel. MVVM Light provides a nice mechanism, called EventToCommand, that allows us to trigger code in our ViewModel from the click of a button or the press of a key on the keyboard. For our confirmation dialog, the code that gets executed in the ViewModel is the original code we passed into the constructor of our Dialog. Now that we have confirmed that MVVM is the way to go when writing a dialog, you may want to experiment with MVVM in your next dialog control in Silverlight and .NET.