Use the Wizard control to simplify many of the tasks that are associated with building a series of forms to collect user input.Collecting user input by using forms is a recurring task in Web development. A group of forms that is used to accomplish a task is often called a wizard.
The ASP.NET Wizard control simplifies many of the tasks that are associated with building multiple forms and collecting user input. The Wizard control provides a simple mechanism that allows you to easily build steps, add a new step, or reorder the steps. You can build linear and non-linear navigation and customize the control's user navigation without writing code.
Building a series of interconnected forms to break up data collection is a common practice. You can accomplish this by managing the navigation between forms, the data persistence, and the state management in each step. With the Wizard control, you use discrete steps to collect data, which allows users to navigate between steps at their discretion and creates a simpler user experience. As a developer, you do not have to worry about making your data persist across pages because the control maintains state while the user completes the various steps.
The Wizard control uses steps to delineate different sections of user data input. Each step within the control is given a StepType to indicate whether it is the beginning step, intermediate step, or completion step. The wizard can have as many intermediate steps as needed. You can add different controls, such as a TextBox or ListBox control, to collect user input. When you reach the Complete step, all of your data is accessible. The following code example illustrates the Wizard control with two steps.
<asp:Wizard ID="Wizard2" runat="server">
<WizardSteps>
<asp:WizardStep runat="server" title="Step 1">
</asp:WizardStep>
<asp:WizardStep runat="server" title="Step 2">
</asp:WizardStep>
</WizardSteps>
</asp:Wizard>
WizardStep Properties -
-
Title - The descriptive name of the step. This name is used for the text of the links in the sidebar.
-
StepType - The type of step, as a value from the wizardStepType enumeration. This value determines the type of navigation buttons that will be shown for this step.
-
AllowReturn - User can return on previous step.
Wizard Events -
-
ActiveStepChanged - This event fires when the control go to a new step.
-
CancelButtonClick - The cancel button is not shown by default, you can add to every step by Wizard.DisplayCancelButtop property. This event fires when Cancel button clicked.
-
FinishButtonClick - This event fires when FinishButton clicked.
-
NextButtonClick - This event fires when Next button clicked on any step.
-
PreviousButtonClick - This event fires when Previous button clicked on any step.
-
SideBarButtonClick - This event fires when a button in the sidebar area clicked.
Wizard Templates -
-
HeaderTemplate - Defines the content of the header region.
-
SideBar Template - Defines the sidebar, which typically include navigation links for each step.
-
StartNavigationTemplate - Defines tha navigation buttons for the first step when StepType is start.
-
StepNavigationTemplate - Defines the navigation templates for intermediate steps when StepType is Step.
-
FinishNavigationTemplate - Defines the navigation buttons for the final step when StepType is finish.
HeaderTemplate:
<HeaderTemplate>
<i>HeaderTemplate</i> - <b><%=Wizard1.ActiveStep.Title %></b>
<br /><br />
</HeaderTemplate>
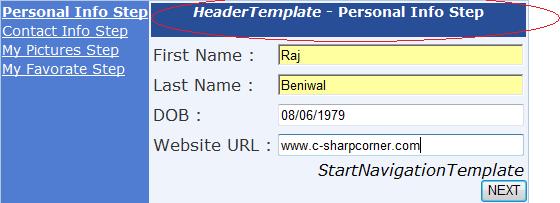
Figure 1.
StartNavigationTemplate :
<StartNavigationTemplate>
<i>StartNavigationTemplate</i><br />
<asp:Button ID="NextButton" runat="server" Text="NEXT" CommandName="MoveNext" />
</StartNavigationTemplate>
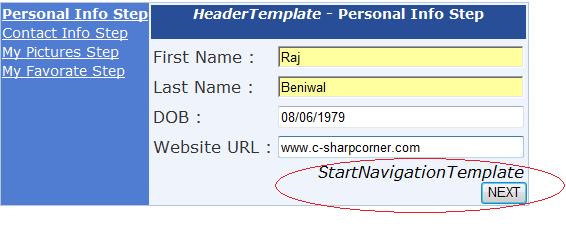
Figure 2.
StepNavigationTemplate :
<StepNavigationTemplate>
<i>StepNavigationTemplate</i><br />
<asp:Button ID="PreviousButton" runat="server" Text="PREVIOUS" CommandName="MovePrevious" />
<asp:Button ID="StartNextButton" runat="server" Text="NEXT" CommandName="MoveNext" />
</StepNavigationTemplate>
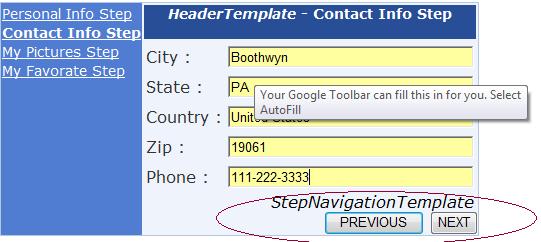
Figure 3.
FinishNavigationTemplate:
<FinishNavigationTemplate>
<i>FinishNavigationTemplate</i><br />
<asp:Button ID="PreviousButton" runat="server" Text="PREVIOUS" CommandName="MovePrevious" />
<asp:Button ID="FinishButton" runat="server" Text="FINISH" CommandName="MoveComplete" />
</FinishNavigationTemplate>
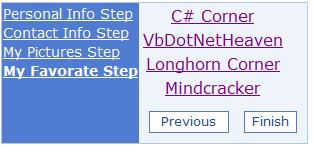
Figure 4.
Here is .aspx code :
<div>
<asp:Wizard ID="Wizard1" runat="server" BackColor="#EFF3FB"
BorderColor="#B5C7DE" BorderWidth="1px" Font-Names="Verdana"
onfinishbuttonclick="Wizard1_FinishButtonClick">
<StepStyle ForeColor="#333333" Width="20%" />
<HeaderTemplate>
<i>HeaderTemplate</i> - <b><%=Wizard1.ActiveStep.Title %></b>
<br /><br />
</HeaderTemplate>
<%--<StartNavigationTemplate>
<i>StartNavigationTemplate</i><br />
<asp:Button ID="NextButton" runat="server" Text="NEXT" CommandName="MoveNext" />
</StartNavigationTemplate>
<StepNavigationTemplate>
<i>StepNavigationTemplate</i><br />
<asp:Button ID="PreviousButton" runat="server" Text="PREVIOUS" CommandName="MovePrevious" />
<asp:Button ID="StartNextButton" runat="server" Text="NEXT" CommandName="MoveNext" />
</StepNavigationTemplate>
<FinishNavigationTemplate>
<i>FinishNavigationTemplate</i><br />
<asp:Button ID="PreviousButton" runat="server" Text="PREVIOUS" CommandName="MovePrevious" />
<asp:Button ID="FinishButton" runat="server" Text="FINISH" CommandName="MoveComplete" />
</FinishNavigationTemplate>--%>
<WizardSteps>
<asp:WizardStep ID="WizardStep1" runat="server" Title="Personal Info Step">
<table cellpadding="2" cellspacing="2">
<tr><td>First Name :</td><td><asp:TextBox ID="FirstNameTextBox" runat="server"
Width="240px"></asp:TextBox></td></tr>
<tr><td>Last Name :</td><td><asp:TextBox ID="LastNameTextBox" runat="server" Width="240px"></asp:TextBox></td></tr>
<tr><td>DOB :</td><td><asp:TextBox ID="DOBTextBox" runat="server" Width="240px"></asp:TextBox></td></tr>
<tr><td>Website URL :</td><td><asp:TextBox ID="WebsiteURLTextBox" runat="server" Width="240px"></asp:TextBox></td></tr>
</table>
</asp:WizardStep>
<asp:WizardStep ID="WizardStep2" runat="server" Title="Contact Info Step">
<table cellpadding="2" cellspacing="2">
<tr><td>City :</td><td><asp:TextBox ID="CityTextBox" runat="server" Width="240px"></asp:TextBox></td></tr>
<tr><td>State :</td><td><asp:TextBox ID="StateTextBox" runat="server" Width="240px"></asp:TextBox></td></tr>
<tr><td>Country :</td><td><asp:TextBox ID="CountryTextBox" runat="server" Width="240px"></asp:TextBox></td></tr>
<tr><td>Zip :</td><td><asp:TextBox ID="ZipTextBox" runat="server" Width="240px"></asp:TextBox></td></tr>
<tr><td>Phone :</td><td><asp:TextBox ID="PhoneTextBox" runat="server" Width="240px"></asp:TextBox></td></tr>
</table>
</asp:WizardStep>
<asp:WizardStep ID="WizardStep3" runat="server" Title="My Pictures Step">
<table cellpadding="2" cellspacing="2" >
<tr><td><asp:Image ID="Image1" runat="server" ImageUrl="~/Raj 045.JPG" Height="200" Width="200" /></td><td><asp:Image ID="Image2" Height="200" ImageUrl="~/Raj 052.JPG" Width="200" runat="server" /></td></tr>
<tr><td><asp:Image ID="Image3" runat="server" Height="200" Width="200" ImageUrl="~/Raj 060.JPG" /></td><td><asp:Image ID="Image4" Height="200" Width="200" ImageUrl="~/Raj 059.JPG" runat="server" /></td></tr>
<tr><td><asp:Image ID="Image5" runat="server" Height="200" Width="200" ImageUrl="~/Raj 061.JPG" /></td><td><asp:Image ID="Image6" Height="200" ImageUrl="~/Raj 062.JPG" Width="200" runat="server" /></td></tr>
</table>
</asp:WizardStep>
<asp:WizardStep ID="WizardStep4" runat="server" Title="My Favorate Step">
<table cellpadding="2" cellspacing="2">
<tr><td align="center"><asp:HyperLink ID="HyperLink1" runat="server" NavigateUrl="http://www.c-sharpcorner.com">C# Corner</asp:HyperLink></td></tr>
<tr><td align="center"><asp:HyperLink ID="HyperLink2" runat="server" NavigateUrl="http://www.vbdotnetheaven.com">VbDotNetHeaven</asp:HyperLink></td></tr>
<tr><td align="center"><asp:HyperLink ID="HyperLink3" runat="server" NavigateUrl="http://www.longhorncorner.com">Longhorn Corner</asp:HyperLink></td></tr>
<tr><td align="center"><asp:HyperLink ID="HyperLink4" runat="server" NavigateUrl="http://www.mindcracker.com">Mindcracker</asp:HyperLink></td></tr>
</table>
</asp:WizardStep>
</WizardSteps>
<SideBarButtonStyle BackColor="#507CD1" Font-Names="Verdana"
ForeColor="White" />
<NavigationButtonStyle BackColor="White" BorderColor="#507CD1"
BorderStyle="Solid" BorderWidth="1px" Font-Names="Verdana" Font-Size="0.8em"
ForeColor="#284E98" />
<SideBarStyle BackColor="#507CD1" Font-Size="0.9em" VerticalAlign="Top" />
<HeaderStyle BackColor="#284E98" BorderColor="#EFF3FB" BorderStyle="Solid"
BorderWidth="2px" Font-Bold="True" Font-Size="0.9em" ForeColor="White"
HorizontalAlign="Center" />
</asp:Wizard>
</div>
<asp:Label ID="Label1" runat="server" Visible="False"></asp:Label>
First Step :
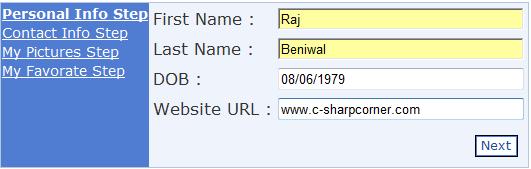
Figure 5.
Second Step :
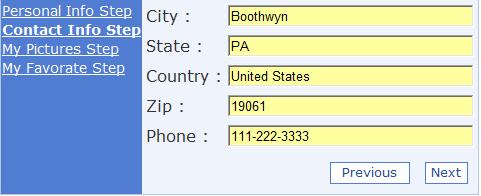
Figure 6.
Third Step:
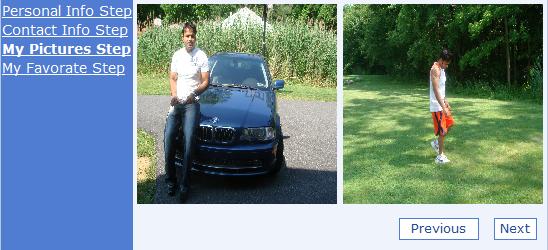
Figure 7.
Fouth Step:

Figure 8.
FinishButton Click :
protected void Wizard1_FinishButtonClick(object sender, WizardNavigationEventArgs e)
{
StringBuilder stringBuilder = new StringBuilder();
stringBuilder.Append("<b>Personal Info - </b> <br />");
stringBuilder.Append("First Name : ");
stringBuilder.Append(FirstNameTextBox.Text);
stringBuilder.Append("<br />Last Name : ");
stringBuilder.Append(LastNameTextBox.Text);
stringBuilder.Append("<br />DOB : ");
stringBuilder.Append(DOBTextBox.Text);
stringBuilder.Append("<br />Website URL : ");
stringBuilder.Append(WebsiteURLTextBox.Text);
stringBuilder.Append("<br /><b>Contact Info</b> <br />");
stringBuilder.Append("City : ");
stringBuilder.Append(CityTextBox.Text);
stringBuilder.Append("<br />State : ");
stringBuilder.Append(StateTextBox.Text);
stringBuilder.Append("<br />Country : ");
stringBuilder.Append(CountryTextBox.Text);
stringBuilder.Append("<br />Zip : ");
stringBuilder.Append(ZipTextBox.Text);
Label1.Visible = true;
Label1.Text = stringBuilder.ToString();
}
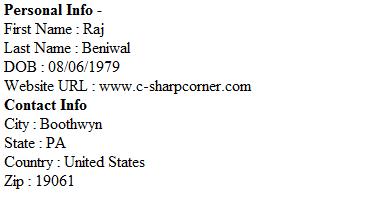
Figure 9.
That's it........