

Introduction
Welcome to the "Demonstrating Backbone.js" article series. This article demonstrates how to create a students directory using backbone.js. This article starts with the concept of Backbone.js and various components of it. Previous articles have provided an introduction to views and the implementation of routers and collections. You can get them from the following:- Demonstrating Backbone.js: Implement View
- Demonstrating Backbone.js: Implement View Part 1
- Demonstrating Backbone.js: Implement View Part 2
- Demonstrating Backbone.js: Implement View Part 3
- Demonstrating Backbone.js: Implement View Part 4
- Demonstrating Backbone.js :Implement View Part 5
- Demonstrating Backbone.js :Implement Routers Part 1
- Demonstrating Backbone.js :Implement Collections Part 2
- Demonstrating Backbone.js :Implement Collections Part 3
- Demonstrating Backbone.js :Implement Collections Part 4
In this article we will see how to use Backbone.js in a simple student directory app with sorting. Let us start with a step-by-step procedure. As I said, the complexity level is beginner.
- Step 1: Create a new project; open Visual Studio 2013 then click on "File" -> "New" -> "Project..." then create a new "ASP.Net Empty WebApplication" then name it "StudentsDirectory".

- Step 2: Create folders css and js as shown below:

To implement Backbone.js we need to download the Backbone.js library and since Backbone.js is dependent on jQuery we need to use the jQuery library.
- Step 3: Add the jQuery, Backbone.js and Underscore.js libraries to the libraries folder as shown:
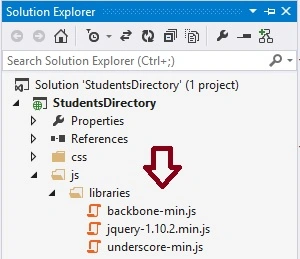
- Step 4: Add a HTML page and include all the libraries as in the following:
- <!DOCTYPE html>
- <html>
- <head>
- <title>Student Directory with Backbone.js</title>
- <link href="css/style.css" rel="stylesheet" />
- </head>
- <body>
- <div id="heading">
- <h1>Students Directory</h1>
- </div>
- <script src="js/libraries/jquery-1.10.2.min.js" type="text/javascript"></script>
- <script src="js/libraries/underscore-min.js" type="text/javascript"></script>
- <script src="js/libraries/backbone-min.js" type="text/javascript"></script>
- </body>
- </html>
Before we proceed we actually need some data so we will generate JSON data using generatedata.com.
- Step 5 : Open generatedata.com and provide the fields as shown and click on "Generate".
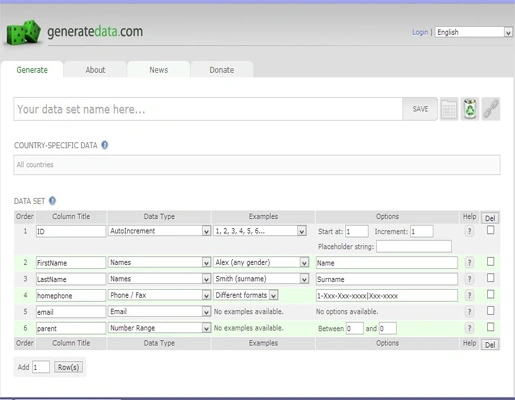
Copy the generated data to the Studentdata.json file.
In this article we learned how to create an outline of a Students Directory app. In future articles we will add the Model,Views and Routers for filtering and sorting
Join the conversation! Your thoughts help the community grow.