


Introduction
- MVC AngularJS and WCF Rest Service For Mind Reader Quiz
- MVC, AngularJS and WCF Rest Service For Master Detail Grid
- AngularJS Filter, Sorting and Animation Using MVC and WCF Rest
- AngularJS Shopping Cart Using MVC and WCF Rest
Why we need to create a Dynamic Menu
If we are working on a simple web site creation with very few pages and only one programmer is working to create a website then in that case we can create a static menu and use it in our web site.
Let's now consider we need to work for a big web application project. Let's consider development of an ERP Web application.
However if more than two developers are working and perhaps the number of pages is greater than 50 to 100 then it will be hard to maintain a static menu.
And also there will be a greater chance of removing and adding a new menu item to the web project, for example our client can ask to add 5 more new menus or remove 1 menu item.
In this case it will be a hard and difficult task to remove the menu Items that are live now.
And also for large web projects like ERP we need to display the menu depending on the user roles. If we use a static menu then it will be very difficult to manage the users for the menu.
To avoid all this we create a Menu Management with a user role setting.
Who can manage the Menu
This is a very important part since an Admin or Super user can Add/Edit/Delete a menu and a user.
When an Admin is logged in he can add a new menu, edit an existing menu and delete a menu item to be displayed.
This article is not focused on menu management but in this article we will see in detail how to create a Menu Master and Menu Detail Table. Insert a sample Menu Item to our Database Tables. Display the Menu from the database dynamically to our MVC Web page using AngularJS and WCF Rest Service. This article will explain:
- How to create a WCF Rest service and retrieve data from a database.
- How to install the AngularJS Package into a MVC application.
- How to create our AngularJS application for Dynamic Menu Creation.
- How to use a WCS service in AngularJS to display dynamic Menu.
Note: the prerequisites are Visual Studio 2013 (if you don't have Visual Studio 2013, you can download it from Microsoft.
Here we can see some basics and reference links for Windows Communication Foundation (WCF). WCF is a framework for building service-oriented applications.
Service-oriented application: Using this protocol the service can be shared and used over a network.
For example, let's consider that we are now working on a project and we need to create some common database function and those functions need to be used in multiple projects and the projects are in multiple places and connected via a network such as the internet.
In this case we can create a WCF service and we can write all our common database functions in our WCF service class. We can deploy our WCF in IIS and use the URL in our application to do DB functions. In the code part let's see how to create a WCF REST service and use it in our AngularJS application.
If you are interested in reading more details about WCF then kindly go to this link.
AngularJS
We might be be familiar with what Model, View and View Model (MVVM) is and what Model, View and Controller (MVC) is. AngularJS is a JavaScript framework that is purely based on HTML, CSS and JavaScript.
Similar to the MVC and MVVM patterns AngularJS uses the Model, View and Whatever (MVW) pattern.
In our example I have used a Model, View and Service. In the code part let's see how to install and create AngularJS in our MVC application.
If you are interested in reading more details about AngularJS then kindly go to this link.
Code Part
Create Database and Table
We will create a MenuMaster MenuDetails table under the Database MenuDB.
Note: The MenuMaster and MenuDetail are the important tables that will use to load our menu dynamically. We need to understand how to insert menu details to these tables to display our menu properly.
In this article I have displayed a 3-level hierarchical display of menus. Here you can see the 3-level hierarchical sample.
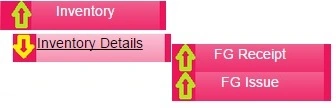
Here we can see that the first level of the hierarchy is the Inventory.
The 2nd level of the hierarchy is the Inventory Details.
The 3rd level of the hierarchy is the Finished Goods Receipt and Finished Goods Issue.
Now let's see how to create a table relationship to create the master and detail menus.
Menu Master Table
- 1st Level hierarchy Insert
- Insert into MenuMaster(Menu_RootID,Menu_ChildID,UserID,CreatedDate) values('Root','Inventory','Shanu',getdate()-23)
- 2nd Level hierarchies Insert
- Insert into MenuMaster(Menu_RootID,Menu_ChildID,UserID,CreatedDate) values('Inventory','INV001','Shanu',getdate()-23)
- 3rd Level hierarchies Insert
- Insert into MenuMaster(Menu_RootID,Menu_ChildID,UserID,CreatedDate) values('INV001','FG001','Shanu',getdate()-23)
- Insert into MenuMaster(Menu_RootID,Menu_ChildID,UserID,CreatedDate) values('INV001','FG002','Shanu',getdate()-23)
Here we can see the fields for the Menu Master. I have used the following fields:
|
Master Table Field Name |
Details |
|
Menu_RootID |
For every top level 1st hierarchy I will insert the id as "Root". This value will be used in a MVC angular filter to display only the 1st level menu items by default. If there are 2-level or 3-level hierarchies tehn the master child id will be the RootID. |
|
Menu_ChildID |
Actual ID for each Menu Item. |
|
UserID |
This is optional. In your case you can store the user id or role id here to maintain the user management to display the menu. |
|
CreatedDate |
This is the record insert date. |
Menu Detail Table
- 1st Level hierarchy Insert
- Insert into MenuDetails(Menu_ChildID,MenuName,MenuDisplayTxt,MenuFileName,
- MenuURL,UserID,CreatedDate)
- values('Inventory','Inventory','Inventory','Index','Inventory',
- 'Shanu',getdate()-23)
- 2nd Level hierarchies Insert
- Insert into MenuDetails(Menu_ChildID,MenuName,MenuDisplayTxt,MenuFileName,
- MenuURL,UserID,CreatedDate)
- values('INV001','Inventory','Inventory Details','Index','Inventory',
- 'Shanu',getdate()-23)
- 3rd Level hierarchies Insert
- Insert into MenuDetails(Menu_ChildID,MenuName,MenuDisplayTxt,MenuFileName,
- MenuURL,UserID,CreatedDate)
- values('FG001','FGIN','FG Receipt','FGIN','Inventory','Shanu',getdate()-43)
- Insert into MenuDetails(Menu_ChildID,MenuName,MenuDisplayTxt,MenuFileName,
- MenuURL,UserID,CreatedDate)
- values('FG002','FGOUT','FG Issue','FGOUT','Inventory','Shanu',getdate()-13)
Here we can see the field for the Menu Detail. I have used the following fields.
|
Master Table Field Name |
Details |
|
Menu_ChildID |
Here we will insert the same Menu Master Child ID |
|
MenuName |
This is to provide a Name for every Menu Item. |
|
MenuDisplayTxt |
Menu Display Text. This field will be used to display in our menu. |
|
MenuFileName |
This is our actual File name for each menu. Here I have used the MVC so I will provide only the File name as our View name. |
|
MenuURL |
The URL path for each Menu item to be used for the hyperlink. Here in my example it was developed using MVC so I will provide the URL as the Controller name. Suppose you are using the ASP.Net web site then you can provide the URL as: “/yourFolderName/yourfilename.aspx” |
|
UserID |
This is optional. In your case you can store a user id or role id here to maintain the user management to display the menu. |
|
CreatedDate |
This is the record insert date. |
The following is the script to create a database, table and sample insert query. Run this script in your SQL Server. I have used SQL Server 2012.
- -- =============================================
- -- Author : Shanu
- -- Create date : 2015-03-20
- -- Description : To Create Database,Table and Sample Insert Query
- -- Latest
- -- Modifier : Shanu
- -- Modify date : 2015-03-20
- -- =============================================
- --Script to create DB,Table and sample Insert data
- USE MASTER
- GO
- -- 1) Check for the Database Exists .If the database is exist then drop and create new DB
- IF EXISTS (SELECT [name] FROM sys.databases WHERE [name] = 'MenuDB' )
- DROP DATABASE MenuDB
- GO
- CREATE DATABASE MenuDB
- GO
- USE MenuDB
- GO
- -- 1) //////////// ToysDetails table
- -- Create Table ToysDetails ,This table will be used to store the details like Toys Information
- IF EXISTS ( SELECT [name] FROM sys.tables WHERE [name] = 'MenuMaster' )
- DROP TABLE MenuMaster
- GO
- CREATE TABLE MenuMaster
- (
- Menu_ID int identity(1,1),
- Menu_RootID VARCHAR(30) NOT NULL,
- Menu_ChildID VARCHAR(30) NOT NULL,
- UserID varchar(50),
- CreatedDate datetime
- CONSTRAINT [PK_MenuMaster] PRIMARY KEY CLUSTERED
- (
- [Menu_ID] ASC ,
- [Menu_RootID] ASC,
- [Menu_ChildID] ASC
- )WITH (PAD_INDEX = OFF, STATISTICS_NORECOMPUTE = OFF, IGNORE_DUP_KEY = OFF, ALLOW_ROW_LOCKS = ON, ALLOW_PAGE_LOCKS = ON) ON [PRIMARY]
- ) ON [PRIMARY]
- GO
- --delete from MenuMaster
- -- Insert the sample records to the ToysDetails Table
- Insert into MenuMaster(Menu_RootID,Menu_ChildID,UserID,CreatedDate) values('Root','Home','Shanu',getdate()-23)
- --Insert into MenuMaster(Menu_RootID,Menu_ChildID,UserID,CreatedDate) values('Home','Home','Shanu',getdate()-23)
- Insert into MenuMaster(Menu_RootID,Menu_ChildID,UserID,CreatedDate) values('Home','About','Shanu',getdate()-23)
- Insert into MenuMaster(Menu_RootID,Menu_ChildID,UserID,CreatedDate) values('Home','Contact','Shanu',getdate()-23)
- Insert into MenuMaster(Menu_RootID,Menu_ChildID,UserID,CreatedDate) values('Root','Masters','Shanu',getdate()-23)
- Insert into MenuMaster(Menu_RootID,Menu_ChildID,UserID,CreatedDate) values('Masters','ITM001','Shanu',getdate()-23)
- --Insert into MenuMaster(Menu_RootID,Menu_ChildID,UserID,CreatedDate) values('ITM001','ITM001','Shanu',getdate()-23)
- Insert into MenuMaster(Menu_RootID,Menu_ChildID,UserID,CreatedDate) values('ITM001','ITM002','Shanu',getdate()-23)
- Insert into MenuMaster(Menu_RootID,Menu_ChildID,UserID,CreatedDate) values('ITM001','ITM003','Shanu',getdate()-23)
- Insert into MenuMaster(Menu_RootID,Menu_ChildID,UserID,CreatedDate) values('Masters','CAT001','Shanu',getdate()-23)
- Insert into MenuMaster(Menu_RootID,Menu_ChildID,UserID,CreatedDate) values('CAT001','CAT001','Shanu',getdate()-23)
- Insert into MenuMaster(Menu_RootID,Menu_ChildID,UserID,CreatedDate) values('CAT001','CAT002','Shanu',getdate()-23)
- Insert into MenuMaster(Menu_RootID,Menu_ChildID,UserID,CreatedDate) values('CAT001','CAT003','Shanu',getdate()-23)
- Insert into MenuMaster(Menu_RootID,Menu_ChildID,UserID,CreatedDate) values('Root','Inventory','Shanu',getdate()-23)
- Insert into MenuMaster(Menu_RootID,Menu_ChildID,UserID,CreatedDate) values('Inventory','INV001','Shanu',getdate()-23)
- Insert into MenuMaster(Menu_RootID,Menu_ChildID,UserID,CreatedDate) values('INV001','FG001','Shanu',getdate()-23)
- Insert into MenuMaster(Menu_RootID,Menu_ChildID,UserID,CreatedDate) values('INV001','FG002','Shanu',getdate()-23)
- select * from MenuMaster
- -- 1) END //
- -- 2) Cart Details Table
- IF EXISTS ( SELECT [name] FROM sys.tables WHERE [name] = 'MenuDetails' )
- DROP TABLE MenuDetails
- GO
- CREATE TABLE MenuDetails
- (
- MDetail_ID int identity(1,1),
- Menu_ChildID VARCHAR(20) NOT NULL,
- MenuName VARCHAR(100) NOT NULL,
- MenuDisplayTxt VARCHAR(200) NOT NULL,
- MenuFileName VARCHAR(100) NOT NULL,
- MenuURL VARCHAR(500) NOT NULL,
- USE_YN Char(1) DEFAULT 'Y',
- UserID varchar(50),
- CreatedDate datetime
- CONSTRAINT [PK_MenuDetails] PRIMARY KEY CLUSTERED
- (
- [MDetail_ID] ASC,
- [Menu_ChildID] ASC
- )WITH (PAD_INDEX = OFF, STATISTICS_NORECOMPUTE = OFF, IGNORE_DUP_KEY = OFF, ALLOW_ROW_LOCKS = ON, ALLOW_PAGE_LOCKS = ON) ON [PRIMARY]
- ) ON [PRIMARY]
- GO
- ----delete from MenuDetails
- Insert into MenuDetails(Menu_ChildID,MenuName,MenuDisplayTxt,MenuFileName,MenuURL,UserID,CreatedDate)
- values('Root','Home','Shanu Home','Index','Home','Shanu',getdate()-23)
- Insert into MenuDetails(Menu_ChildID,MenuName,MenuDisplayTxt,MenuFileName,MenuURL,UserID,CreatedDate)
- values('Home','Home','Shanu Home','Index','Home','Shanu',getdate()-23)
- Insert into MenuDetails(Menu_ChildID,MenuName,MenuDisplayTxt,MenuFileName,MenuURL,UserID,CreatedDate)
- values('About','About','About Shanu','About','Home','Shanu',getdate()-43)
- Insert into MenuDetails(Menu_ChildID,MenuName,MenuDisplayTxt,MenuFileName,MenuURL,UserID,CreatedDate)
- values('Contact','Contact','Contact Shanu','Contact','Home','Shanu',getdate()-13)
- Insert into MenuDetails(Menu_ChildID,MenuName,MenuDisplayTxt,MenuFileName,MenuURL,UserID,CreatedDate)
- values('Masters','Masters','Masters','ItemDetails','Masters','Shanu',getdate()-13)
- Insert into MenuDetails(Menu_ChildID,MenuName,MenuDisplayTxt,MenuFileName,MenuURL,UserID,CreatedDate)
- values('ITM001','ItemMaster','Item Master','ItemDetails','Masters','Shanu',getdate()-13)
- Insert into MenuDetails(Menu_ChildID,MenuName,MenuDisplayTxt,MenuFileName,MenuURL,UserID,CreatedDate)
- values('ITM002','ItemDetail','Item Details','ItemDetails','Masters','Shanu',getdate()-13)
- Insert into MenuDetails(Menu_ChildID,MenuName,MenuDisplayTxt,MenuFileName,MenuURL,UserID,CreatedDate)
- values('ITM003','ItemManage','Item Manage','ItemManage','Masters','Shanu',getdate()-13)
- Insert into MenuDetails(Menu_ChildID,MenuName,MenuDisplayTxt,MenuFileName,MenuURL,UserID,CreatedDate)
- values('CAT001','CatMaster','Category Masters','CATDetails','Masters','Shanu',getdate()-13)
- Insert into MenuDetails(Menu_ChildID,MenuName,MenuDisplayTxt,MenuFileName,MenuURL,UserID,CreatedDate)
- values('CAT002','CATDetail','Category Details','CATDetails','Masters','Shanu',getdate()-13)
- Insert into MenuDetails(Menu_ChildID,MenuName,MenuDisplayTxt,MenuFileName,MenuURL,UserID,CreatedDate)
- values('CAT003','CATManage','Category Manage','CATManage','Masters','Shanu',getdate()-13)
- Insert into MenuDetails(Menu_ChildID,MenuName,MenuDisplayTxt,MenuFileName,MenuURL,UserID,CreatedDate)
- values('Inventory','Inventory','Inventory','Index','Inventory','Shanu',getdate()-23)
- Insert into MenuDetails(Menu_ChildID,MenuName,MenuDisplayTxt,MenuFileName,MenuURL,UserID,CreatedDate)
- values('INV001','Inventory','Inventory Details','Index','Inventory','Shanu',getdate()-23)
- Insert into MenuDetails(Menu_ChildID,MenuName,MenuDisplayTxt,MenuFileName,MenuURL,UserID,CreatedDate)
- values('FG001','FGIN','FG Receipt','FGIN','Inventory','Shanu',getdate()-43)
- Insert into MenuDetails(Menu_ChildID,MenuName,MenuDisplayTxt,MenuFileName,MenuURL,UserID,CreatedDate)
- values('FG002','FGOUT','FG Issue','FGOUT','Inventory','Shanu',getdate()-13)
- select * from MenuMaster
- select * from MenuDetails
- select A.Menu_RootID,
- B.MDetail_ID,
- B.Menu_ChildID,
- B.MenuName,
- B.MenuDisplayTxt,
- B.MenuFileName,
- B.MenuURL ,
- B.UserID
- FROM
- MenuMaster A
- INNER JOIN MenuDetails B
- ON A.Menu_ChildID=B.Menu_ChildID
- Create WCF REST Service
Open Visual Studio 2013 then select "File" -> "New" -> "Project..." then select WCF Service Application then select your project path and name your WCF service and click OK.
Once we have created the WCF Service we can see “IService.CS” and “Service1.svc” in the Solution Explorer as in the following.

- IService.CS: In “IService.CS” we can see 3 contracts by default.
- [ServiceContract]: Describes the methods or any operations available for the service. The Service Contract is an interface and methods can be declared inside the Service Interface using the Operation Contract attribute.
- [OperationContract]: is similar to the web service [WEBMETHOD].
- [DataContract]: describes the data exchange between the client and the service.
- [ServiceContract]
The following code will be automatically created for all the IService.CS files. We can change and write our own code here.
- public interface IService1
- {
- [OperationContract]
- string GetData(int value);
- [OperationContract]
- CompositeType GetDataUsingDataContract(CompositeType composite);
- // TODO: Add your service operations here
- }
- // Use a data contract as illustrated in the sample below to add composite types to service operations.
- [DataContract]
- public class CompositeType
- {
- bool boolValue = true;
- string stringValue = "Hello ";
- [DataMember]
- public bool BoolValue
- {
- get { return boolValue; }
- set { boolValue = value; }
- }
- [DataMember]
- public string StringValue
- {
- get { return stringValue; }
- set { stringValue = value; }
- }
- }
- public class MenuDataContract
- {
- [DataContract]
- public class MenuMasterDataContract
- {
- [DataMember]
- public string Menu_ID { get; set; }
- [DataMember]
- public string Menu_RootID { get; set; }
- [DataMember]
- public string Menu_ChildID { get; set; }
- [DataMember]
- public string UserID { get; set; }
- }
- [DataContract]
- public class MenuDetailDataContract
- {
- [DataMember]
- public string MDetail_ID { get; set; }
- [DataMember]
- public string Menu_RootID { get; set; }
- [DataMember]
- public string Menu_ChildID { get; set; }
- [DataMember]
- public string MenuName { get; set; }
- [DataMember]
- public string MenuDisplayTxt { get; set; }
- [DataMember]
- public string MenuFileName { get; set; }
- [DataMember]
- public string MenuURL { get; set; }
- [DataMember]
- public string UserID { get; set; }
- }
- }
- RequestFormat = WebMessageFormat.Json,
- ResponseFormat = WebMessageFormat.Json,
- JSON is a lightweight data interchange format.
- UriTemplate: Here we provide our Method Name.
- [ServiceContract]
- public interface IService1
- {
- [OperationContract]
- [WebInvoke(Method = "GET",
- RequestFormat = WebMessageFormat.Json,
- ResponseFormat = WebMessageFormat.Json,
- UriTemplate = "/GetMenuDetails/")]
- List<MenuDataContract.MenuDetailDataContract> GetMenuDetails();
- }
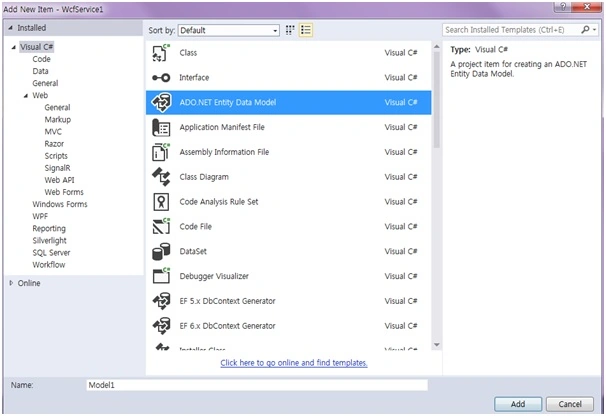
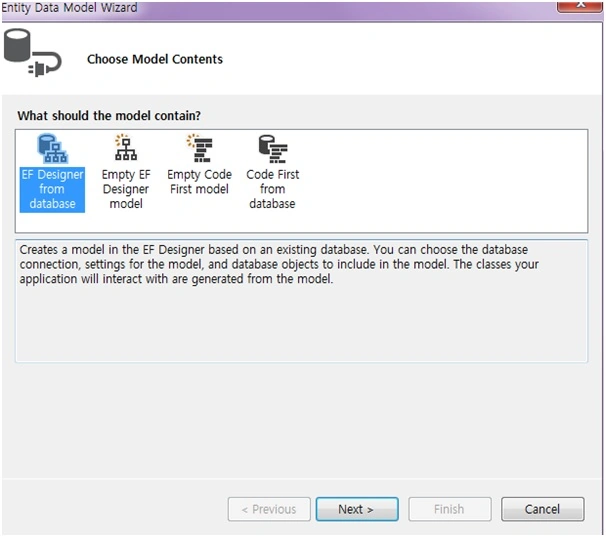
Select EF Designer from Database and click Next.
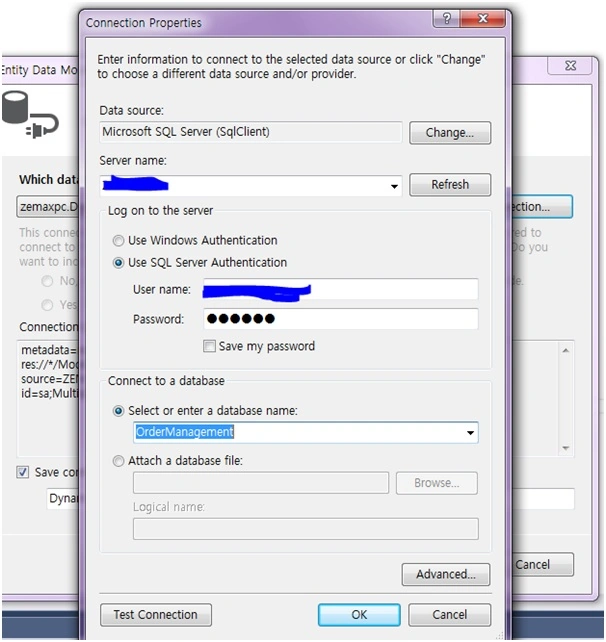
Click New Connection.
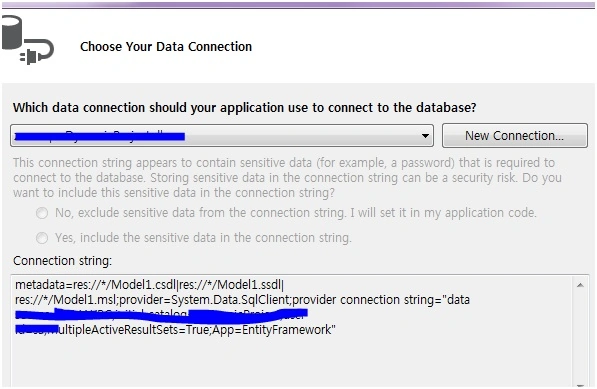
Here we can select our Database Server Name and enter the DB server SQL Server Authentication User ID and Password. We have already created our database as “MenuDB” so we can select the database and click OK.
Click Next and select the tables to be used and click Finish.
Here we can see we have now created our ShanuMenuModel.
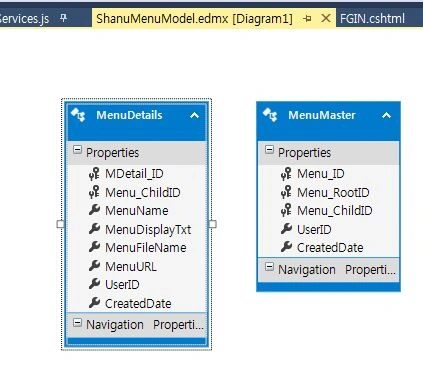
Service1.SVC
“Service.SVC.CS” implements the IService Interface and overrides and defines all the methods of the Operation Contract. For example here we can see I have implemented the IService1 in the Service1 class. I have created the object for our Entity model and in GetMenuDetails using a LINQ join query I get both Menu Master and Detaildatas.
- public class Service1 : IService1
- {
- ShanuMenuCreation_WCF.MenuDBEntities OME;
- public Service1()
- {
- OME = new ShanuMenuCreation_WCF.MenuDBEntities();
- }
- public List<MenuDataContract.MenuDetailDataContract> GetMenuDetails()
- {
- ////var query = (from a in OME.MenuDetails
- //// select a).Distinct();
- var query = (from A in OME.MenuMaster
- join B in OME.MenuDetails on A.Menu_ChildID equals B.Menu_ChildID
- select new
- {
- A.Menu_RootID,
- B.MDetail_ID,
- B.Menu_ChildID,
- B.MenuName,
- B.MenuDisplayTxt,
- B.MenuFileName,
- B.MenuURL ,
- B.UserID
- }).ToList().OrderBy(q => q.MDetail_ID);
- List<MenuDataContract.MenuDetailDataContract> MenuList = new List<MenuDataContract.MenuDetailDataContract>();
- query.ToList().ForEach(rec =>
- {
- MenuList.Add(new MenuDataContract.MenuDetailDataContract
- {
- MDetail_ID = Convert.ToString(rec.MDetail_ID),
- Menu_RootID = rec.Menu_RootID,
- Menu_ChildID = rec.Menu_ChildID,
- MenuName = rec.MenuName,
- MenuDisplayTxt = rec.MenuDisplayTxt,
- MenuFileName = rec.MenuFileName,
- MenuURL = rec.MenuURL,
- UserID = rec.UserID,
- });
- });
- return MenuList;
- }
- }
Web.Config
In the WCF project's “Web.Config” make the following changes.
Change
- <add binding="basicHttpsBinding" scheme="https" /> to <add binding="webHttpBinding" scheme="http" />
- </behaviors>
- <endpointBehaviors>
- <behavior>
- <webHttp helpEnabled="True"/>
- </behavior>
- </endpointBehaviors>
- </behaviors>
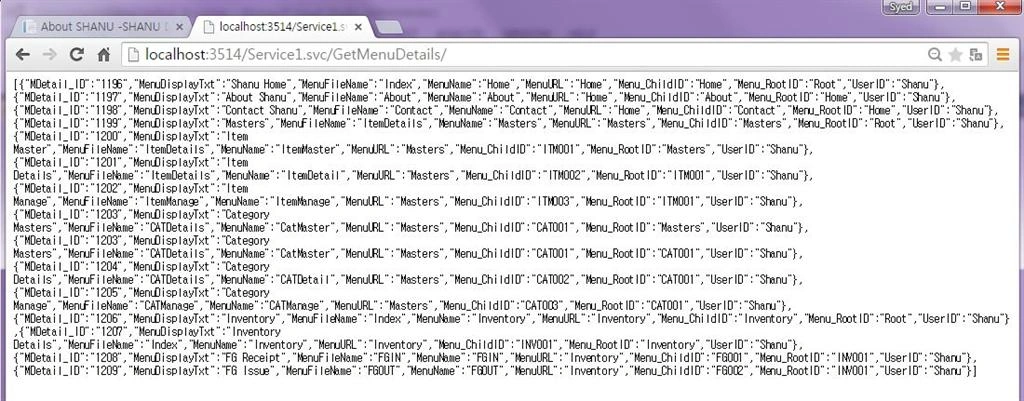
Create MVC Web Application
So now we have completed our WCF and now it's time to create our MVC AngularJS application.
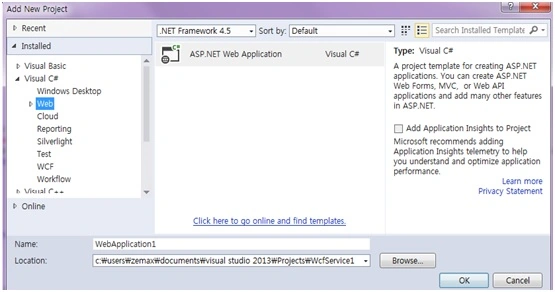
We can add a new project to our existing project and create a new MVC web application as in the following.
Right-click the project in the solution and click Add New Project then enter your project name and click "OK".
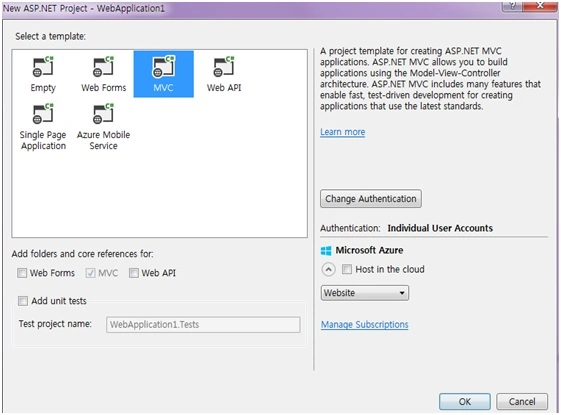
Select MVC and click "OK".
We have now created our MVC application and it's time to add our WCF Service and install the AngularJS package to our solution.
Add WCF Service: Right-click MVC Solution and click Add then click Service Reference.
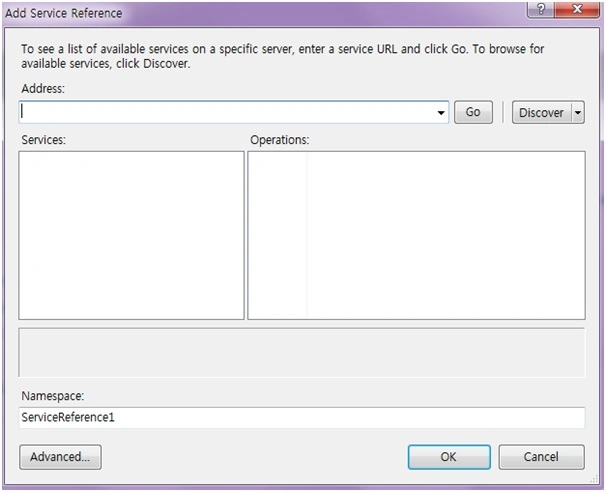
Enter your WCF URL and click GO. Here my WCF URL is http://localhost:3514/Service1.svc/
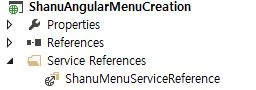
Add your name and click OK.
Now we have successfully added our WCF Service to our MVC application.
Procedure to Install AngularJS package
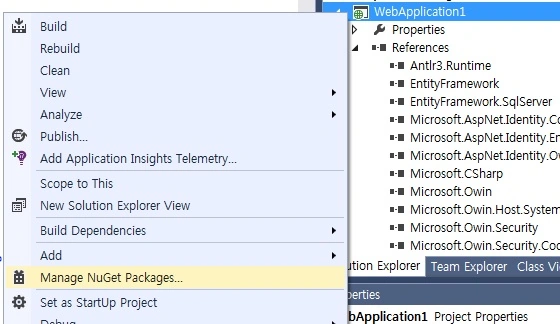
Select Online and Search for AngularJS. Select the AngularJS and click Install.
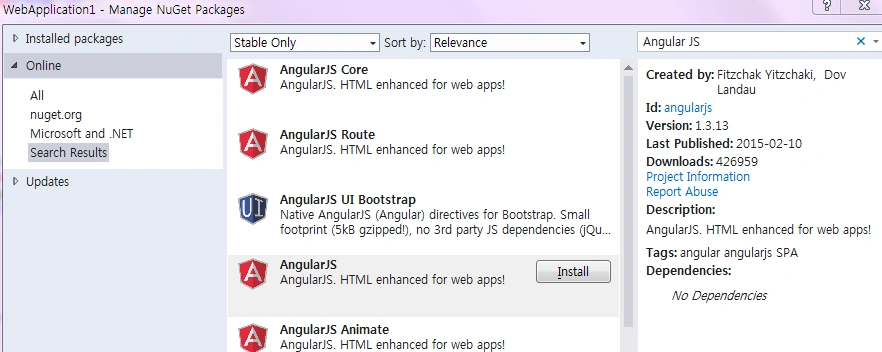
Now we have Installed the AngularJS package into our MVC Project. Now let's create our AngularJS.
- Modules.js
- shoppingController.js
- Services.js
Procedure to Create AngularJS Script Files
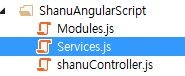
Right-click the Script folder and create your own folder to create the AngularJS Model/Controller and Service JavaScript. In your script folder add three JavaScript files and name them Modules.js, Controllers.js and Services.js as in the following.
- /// <reference path="../angular.js" />
- /// <reference path="../angular.min.js" />
- var app;
- (function () {
- app = angular.module("RESTClientModule", []);
- })();
Services.js: Here we provide a name for our service and we use this name in shanucontroller.js. Here for the Angular service I have given the name "AngularJs_WCFService". You can provide your own name but be careful of changing the name in Controllers.js. AngularJS can receive JSON data. Here we can see I have provided our WCS service URL to get the Item details as JSON data. To insert an Item information result to the database we pass the data as JSON data to our WCFinsert method as a parameter.
- /// <reference path="../angular.js" />
- /// <reference path="../angular.min.js" />
- /// <reference path="Modules.js" />
- app.service("AngularJs_WCFService", function ($http) {
- //Get Order Master Records
- this.geMenuDetails = function () {
- return $http.get("http://localhost:3514/Service1.svc/GetMenuDetails");
- };
- });
Variable declarations
First I declared all the local variables that need to be used and the current date and store the date using $scope.date.
Note: $scope.subChildIDS = "ITM001"; this variable has been used to filter the 2nd level hierarchy.
Methods
getAllMenuDetails(): In this method I will get all the Menu Detail as JSON and bind the result to the Main page.
shanuController.js full source code
- /// <reference path="../angular.js" />
- /// <reference path="../angular.min.js" />
- /// <reference path="Modules.js" />
- /// <reference path="Services.js" />
- app.controller("AngularJsShanu_WCFController", function ($scope, $window, AngularJs_WCFService) {
- $scope.date = new Date();
- $scope.showDetails = false;
- $scope.showSubDetails = false;
- $scope.subChildIDS = "ITM001";
- $scope.Imagename = "R1.png";
- getAllMenuDetails();
- //To Get All Records
- function getAllMenuDetails() {
- var promiseGet = AngularJs_WCFService.geMenuDetails();
- promiseGet.then(function (pl) {
- $scope.MenuDetailsDisp = pl.data
- },
- function (errorPl) {
- });
- }
- $scope.showMenu = function (showMenus) {
- if (showMenus == 1) {
- $scope.Imagename = "R2.png"
- $scope.showDetails = true;
- }
- else {
- $scope.Imagename = "R1.png"
- $scope.showDetails = false;
- }
- }
- $scope.showsubMenu = function (showMenus,ids) {
- if (showMenus == 1) {
- $scope.subChildIDS = ids;
- $scope.showSubDetails = true;
- }
- else if(showMenus == 0) {
- $scope.showSubDetails = false;
- }
- else {
- $scope.showSubDetails = true;
- }
- }
- });
So now we have created our AngularJS Module/Controller and Service. So what is next?
Create MVC Controland View to display our result.
Add Controller
Right-click Controllers then select Add Controller then select MVC 5 Controller–Empty then click Add.
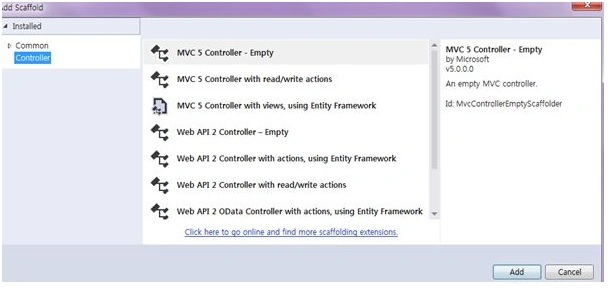
Change the Controller name and here I have given it the name “MastersController” and click OK.
Add View
Right-click on the Controller Index and click Add View.
MVC Controller CS File: Here we can in my MVC Controller, I have created 3 menus with sub items. For example I have created the 2 controllers MastersController.cs and InventoryController.cs.
- public class MastersController : Controller
- {
- // GET: Masters
- public ActionResult Index()
- { return View(); }
- public ActionResult ItemDetails()
- { return View(); }
- public ActionResult ItemManage()
- { return View(); }
- public ActionResult CATDetails()
- { return View(); }
- public ActionResult CATManage()
- { return View(); }
- }
- public class InventoryController : Controller
- {
- // GET: Inventory
- public ActionResult Index()
- {
- return View();
- }
- public ActionResult FGIN()
- {
- return View();
- }
- public ActionResult FGOUT()
- {
- return View();
- }
- }
Index View
Name the View “Index”.
In the View, design your page and reference angular.js, Modules.js, Services.js and Controllers.js.
In AngularJS we use {{ }} to bind or display the data.
Here we can see that I first created a table and something for that table.
First in the table I used the data-ng-controller="AngularJsShanu_WCFController" and here we can see data-ng-controller will be used to bind the data of the controller to the HTML table.
Using < li data-ng-repeat="menus in MenuDetailsDisp | filter:{Menu_RootID:'Root'}" > we can get all the menu details and display the First Level hierarchy menu details as top menu.
Here we can see I have filtered the menu by the rootId "Root". During our insert query I have already explained that for every top-level menu I will provide the Rootid as ‘Root’. First we add all the top-level menus and for each top-level menu if there is any 2nd level hierarchy then I will load the 2nd level menu details to filter by the 1st level RootID as in the following.
- <li data-ng-repeat="menus in MenuDetailsDisp | filter:{Menu_RootID:'Root'}">
- @{
- var url = Url.Action("{{menus.MenuFileName}}", "{{menus.MenuURL}}", new { id = "{{id=menus.MenuURL}}" });
- url = HttpUtility.UrlDecode(url);
- }
- <a data-ng-href="@url">{{menus.MenuDisplayTxt}}</a>
- <ul class="sub-menu">
- <li data-ng-repeat="submenus in MenuDetailsDisp | filter:{Menu_RootID:menus.Menu_ChildID}" ng-mouseover="showsubMenu(1,submenus.Menu_ChildID);" ng-mouseout="showsubMenu(0,submenus.Menu_ChildID);">
- @{
- var url1 = Url.Action("{{submenus.MenuFileName}}", "{{submenus.MenuURL}}", new { id = "{{id=submenus.MenuURL}}" });
- url1 = HttpUtility.UrlDecode(url1);
- }
- <a data-ng-href="@url1">{{submenus.MenuDisplayTxt}}</a>
- <div style="overflow:visible;height:100px;">
- <ul class="menu">
- <li data-ng-repeat="menus in MenuDetailsDisp | filter:{Menu_RootID:'Root'}">
- @{
- var url = Url.Action("{{menus.MenuFileName}}", "{{menus.MenuURL}}", new { id = "{{id=menus.MenuURL}}" });
- url = HttpUtility.UrlDecode(url);
- }
- <a data-ng-href="@url">{{menus.MenuDisplayTxt}}</a>
- <ul class="sub-menu">
- <li data-ng-repeat="submenus in MenuDetailsDisp | filter:{Menu_RootID:menus.Menu_ChildID}" ng-mouseover="showsubMenu(1,submenus.Menu_ChildID);" ng-mouseout="showsubMenu(0,submenus.Menu_ChildID);">
- @{
- var url1 = Url.Action("{{submenus.MenuFileName}}", "{{submenus.MenuURL}}", new { id = "{{id=submenus.MenuURL}}" });
- url1 = HttpUtility.UrlDecode(url1);
- }
- <a data-ng-href="@url1">{{submenus.MenuDisplayTxt}}</a>
- <ul ng-show="showSubDetails" class="sub-menu2">
- <li data-ng-repeat="sub1menus in MenuDetailsDisp | filter:{Menu_RootID:subChildIDS}" ng-mouseover="showsubMenu(3,9);">
- @{
- var url2 = Url.Action("{{sub1menus.MenuFileName}}", "{{sub1menus.MenuURL}}", new { id = "{{id=sub1menus.MenuURL}}" });
- url2 = HttpUtility.UrlDecode(url2);
- }
- <a data-ng-href="@url2">{{sub1menus.MenuDisplayTxt}}</a>
- </li>
- </ul>
- </li>
- </ul>
- </li>
- </ul>
- </div>
Run the Program
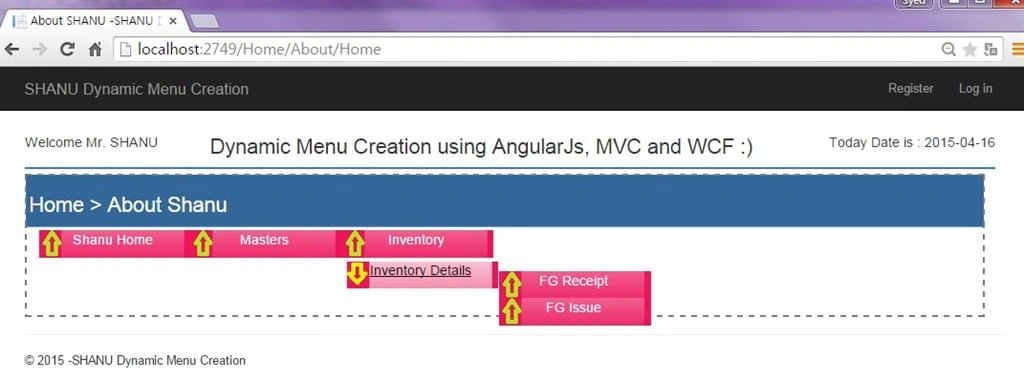
(Output Menu Type 1)
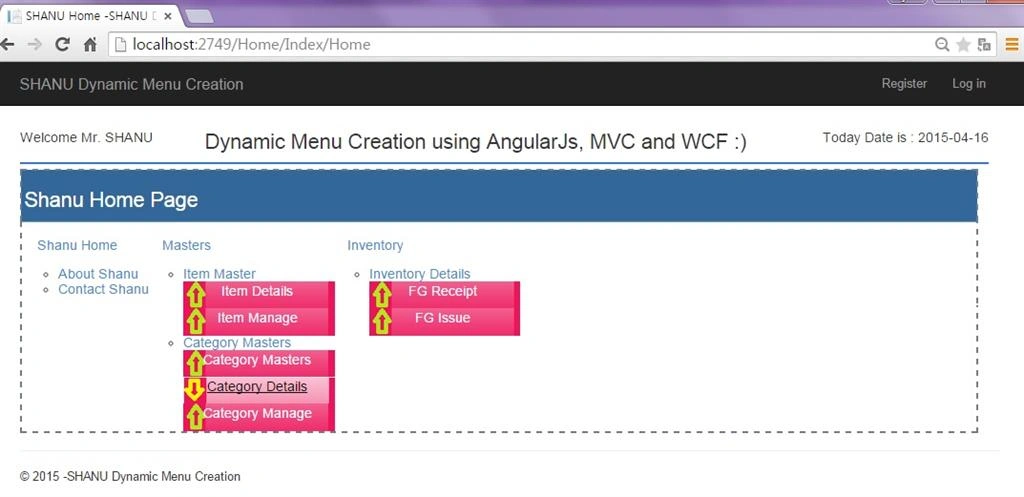
(Output Menu Type 2)
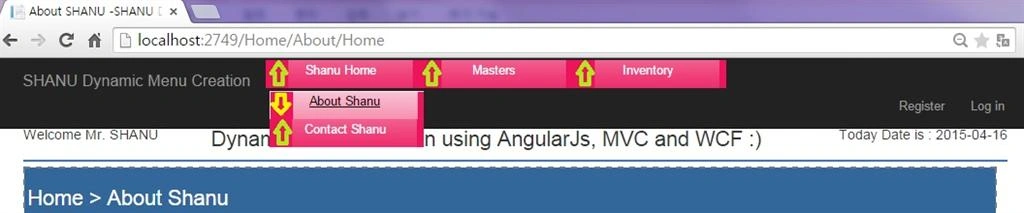
Note: This code can be used in our MVC View page or this code can be used in Shared>Layout.Cshtml so that the menu will be a common menu that can be used for all pages globally. Here we can see in the preceding that the same menu code has been added to the Layout.cshtm page. By this the menu will be added globally and can be accessed in all pages.
You can extend this application depending on your requirements and add more functionality, like user management, menu management and and so on.
Supported Browsers: Chrome and Firefox.
kalu singh raoPosted Jul 22, 2016, 1:56 AM
Nice
Bruno PétersonPosted May 3, 2015, 8:32 AM
Very good!
Gowtham RajamanickamPosted Apr 24, 2015, 12:41 AM
excellent....
Karthik Muthu KaruppanPosted Apr 23, 2015, 11:36 AM
nice
Vijay SPosted Apr 21, 2015, 3:49 AM
Nice Article
Sibeesh VenuPosted Apr 20, 2015, 6:38 AM
good one.
K P Singh ChundawatPosted Apr 18, 2015, 1:57 AM
Great Work and well explain Man ...Keep it up ....Very helpful for me ...Thanks for it .
NitinPosted Apr 17, 2015, 6:35 AM
very well explained
Upendra Pratap ShahiPosted Apr 17, 2015, 5:20 AM
nice sir
Ibrahim RashidPosted Apr 17, 2015, 4:13 AM
Very good article with very good explanation.Thank you Sir
Manish Kumar ChoudharyPosted Apr 17, 2015, 2:46 AM
Superb explanation.
Jitendra KumarPosted Apr 17, 2015, 1:54 AM
Nice One.
Syed ShanuPosted Apr 17, 2015, 12:23 AM
Thank You SanthaKumar
Santhakumar MunuswamyPosted Apr 17, 2015, 12:01 AM
Thanks for nice article
Santhakumar MunuswamyPosted Apr 17, 2015, 12:01 AM
Good work
Rahul Kumar SaxenaPosted Apr 16, 2015, 10:45 PM
Good Work...