

Introduction
Recently I was working on a website for a customer who asked me to import a mailing list to a mysql database table on the site. This was going to be run through an “email blast” utility, which also had to facilitate html so it could send through images and rich text. Although there are PHP software utilities that are already made for this, I decided to make my own for the purpose of learning more about how the process really works. I have included screen snapshots as well as programming code that illustrates some of the more specialized custom software that comprises this email blast utility.
Select recipients for the email blast from a list
The operator is first required to log in with a user id and password that will be authenticated with its stored counterparts in a mysql data table on the site (see image below).
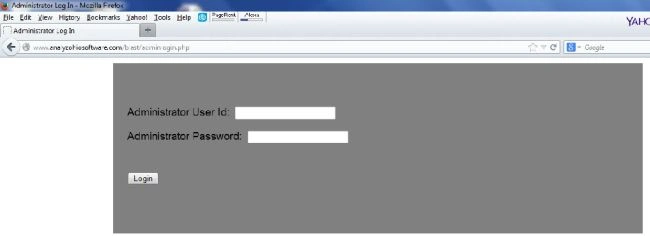
Here is the PHP code that will authenticate the user’s log in credentials after the “Login” button has been clicked:
- <?php
- // connect to the mysql database with predefined
- // constants from the included 'generic_config.php' file.
- $conn = mysql_connect(DB_HOSTX, DB_USERX, DB_PASSWORDX) or die('Could not connect: ' . mysql_error());
- $db_selected = mysql_select_db(DB_NAMEX, $conn) or die('Could not select database');
- $query_rsLogin = "SELECT * FROM generic_admin_datatable";
- $rsLogin = mysql_query($query_rsLogin, $conn) or die(mysql_error());
- $totalRows_rsLogin = mysql_num_rows($rsLogin);
- if ( $totalRows_rsLogin >= 1 ) {
- $flagvar3 = 1;
- $rowx = mysql_fetch_row($rsLogin);
- if ( $_POST['uservar'] == $rowx[0] && $_POST['passvar'] == $rowx[1] ) {
- // set the php session variable to 'YES' so the
- // email address listing page won't bounce us
- // back to this one.
- $_SESSION['getin'] = "YES";
- // initialize the php session variable to the
- // first row of the listed email addresses.
- $_SESSION[start_row] = 0;
- $flagvar3 = 0;
- // set the 'blastready' field for all the email
- // addresses to 'NO'.
- mysql_query("UPDATE generic_mailing_list SET blastready = 'NO'") or die('Query failed: ' . mysql_error());
- }
- }
- mysql_free_result($rsLogin);
- mysql_close($conn);
- // redirect to the email address listing page.
- header("Location: http://www.genericsite.com/blast/emailblastlist.php");
- ?>
Upon successful log in, the operator will be redirected to a web page that shows a listing of email recipients (see image below). This is populated with email addresses and the first and last names from the mysql data table on the site. Notice there are 2 sets of navigation buttons at the top. The operator may move backwards and forwards through the list by 12 or 100 rows with each click.
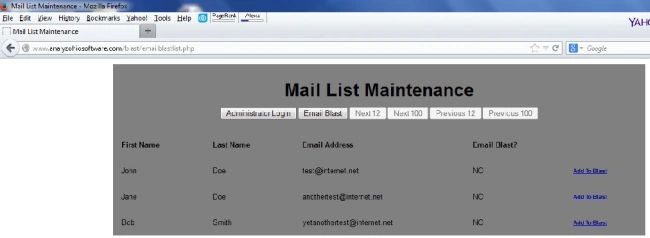
If the operator wants to do a selective email blast to the listing of recipients, then the “Add To Blast” link to the right of each chosen row needs to be clicked. This will change the default status of “NO” under the “Email Blast?” column to “YES” (see image below).
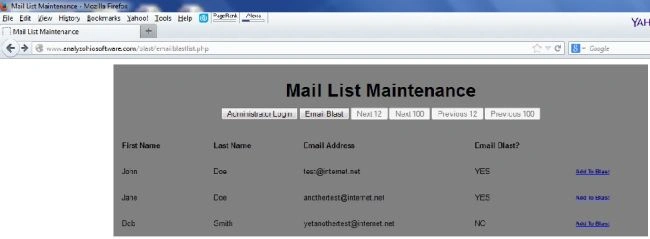
Here is the PHP code that switches the “Email Blast?” column to “YES” for a selected row from the listing of recipients:
- <?php
- session_start();
- // this configuration file contains predefined
- // constants used to connect to the server and database.
- include 'generic_config.php';
- // assign the passed email address variable into
- // a php session variable.
- $_SESSION[at] = $_GET['var'];
- // connect to the mysql database with predefined
- // constants from the included 'generic_config.php' file.
- $conn = mysql_connect(DB_HOSTX, DB_USERX, DB_PASSWORDX) or die('Could not connect: ' . mysql_error());
- $db_selected = mysql_select_db(DB_NAMEX, $conn) or die('Could not select database');
- // set the 'ready for email blast' column in the listing to 'YES' for
- // the passed email address.
- mysql_query("UPDATE generic_mailing_list SET blastready = 'YES' WHERE emailaddress = '".$_SESSION[at]."'") or die('Query failed: ' . mysql_error());
- mysql_close($conn);
- // redirect to the email address listing page.
- header("Location: http://www.genericsite.com/blast/emailblastlist.php");
- ?>
If sending an email to all recipients in the listing is desired, then nothing needs to be clicked on this web page. That will be taken care of in the next one where the email is being composed for the blast operation. To go to that web page, just click the “Email Blast” button at the top of the page.
Next, fill out the email web page and send out the blast!
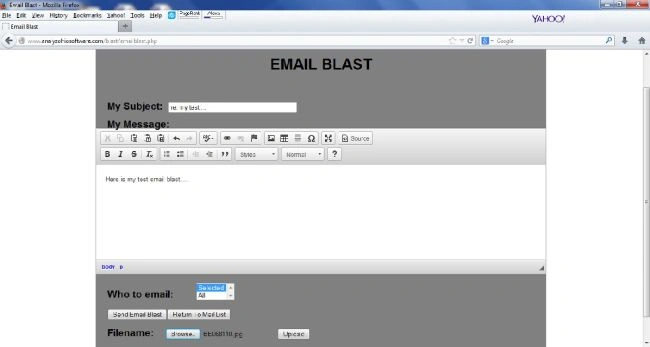
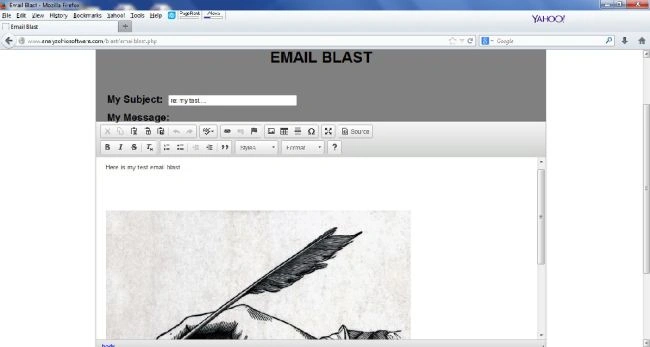
This next web page is where the operator will compose the content for the email blast (see image below).

Notice the “Who to email:” combo box control. By default it is set to “Selected” for a selective email blast operation. As mentioned previously, this designator is meant for choosing specific email recipients from the prior web page. The “All” designator will blast the email to all recipients from the list.
Also, the text area for the message body has been embellished with a rich text editor, “CKEDITOR”. I declared the text area for the email message, which I named “MESSAGEBOARD”. I then used the script tag enclosed directive CKEDITOR.replace(‘MESSAGEBOARD’) to integrate the rich text editor into the text area as shown below:
- <br><br>
- <H1>EMAIL BLAST</H1>
- <br><br>
- <!--inputs for subject and message.-->
- <H2> My Subject: <input name="SUBJECT" type="text" size="40" maxlength="40" value="<?php echo $_SESSION['mysubject']; ?>"></H2>
- <H2> My Message: <textarea name="MESSAGEBOARD" cols="50" rows="10"><?php echo $var = isset($_SESSION['post_html']) ? $_SESSION['post_html'] : ''; ?>
- <!--embellish the message field with CKEditor to format for rich text.-->
- <script>
- CKEDITOR.replace( 'MESSAGEBOARD' );
- </script>
- <!--dropdown list for 'Selected' or 'All' to direct php email blast routine for what type of blast.-->
- <h2> Who to email:
- <select name="towhom" size="2">
- <option selected="">Selected</option>
- <option>All</option>
- </select>
- </h2>
- <!--click to go to email blast scroll list or email blast processing.-->
- <h2> <input name="submit_email" value="Send Email Blast" type="submit"><input name="submit_return_to" value="Return To Mail List" type="submit"></h2>
- <!--upload an image file from user's local computer and subsequently paste in the message field.-->
- <h2> <label for="file">Filename: </label><input name="file" id="file" type="file"><input name="gogetem" value="Upload" type="submit"></h2>
Douglas MillerPosted May 31, 2014, 10:58 AM
Sounds good.....I look forward to seeing it.
Mahesh ChandPosted May 30, 2014, 11:37 AM
Great Doug. Please keep your website links to "1" to keep article clean. We are working on a new profile template where you can promote your website/business in a better way. We will also put some kind of space on articles to promote businesses so there are less embedded links within the article. Thank you for supporting the community.