

Introduction
In my previous articles, I explained a lot about Angular.js; i.e., how to save, update, delete, get, paging searching, sorting etc. In this article, we talk about the new library of Angular.js; i.e, Angular material .
Here a question arises. What is Angular material and how to use it ?
Answer
Angular material is a component library of Angular.JS that is used to create attractive, responsive Web pages; that is the need of today's standards.
Angular material's built in responsive features helps us to create the Website irrespective of any devices. The Website runs on all the devices - either it is a desktop or a mobile. It automatically adjusts itself on the screen accordingly.
Angular material provides almost all types of the controls with better designs - either it is navigation bars or they are form inputs, everything is provided with Angular.js library.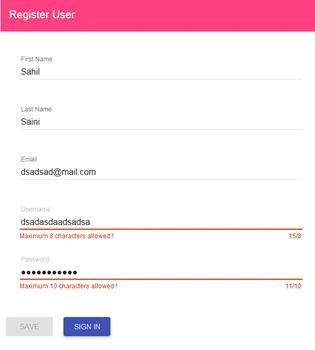
Start creating the database
- Create a database named Test.
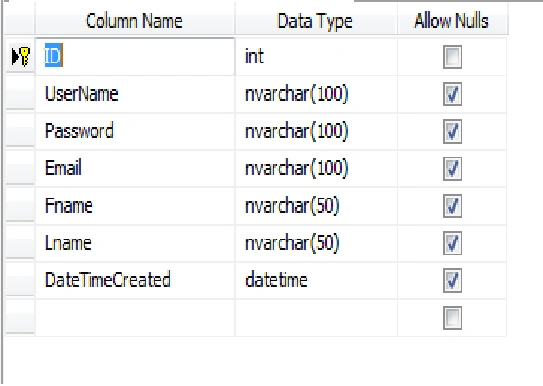
- Create a table Login in the database.
Start with code
Basic setup
- Open VS and create a new project.
- Go to the reference folder in Solution Explorer and right click on the folder, select Manage NuGet Packages.
- Install the Angular material and Angular.JS libraries online or download from the links, given below:
- Download Angular Material CSS.
- Download AngularJS.
- Download Angular animate JS.
- Download Angular Aria JS.
- Download Angular messages JS.
- Download Angular Material JS.
- Open BundleConfig.cs file in App_Start folder.
- Remove the code inside from RegisterBundles method. Don't remove the method.
Layout setup of the project
- Open the Layout.cshtml file in shared folder of views.
- Start writing code, as shown below:
-
- <!DOCTYPE html>
- <html lang="en">
- <head>
- <meta charset="utf-8" />
- <title>@ViewBag.Title</title>
- <link href="~/favicon.ico" rel="shortcut icon" type="image/x-icon" />
- <meta name="viewport" content="width=device-width" />
- <link href="~/Content/angular-material.min.css" rel="stylesheet" />
- <script src="~/Scripts/angular.min.js"></script>
- <script src="~/Scripts/angular-animate/angular-animate.min.js"></script>
- <script src="~/Scripts/angular-aria/angular-aria.min.js"></script>
- <script src="~/Scripts/angular-messages.min.js"></script>
- <script src="~/Scripts/angular-material/angular-material.min.js"></script>
- </head>
- <body>
- <div class="wrapper">
- <div class="container">
- @RenderBody()
- </div>
- </div>
- @RenderSection("scripts", required: false)
- </body>
- </html>
- Here, in the head section, drag and drop the files whose links are given above.
UI Creation
- Go to the Controller folder, create Register Controller.
- Change the name of the Action Result index to register.
- Right click on Action Result register and select addview option.
- Go to the Register view that is created from register actionresult.
Start writing code
- <html ng-app="myApp">
- <head>
- <title>Register</title>
- </head>
- <body>
- <div ng-controller="controll" layout="column" layout-padding ng-cloak>
- <br />
- <md-content class="md-no-momentum">
- <md-toolbar class="md-accent">
- <h2 class="md-toolbar-tools">
- <span flex>Register User</span>
- </h2>
- </md-toolbar><br /><br />
- <form name="userForm">
- <div layout-gt-sm="column" flex="30">
- <md-input-container class="md-icon-float md-block">
- <label>First Name</label>
- <md-icon md-svg-src="~/Content/Icons/employee.svg" class="fName"></md-icon>
- <input type="text" class="form-control" name="fName" ng-model="fName" required autofocus />
- <div ng-messages="userForm.fName.$error">
- <div ng-message="required">First name is required!</div>
- </div>
- </md-input-container>
- <md-input-container class="md-icon-float md-block">
- <label>Last Name</label>
- <md-icon md-svg-src="~/Content/Icons/employee.svg" class="lName"></md-icon>
- <input type="text" class="form-control" name="lName" ng-model="lName" required autofocus />
- <div ng-messages="userForm.lName.$error">
- <div ng-message="required">Last name is required !</div>
- </div>
- </md-input-container>
- </div>
- <div layout-gt-sm="column" flex="30">
- <md-input-container class="md-icon-float md-block">
- <label>Email</label>
- <md-icon md-svg-src="~/Content/Icons/placeholder.svg" class="uEmail"></md-icon>
- <input type="email" class="form-control" name="uEmail" ng-model="uEmail" ng-pattern="/^.+.+\..+$/" required autofocus />
- <div ng-messages="userForm.uEmail.$error">
- <div ng-message-exp="['required','pattern']">Email is required in correct format !</div>
- </div>
- </md-input-container>
- <md-input-container class="md-icon-float md-block">
- <label>Username</label>
- <md-icon md-svg-src="~/Content/Icons/placeholder.svg" class="uName"></md-icon>
- <input type="text" class="form-control" name="uName" ng-model="uName" md-maxlength="8" required autofocus />
- <div ng-messages="userForm.uName.$error">
- <div ng-message="required">Username is required !</div>
- <div ng-message="md-maxlength">Maximum 8 characters allowed !</div>
- </div>
- </md-input-container>
- </div>
- <div layout-gt-sm="column" flex="30">
- <md-input-container class="md-icon-float md-block" flex-gt-sm>
- <label>Password</label>
- <md-icon md-svg-src="~/Content/Icons/cityscape.svg" class="uPwd"></md-icon>
- <input type="password" class="form-control" name="uPwd" ng-model="uPwd" md-maxlength="10" required autofocus />
- <div ng-messages="userForm.uPwd.$error">
- <div ng-message="required">Password is required !</div>
- <div ng-message="md-maxlength">Maximum 10 characters allowed !</div>
- </div>
- </md-input-container>
- <md-input-container class="md-icon-float md-block" flex-gt-sm>
- <md-button class="md-raised md-primary" ng-click="SaveUser();" ng-disabled="!(fName && lName && uEmail && uName && uPwd)">
- <md-tooltip>
- Save
- </md-tooltip>
- Save
- </md-button>
- <md-button class="md-raised md-primary">
- <md-tooltip>
- Sign in
- </md-tooltip>
- Sign in</md-button>
- </md-input-container>
- </div>
- </form>
- </md-content>
- </div>
- </body>
- </html>
- In the code shown above, every tag is prefixed with md and .md is a prefixed for Angular material design.
- Let's start with each and every tag .
- md-content is a tag, in which all the code resides. It is given with a class, that is defined in the Angular css file with certain designs.
- md-toolbar is used to design a toolbar on the upper side of the page.
- md-input-container is a Container for input like in the bootstrap, it contains class for display icon and other css effects of label, which is defined inside this.
- md-icon is used to display the icon before the control and we have to give path of the icon in md-svg-src attribute of this tag.
- ng-messages is used to display the error message for the control on violation of validation rules.
- ng-message is used inside the ng-messages tag to display multiple messages.
- Both of these are used with div tags.
- Inside the ng-messages atribute, we have to give the model name of the field with check of an error.
- Inside the ng-message attribute, the type of validation is declared. For ex.-- we declare, what is required in an input tag. This is used with ng-message to display the required message.
Sidney JonesPosted Mar 15, 2018, 2:33 AM
Very simple instructions. Thank you
Mayur PadhiyarPosted May 29, 2017, 8:56 AM
Sir not working it is showing the blank page and nothing coming.
Vignesh ManiPosted Jun 3, 2016, 9:25 AM
Nice