

Introduction
- Create a Mobile Service.
- Build an electronic circuit.
- Write the code for to upload data form sensor dht11 to Microsoft Azure.
- Test application.
- Conclusion.
Create a Mobile Service
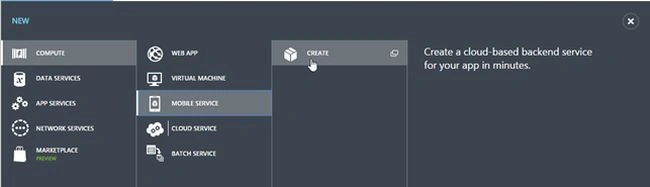
Creating a mobile service is very simple, you first need to have an account and a subscription to Microsoft Azure. Enter the portal than on the home screen press the New button that we can see in the lower left as in the following:
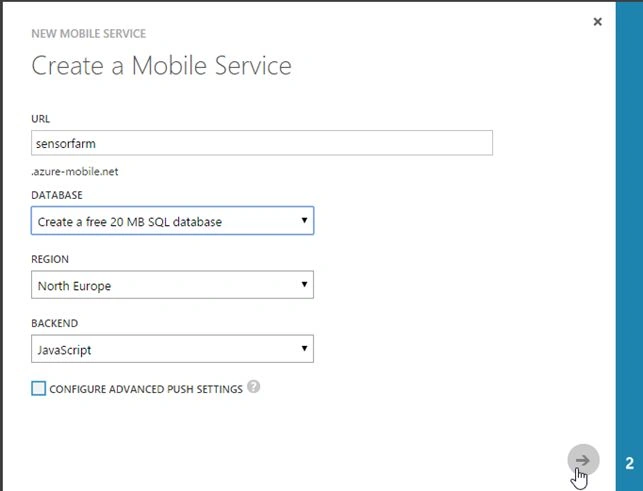
 In the next screen, we need to name the Mobile Service, choose whether to use an existing or create a free 20 MB database, where to place it. In my case, the nearest Data Center is North Europe, so this will not be the same for everyone, but it is advisable to choose the Data Center nearest your location. Finally, select the Backend to be JavaScript.
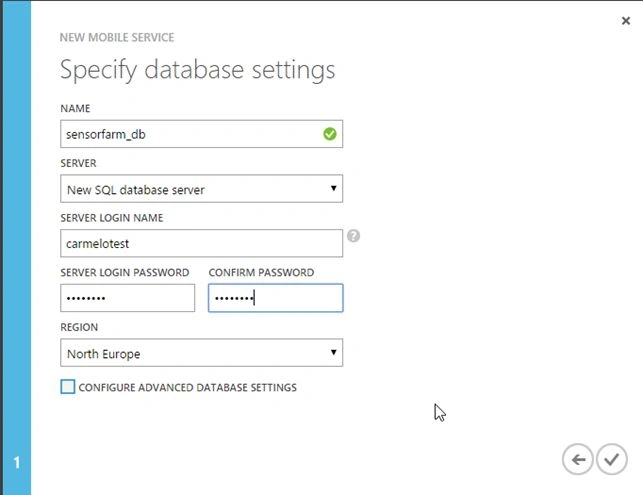
 Next create a database and give it a name. Choose whether to create a new database SQLServer and then enter your credentials, as in the following figure:
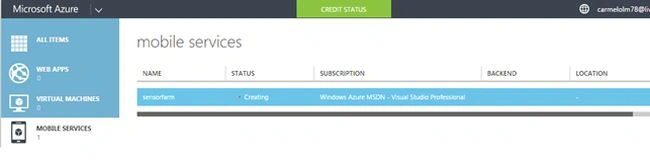
 After this activity, Azure creates the Mobile Service and we can see that now we have a Mobile service and one database.
 We are now ready to create a table within the Database sensorfarm_db. Click with the mouse on sensorfarm under Mobile Service, the next screen, click the button located next to "ADD A TABLE". You will see another screen where we will need to enter the name of the table, insert tabsensor as in the following figure:
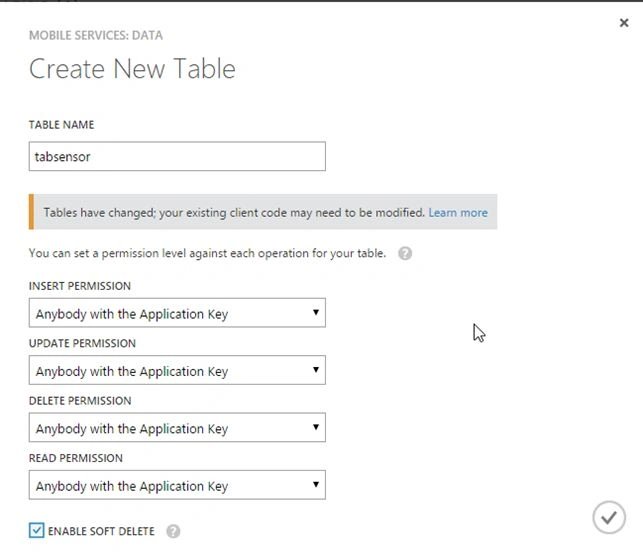 Leave all the other fields as they are and click on the button shown with checkmarks in the lower-right corner and wait until it creates the table.
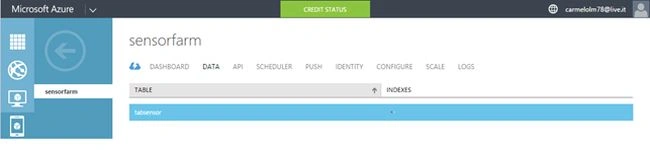 This was the procedure end, the procedure for the creation of a Mobile Service. We now turn to the implementation of the electronic circuit.
Build an electronic circuit
For the realization of the circuit, we need the following components:
This was the procedure end, the procedure for the creation of a Mobile Service. We now turn to the implementation of the electronic circuit.
Build an electronic circuit
For the realization of the circuit, we need the following components:
Figure 1: New Mobile Service Create
Figure 2: Create a Mobile Service
Figure 3: Specify Database Setting
Figure 4: Mobile service
Figure 5: SQL database
Figure 6: Create New table
Figure 7: Checkmarks in the lower right corner
- Board Arduino Due
- Board Ethernet shield
- Sensor DHT11
- BreadBoard (basis for the connection of the sensor)
- Colmeter (cables for the connection from board Arduino Due and sensor DHT11)
- Power Supply Cable for the connection board Arduino due
Here I will show the pictures of the final circuit. The sensor can operate from a voltage of 3.3 Volt DC up to a maximum of 5.5 Volts. For greater clarity on the connection and operation, refer to the official documentation.
The connections are:
- Pin Signal Sensor with cable Black on pin 4 Arduino Due
- Pin +5v Sensor with cable Red on pin 5v Arduino Due
- Pin – Sensor with cable blue on pin GND Arduino Due
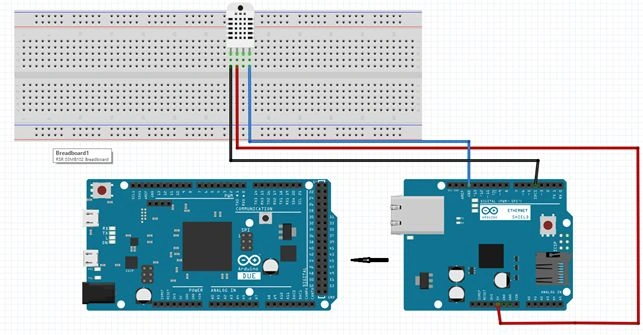
Figure 8: Pin GND Arduino Due
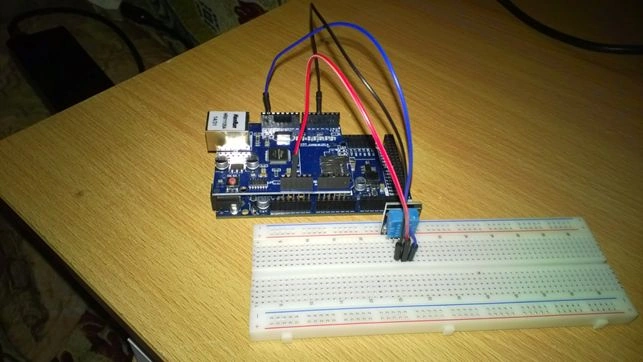
Figure 9: Practical in circuit
- Extracting the files in the Zip file and manually copy the directory C: \ Program Files (x86) \ Arduino \ libraries.
- Follow the procedure below, start the Arduino IDE, let's select the menu Sketch command to include the library and then add the Zip library as shown.
Figure 10: Include library and then add Zip library
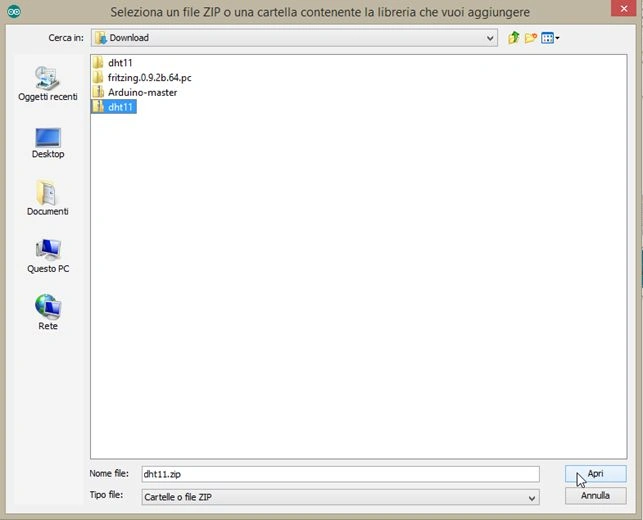
Figure 11: Select the Zip file
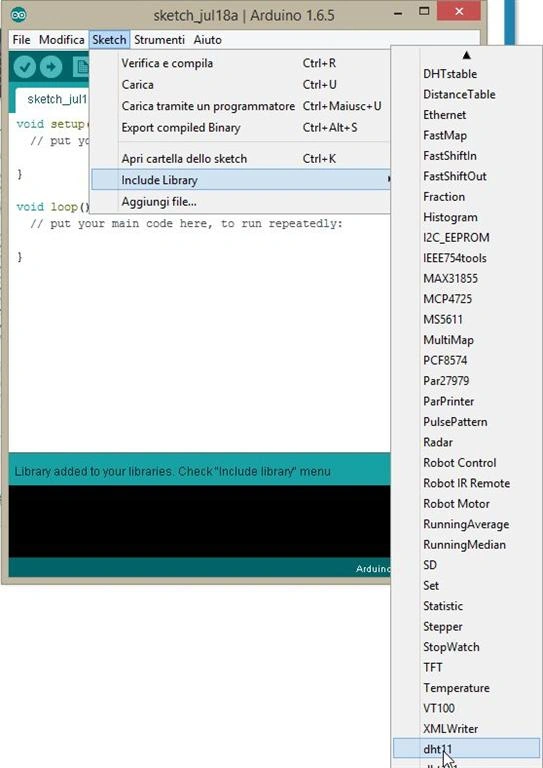
Figure 12: Include Library
- #include <SPI.h>
- #include <Ethernet.h>
- #include <dht11.h>
- // Ethernet shield MAC address (sticker in the back)
- byte mac[] = { 0xDE, 0xAD, 0xBE, 0xEF, 0xFE, 0xED };
- /*You can find this values in your Mobile Service dashboard
- server = namemobileservice.azure-mobile.net
- table_name = nametable
- ams_key = your keyvalue, find in home page mobile service, with a click on button MANAGE KEYS*/
- const char* server = "sensorfarm.azure-mobile.net";
- const char* table_name = "tabsensor";
- const char* ams_key = "you can find it on mobile service with manage keys button";
- EthernetClient client;
- char buffer[64];
- dht11 DHT;
- #define DHT11_PIN 4
- /*This method use Mobile service REST API fot to write value*/
- void write_sensorvalue(double tempvalue, double humidityvalue)
- {
- if (client.connect(server, 80)) {
- /*Table name in Mobile service*/
- sprintf(buffer, "POST /tables/%s HTTP/1.1", table_name);
- client.println(buffer);
- /*Sever name in Mobile Service*/
- sprintf(buffer, "Host: %s", server);
- client.println(buffer);
- /*Mobile Services application key*/
- sprintf(buffer, "X-ZUMO-APPLICATION: %s", ams_key);
- client.println(buffer);
- // JSON content type for the information
- client.println("Content-Type: application/json");
- /*Write values of temperature and humidity from DHT11 sensor*/
- sprintf(buffer, "{\"tempvalue\":\"%f\",\"humidityvalue\":\"%f\"}", tempvalue, humidityvalue);
- // Content length
- client.print("Content-Length: ");
- client.println(strlen(buffer));
- // End of headers
- client.println();
- // Request body
- client.println(buffer);
- }
- else
- {
- Serial.println("no connection available!");
- }
- client.stop();
- }
- /*-------------------------------------------------------*/
- /*Setup method*/
- /*-------------------------------------------------------*/
- void setup()
- {
- Serial.begin(9600);
- if (Ethernet.begin(mac) == 0)
- {
- Serial.println("ethernet shield failed");
- for (;;);
- }
- // Ethernet shield initialization:
- delay(1000);
- }
- /*-------------------------------------------------------*/
- /*Loop method*/
- /*-------------------------------------------------------*/
- void loop()
- {
- /*Read value from sensor input*/
- int chk = DHT.read(DHT11_PIN);
- /*Call method writ_sensorvalue and pass sensor parameter for to save on mobile service*/
- write_sensorvalue((DHT.temperature), (DHT.humidity));
- /*Time wait for new input data*/
- delay(10000);
- }
- #include <dht11.h>
- const char* server = "sensorfarm.azure-mobile.net";
- const char* table_name = "tabsensor";
- const char* ams_key = " you can find it on mobile service with manage keys button ";
We're going to declare yet another three variables as in the following:
- char buffer[64];
- dht11 DHT;
- #define DHT11_PIN 4
Where the first will be the data buffer in the upload, the second represents the file where DHT11, by the methods and other variables, we will be able to read the values of temperature and humidity by the sensor. What the last variable does is set the pin 4 of Arduino Two as input to the sensor, so we need to necessarily connect the pin "Signal" sensor DHT11 on pin 4 of the board. The method write_sensorvalue, is the most interesting, since it uploads data to Azure, we see the most significant pieces of code.
- /*Table name in Mobile service*/
- sprintf(buffer, "POST /tables/%s HTTP/1.1", table_name);
- client.println(buffer);
- /*Sever name in Mobile Service*/
- sprintf(buffer, "Host: %s", server);
- client.println(buffer);
- /*Mobile Services application key*/
- sprintf(buffer, "X-ZUMO-APPLICATION: %s", ams_key);
- client.println(buffer);
We perform an HTTP request and a call POST where we must indicate the name of the table previously, the name of the Server and code key, this to allow the correct upload of all the data.
With the preceding code, we specify in what format we are sending data and then type JSON and in the last piece of code, we specify the pattern, or what will meet in the table tabsensor when we're going to see if the data has been loaded properly. The Setup method we have already seen in the previous article and more interesting and the Loop method.
- // JSON content type for the information
- client.println("Content-Type: application/json");
- /*Write values of temperature and humidity from DHT11 sensor*/
- sprintf(buffer, "{\"tempvalue\":\"%f\",\"humidityvalue\":\"%f\"}", tempvalue, humidityvalue);
- void loop()
- {
- /*Read value from sensor input*/
- int chk = DHT.read(DHT11_PIN);
- /*Call method writ_sensorvalue and pass sensor parameter for to save on mobile service*/
- write_sensorvalue((DHT.temperature), (DHT.humidity));
- /*Time wait for new input data*/
- delay(10000);
- }
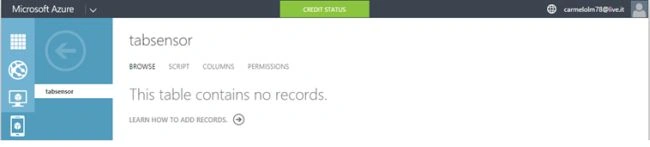
Figure 13: Table Tabsensor
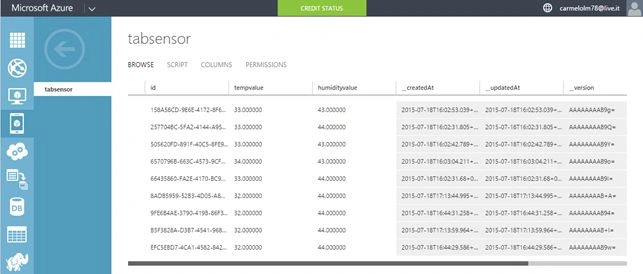
Figure 14: Tab Sensor
Aayush GC BhujelPosted Apr 17, 2016, 9:51 AM
Great article. We are doing a small project and we want to update the record rather than create new record every time. Is that possible? If yes, can you show us how! Thank you!
Asfend YarPosted Mar 12, 2016, 11:53 PM
good
Kumaresh RajalingamPosted Feb 12, 2016, 8:29 PM
Nice one sir
Vaikesh K PPosted Aug 22, 2015, 8:58 AM
Great Work Sir :)
Avirup BasuPosted Aug 22, 2015, 8:53 AM
Good article Sir. Was wandering about one stuff though. Here we have used an ethernet shield and made it a standalone. However is it possible to use the Windows 10 IoT core to develop an app that will collect data and upload it to the azure mobile services?
Yazdgerd SasaniPosted Aug 18, 2015, 12:53 AM
Thanks :)
Santhakumar MunuswamyPosted Jul 23, 2015, 3:14 PM
Thanks for nice article:)
Afzaal Ahmad ZeeshanPosted Jul 21, 2015, 2:12 AM
A good guide for beginners.
Gopi ChandPosted Jul 20, 2015, 1:02 PM
Great content
Sibeesh VenuPosted Jul 20, 2015, 9:08 AM
Good one :)
Chervine BhiwooPosted Jul 20, 2015, 7:15 AM
Great Article!
Gowtham RajamanickamPosted Jul 20, 2015, 6:53 AM
its amazing
Avirup BasuPosted Jul 20, 2015, 3:48 AM
Awesome Sir.