

Introduction
This is the second article in the series and here, we are going to set up a Microsoft Azure DevOps build pipeline to automate the tasks. We did that manually in the first article of the series. Each time we push a change to the master branch, the build will be triggered to build our application, then build a Docker image, and push it to the Docker Hub.
If you have been following along, you must have -
- a GitHub repository
- a working web application in ASP .Net Core (or something similar)
- a Docker Image for the application
- a running container to host your application locally
There are tree parts in this series,
- Develop an ASP .Net Core web application and containerize it with Docker
- Setup Continuous Integration with Microsoft Azure DevOps Pipeline and GitHub - This one
- Setup a Continuous Deployment pipeline to deploy the application as a Docker container on Azure Web App Service
Docker Registry
First, you need to set up an account at Docker Hub. After that, create a repository where you can keep Docker images for your application.
You already have a Docker image built in the previous steps, that works well. So now, you can tag that image with the repository name. However, the Docker client running on your local machine needs to connect with the Docker Hub account, before you can push the image.
The following commands tag the local image for Docker Hub repository, authorize the Docker client and finally push the image to Docker Hub.
- $ docker tag <image-name> <namespace>/<repository>:<tag>
- // example
- $ docker tag webapp quickdevnotes/webapp:v1
- // login to your Docker Hub account
- $ docker login
- username: quickdevnotes
- password:
- // push the to Docker Hub
- $ docker push quickdevnotes/webapp:v1
Note that I'm using a public repository at Docker Hub. If you are using a private repository, then you will have to first login using the docker login command and then push the image. Otherwise, the push will fail with authorization error.
Azure DevOps - Project
Now comes the interesting part. To start using the Azure DevOps pipelines, you first need to have a user account. If you already have an account, great, you are good to start or you can register here.
Once you are in, it asks you to create an organization and where you want to host your project. Name it anything you like and select a region suitable to your need:
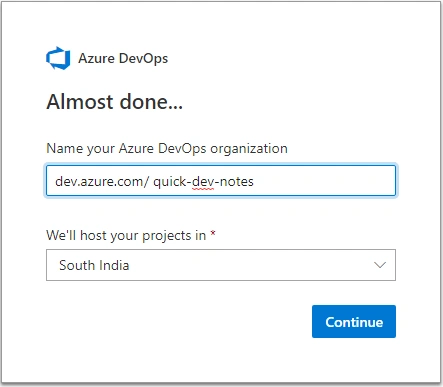
Next, we have to create a project under the organization. Select +Create Project from the top right, and provide the required details.
From the "Advanced" section we don't need anything for this series. So, I leave the choice up to you.
Continuous Integration (Build Pipeline)
It's finally time to automate the manual steps. From Pipelines > Builds select New Pipeline.
Where is your code?
The first thing Azure pipeline needs is to connect with your application code repository. So, on the Connect tab, select GitHub a connection to your GitHub.
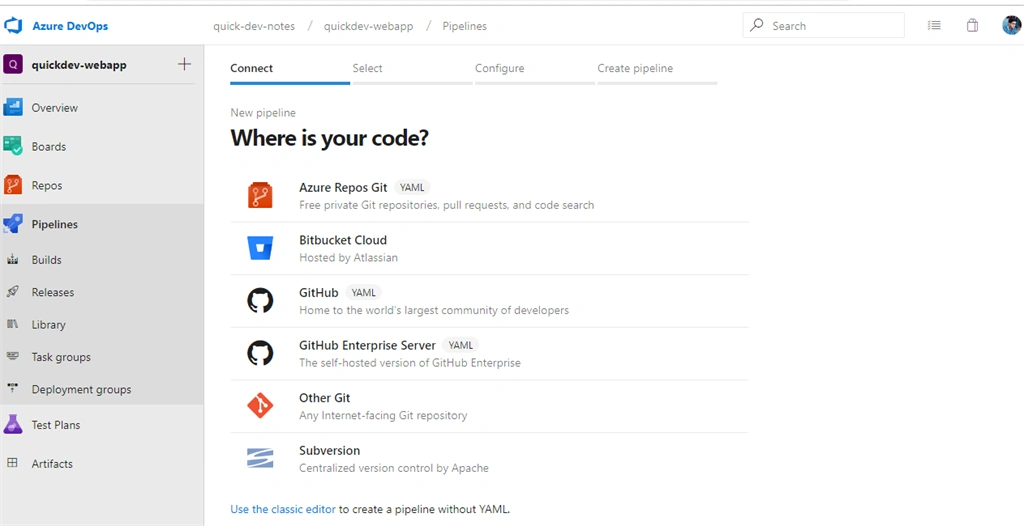
After that, you will be prompted with OAuth authentication to authorize Azure Pipelines for accessing the GitHub repository. Grant the authorization and provide credentials as required.
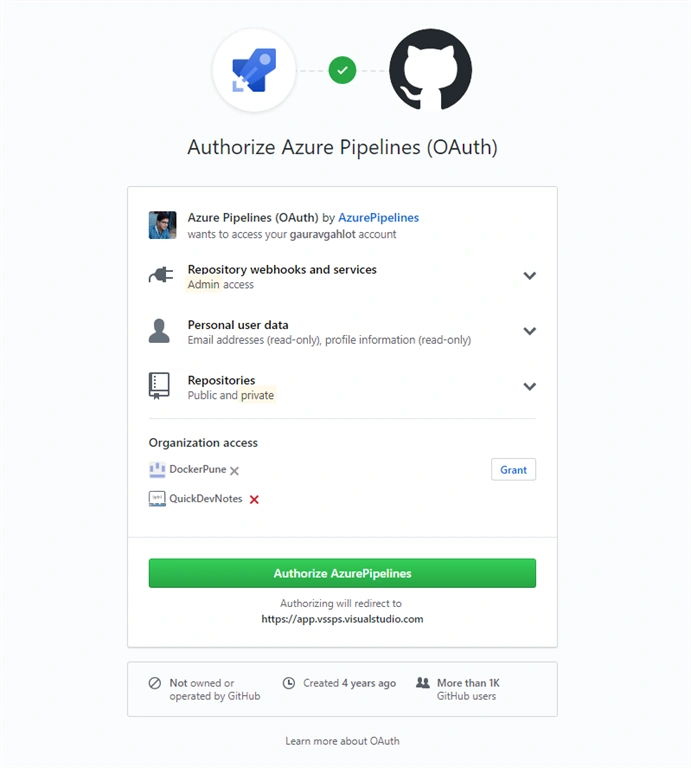
Select a repository
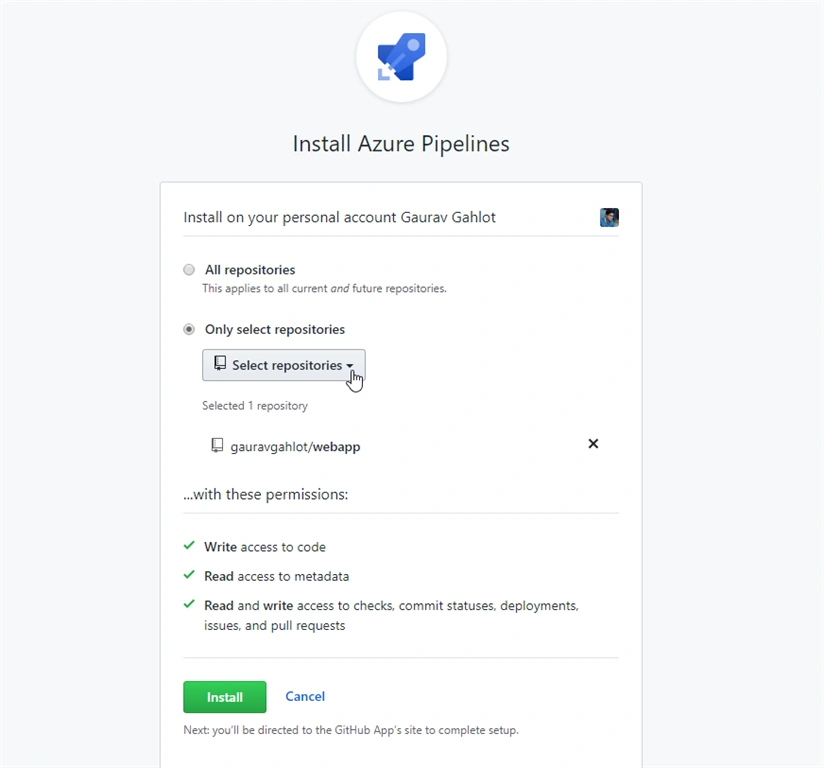
Once the authorization completes, you can see a list of repositories from the GitHub account. From the list of repositories select your application repository, which then prompts you to Install Azure Pipelines. Use the "only select repositories" option and from the drop-down select your application repository.
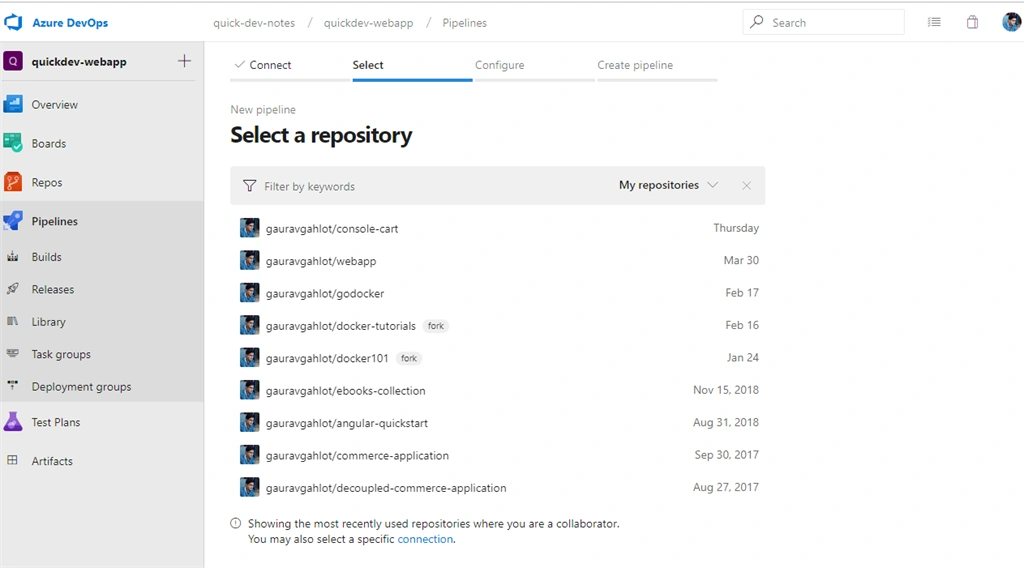
If you want to install Azure Pipelines for all current and future repositories select "All repositories" and click install.
azure-pipelines.yaml
The Azure pipeline is smart enough to analyze your application repository and provide a basic azure-pipelines.yml file. This YAML file lies at the root of your GitHub repository and is used by the Azure build pipeline to perform certain tasks like building the application, executing tests, building Docker Image and many more.
Here is the azure-pipelines.yml file for my build pipeline. I know, it can be overwhelming; but everything will be clear after we talk about each task in detail.
- trigger:
- - master
- pool:
- vmImage: 'Ubuntu-16.04'
- variables:
- imageName: 'quickdevnotes/webapp:$(build.buildNumber)'
- steps:
- - script: dotnet test WebApp.Tests/WebApp.Tests.csproj --logger trx
- displayName: Run unit tests
- - task: PublishTestResults@2
- condition: succeededOrFailed()
- inputs:
- testRunner: VSTest
- testResultsFiles: '**/*.trx'
- - task: Docker@1
- displayName: Build an image
- inputs:
- command: Build an image
- containerregistrytype: Container Registry
- dockerRegistryEndpoint: DockerHub
- dockerFile: Dockerfile
- imageName: $(imageName)
- imageNamesPath:
- restartPolicy: always
- - task: Docker@1
- displayName: Push an image
- inputs:
- command: Push an image
- containerregistrytype: Container Registry
- dockerRegistryEndpoint: DockerHub
- dockerFile: Dockerfile
- imageName: $(imageName)
- imageNamesPath:
- restartPolicy: always
Note that the file generated for your build pipeline will be different from what you see here. This is because I have updated the file with the tasks required to achieve our end goal.
CI Tasks - a close look
Let's take a closer look at the tasks defined in the above build file. We will stay at a high level though, just to keep things simple for this series.
- trigger:
- - master
The trigger specifies, pushes to which branch will trigger the continuous integration pipeline to run. In my case, it's the master branch.
If you want to use a different branch just change the name of the branch. If we do not specify any branch, pushes to any branch will trigger a build.
- pool:
- vmImage: 'Ubuntu-16.04'
The above lines tell which agent pool to use for a job/task of the pipeline.
- variables:
- imageName: 'quickdevnotes/webapp:$(build.buildNumber)'
We use the variables section to declare any variables we want to use in our pipeline. For instance, here I'm creating a variable imageName which will be set to name of the Docker image that I want to create. The Continuous Integration best practices recommend using $(build.buildNumber) to tag your Docker images. Because it makes it easy to update or rollback any changes.
- - script: dotnet test WebApp.Tests/WebApp.Tests.csproj --logger trx
- displayName: Run unit tests
- - task: PublishTestResults@2
- condition: succeededOrFailed()
- inputs:
- testRunner: VSTest
- testResultsFiles: '**/*.trx'
I have also added some basic unit tests to my application. With the above script, these tests will execute each time the build is run. We can also get test reports out of these test runs.
- - task: Docker@1
- displayName: Build an image
- inputs:
- command: Build an image
- containerregistrytype: Container Registry
- dockerRegistryEndpoint: DockerHub
- dockerFile: Dockerfile
- imageName: $(imageName)
- imageNamesPath:
- restartPolicy: always
- - task: Docker@1
- displayName: Push an image
- inputs:
- command: Push an image
- containerregistrytype: Container Registry
- dockerRegistryEndpoint: DockerHub
- dockerFile: Dockerfile
- imageName: $(imageName)
- imageNamesPath:
- restartPolicy: always
The first in the above two tasks build a Docker image using the Dockerfile available at the root of the repository. After building the image, the second task pushes that image to our repository on Docker Hub. After building the image, the second task pushes that image to our repository on Docker Hub. To read more about the different tasks and available options, please refer to the docs.
To push an image to your Docker Hub repository, the Docker client running on the build agent needs to authorize first, similar to what you did while pushing the image manually.
- - task: Docker@1
- ...
- dockerRegistryEndpoint: DockerHub
- ...
The dockerRegistryEndpoint is set to a docker registry service connection that holds the credentials for the Docker Hub account and is used for authorization. Let's set up that next.
Docker Registry Service Connection
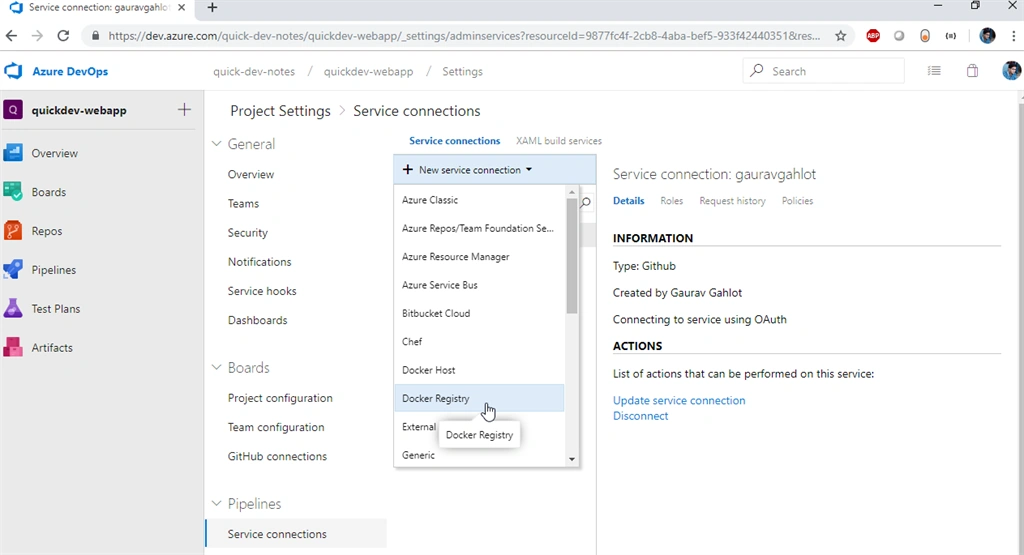
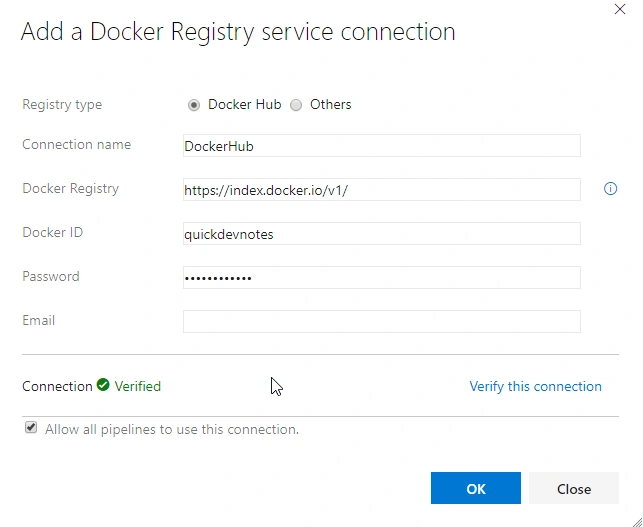
On the next dialog window, select Docker Hub as the Registry Type and set DockerHub (must be the same as dockerRegistryEndpoint in build task) as the Connection Name. Then, provide the Docker ID and Password of your Docker Hub account. Email is optional. Please ensure "Allow all pipelines to use this connection" is checked.
Testing the Build Pipeline
I believe, by now you have enough information to customize your continuous integration pipeline. Alright then, it's time to test if it does what we expect. Go to Pipelines > Builds and select Queue to queue a build. If you don't get any errors, you must see a build in progress. Here is the output from my build pipeline, after a successful build:
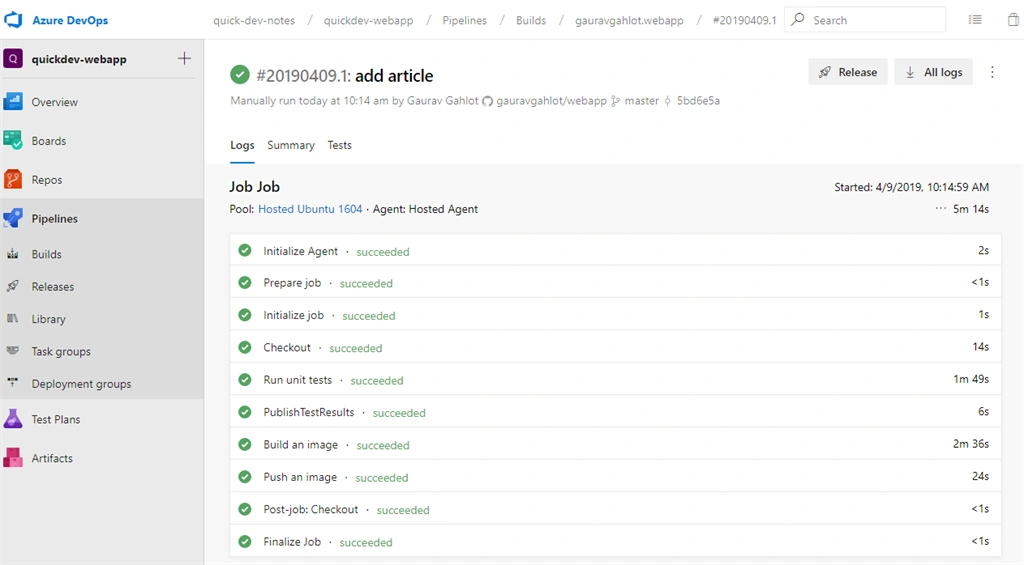
The final task in the pipeline has successfully pushed the newly built Docker image to Docker Hub. Notice the image tag, which is equal to the build number in the above image:
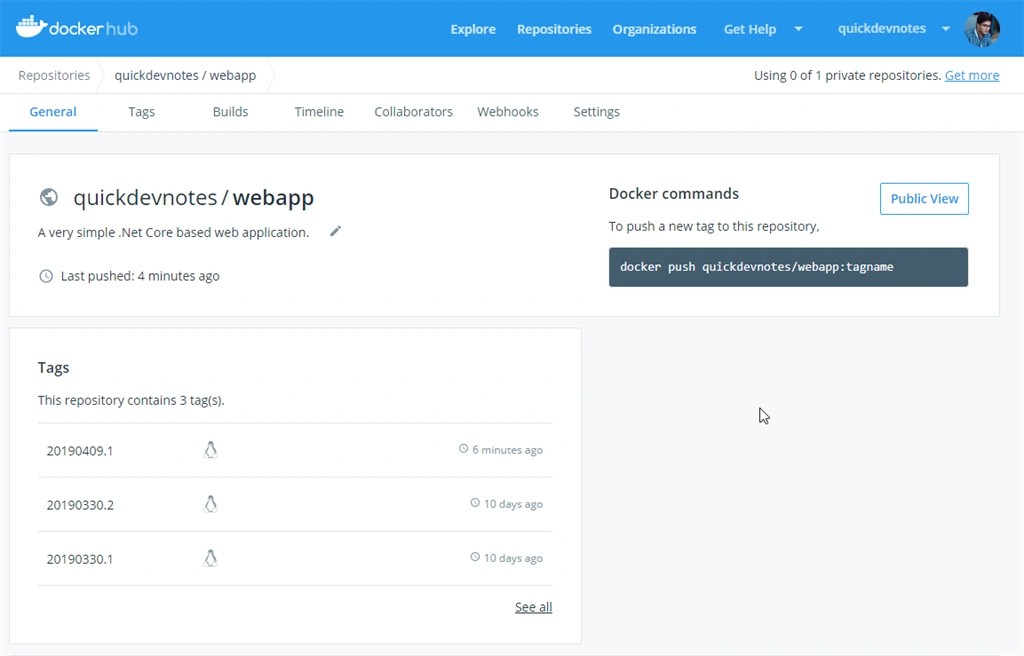
To make a final test, change something in the application code and push it to the master branch. This will trigger the build and you will see the commit message as build title:
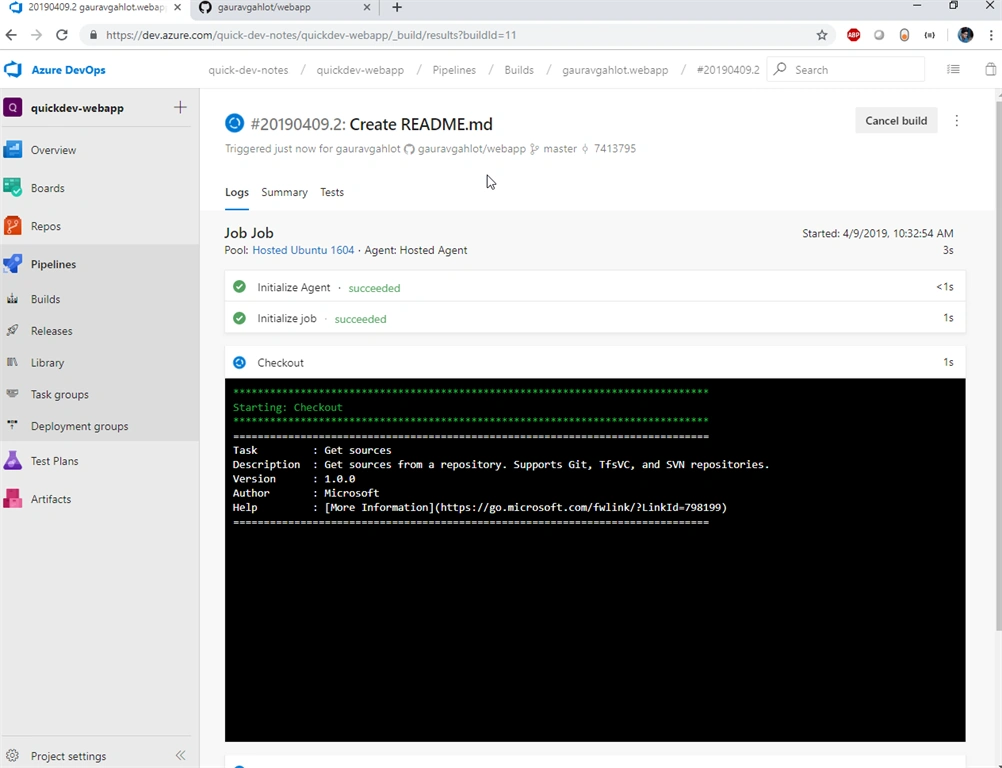
Notice how the build description tells you about the build trigger, and this proves it is not a manual trigger.
Congratulations!!
Conclusion
In this article, we have successfully set up a working continuous integration build pipeline with Microsoft Azure DevOps. Starting from building a .Net Core web application, to setting up a CI pipeline, we are halfway through. Next, we will set up a release pipeline to deploy our application as a Docker container on Azure Web App Service. It's going to be fun.
Join the conversation! Your thoughts help the community grow.