

Before proceeding further, I recommend you read my first article: Getting Started with Microsoft Bot Framework.
Once you are done with creating the project as you can see there is an API Controller in Controllers folder named “MessageController”.
- [BotAuthentication]
- public class MessagesController: ApiController
- {
- /// <summary>
- /// POST: api/Messages
- /// Receive a message from a user and reply to it
- /// </summary>
- public async Task < Message > Post([FromBody] Message message)
- {
- if (message.Type == "Message")
- {
- // calculate something for us to return
- int length = (message.Text ? ? string.Empty).Length;
- // return our reply to the user
- return message.CreateReplyMessage($ "You sent {length} characters");
- }
- else
- {
- return HandleSystemMessage(message);
- }
- }
- }
I am changing text a little bit and my message will look like this.
- /// <summary>
- /// POST: api/Messages
- /// Receive a message from a user and reply to it
- /// </summary>
- public async Task < Message > Post([FromBody] Message message)
- {
- if (message.Type == "Message")
- {
- // return our reply to the user
- return message.CreateReplyMessage($ "Raj said:{message.Text}");
- }
- else
- {
- return HandleSystemMessage(message);
- }
- }
Run your application,
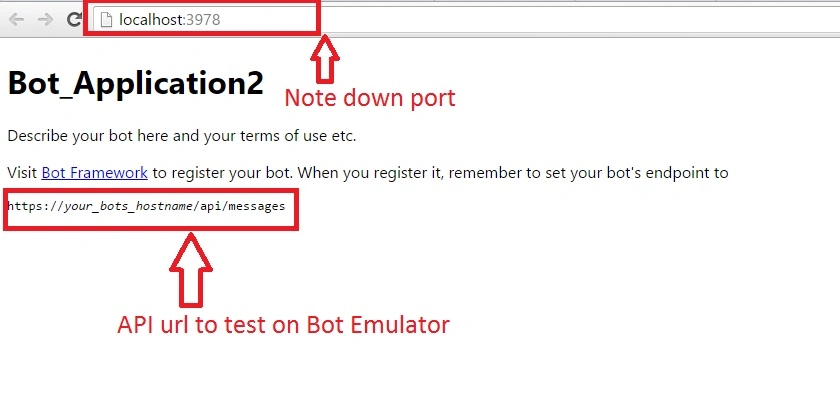
If you want to run on emulator to test your calls, Install emulator form here.
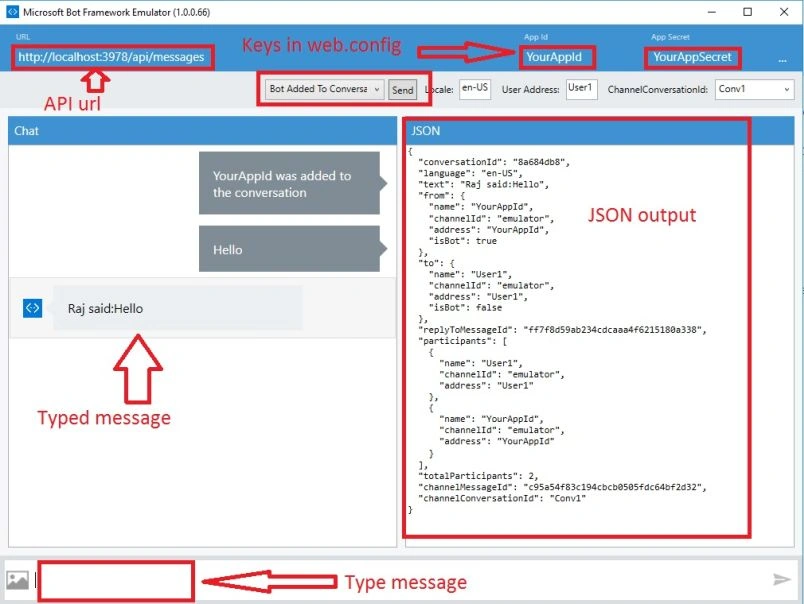
Pass three things when you run Bot Emulator.
- URL - You have to mention your application url with port before api/messages.
- AppId - Defined in web.config
- AppSecret - Defined in web.config
Conclusion
In this article, we have learned how to create a bot using Microsoft Bot Framework. In next article we will see how to publish your Bot Application to Microsoft Azure. If you have any question or comments, message me on C# Corner comments section.
Next article: How to publish your bot to Microsoft Azure
Bhavik PatelPosted Jul 16, 2016, 10:44 PM
Good one
kalu singh raoPosted Jul 6, 2016, 2:10 AM
Nice...
Prasanna MuraliPosted Jun 24, 2016, 1:18 AM
Nice one..
Raveendra Reddy ChitapanaPosted Jun 10, 2016, 6:25 AM
Good Article
Thiruppathi RPosted Jun 10, 2016, 3:05 AM
Nice.
RajaPosted Jun 10, 2016, 12:35 AM
Nice Share...
Debasis SahaPosted Jun 10, 2016, 12:17 AM
Good one..
Sanjay SabariyaPosted Jun 8, 2016, 11:49 PM
nice one..
Santhakumar MunuswamyPosted Jun 8, 2016, 11:38 PM
Thanks for sharing
Mahesh ChandPosted Jun 8, 2016, 10:50 PM
Nice to see some Bot applications. This will be the next big thing.
jaymin sutharPosted Jun 8, 2016, 10:27 PM
Give us source code
jaymin sutharPosted Jun 8, 2016, 10:27 PM
Provide source code
Bhavik PatelPosted Jun 8, 2016, 10:22 PM
nice explained.
Sonu ChaudharyPosted Jun 8, 2016, 2:52 PM
good one ..