Background
In my previous article
Creating WCF Service we learned how to create a simple WCF Service application. This article explains how to consume the WCF Service application in an ASP.Net web Application.
And remember, I have written this article only focusing on beginners. So let us start step-by-step so beginners can understand it very easily.
Requirement
You need to keep a WCF service application in running mode so it can be accessible for use, so go to my article
Creating WCF Service and create a WCF service and keep it in running mode I hope you have done that.
What does consuming mean?
Many beginners are confused about what means consuming means, but its very simple, it means to use the WCF Services in an application.
Example:
I have created WCF Services and now I want to use it in a real requirement so I used it in an ASP.Net Web Application. In other words, I am consuming the WCF Service in an ASP.Net web application. Similarly, you can use the same WCF Service in Windows, console application, Java and other applications.
I hope you understand the word "consuming".
So let us create the simple ASP.Net Web Application as:
- "Start" - "All Programs" - "Microsoft Visual Studio 2010".
- "File" - "New" - "Web..." then in the New WebSite "C#" - "Empty webSite" (to avoid adding a master page).
- Give the project a name, such as "ConsumingWCFservice" or another as you wish and specify the location.
- Then right-click on Solution Explorer and select "Add New Item" - "Default.aspx" page.
- Then drag three Text Boxes, one Button, and one Label onto the "Default.aspx" page.
Then the <body> section of the Default.aspx page looks as in the following:
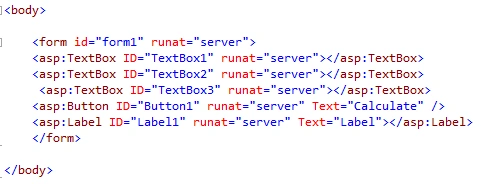
In the preceding source code, you have seen that I have taken three text boxes to get input from users because we know that our WCF Service method created as in my article Creating WCF Service takes the three input values day, month and year so I have taken the three text boxes and button click event. We will call the WCF Service method and the output will be displayed on the label control so I have also taken one button and label control.
I hope you understand it.
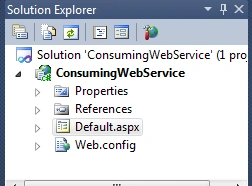
Now your Solution Explorer of ASP.Net Web Application will be as in the following:
Adding a WCF Service Reference in the ASP.Net Web Application
The most important task when consuming a WCF Service in an ASP.Net Web Application is adding the WCF Service reference into the ASP.Net web application. So how to add it? Let us see the procedure.
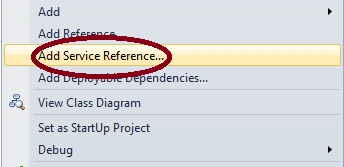
1. Right-click on the ASP.Net Web Application and click on "Add Service Reference" as in the following:
2. Then after clicking on the above option, the following window will appear, Now this is a very important step, when adding the WCF service reference to the ASP.Net web Application. Since you see "URL" option in the following window, on that window we need to paste or type the WCF Service URL address.
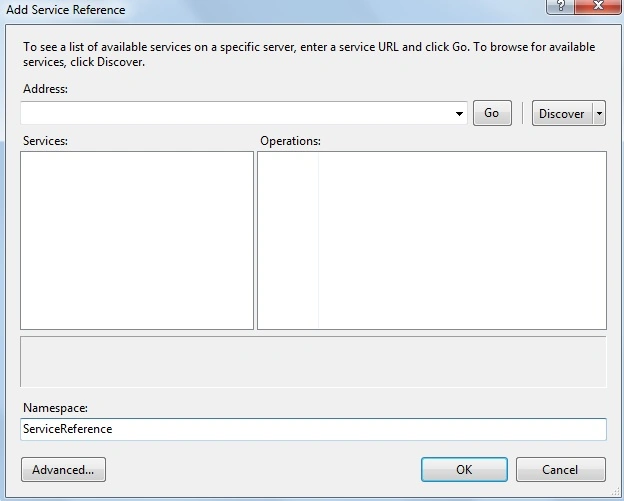
So how to add the URL Reference in the preceding URL box, let us see the procedure again.
- Run the WCF Service we created in my article Creating WCF Service by clicking on F5 or whatever other option you are familiar with, it will then show the following WFC Client window and copy the address as
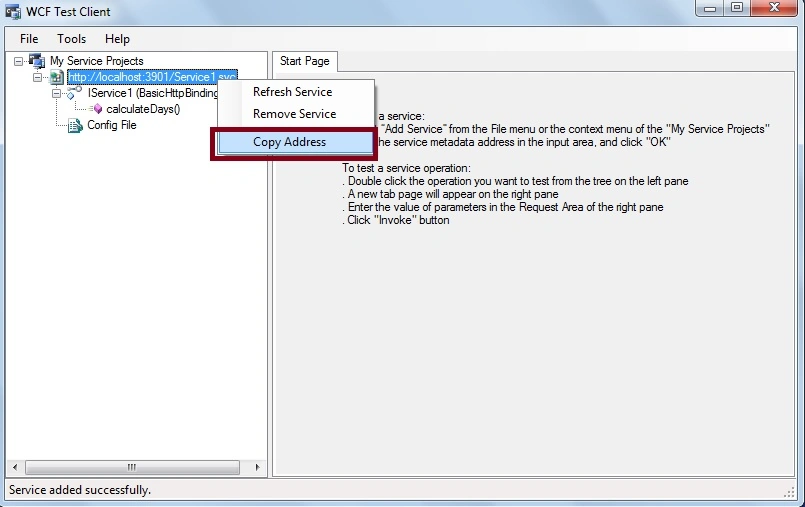
Now just you need to copy the preceding URL that I have circled in red and paste it into the window URL option, as shown in the following and click on discover button, it will show following output as
After pasting the URL in the preceding window box, click on the green right headed arrow button, it will discover the WCF Services available related to that URL address and you see that in that related URL one WCF Service is found message is displayed along with the WCF Service name, "WCF Services" in the preceding right hand side window.
- WCF Service Reference Name
In the right hand corner of the window you have seen the option for the Web reference name; the web reference name is anything you wish and this name will be added in your ASP.Net Web Application as allies name for Web Service. In my article, I have given the web reference name as "ServiceReference".
Then after adding the WCF Service reference in the ASP.Net web application the Solution Explorer will look as in the following:
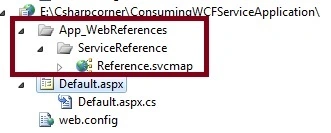
In the preceding window, you have clearly seen that the WCF Service reference named "ServiceReference" is added into the ASP.Net web Application. I hope you understand how to add the WCF Service reference into the ASP.Net web application.
Now after adding the WCF service Reference the following endpoints are by default added into web.config file as
Calling the WCF Service method from the ASP.Net Web Application
We have added the WCF Service reference into our web application. Now next is how to call the WCF Service method that we created in our WCF Service Application from the ASP.Net Web Application.
The following is the procedure:
1. Go to the Default.aspx page of our ASP.Net Web application and double-click on the button that we have placed on the Default.aspx page.
2. Now write the following code in the button click to create the object of the WCF Service class as:
ServiceReference.Service1Client age = new ServiceReference.Service1Client();
In the code above, I have created the object named "age" of WCF Service client followed by the Web reference name ("ServiveReference") and WCF Service client , I hope you understand how to create the object of the WCF Service client.
The entire code of the Default.aspx.cs page will be as follows:
- using System;
-
- public partial class _Default : System.Web.UI.Page
- {
- protected void Page_Load(object sender, EventArgs e)
- {
-
- }
- protected void Button1_Click(object sender, EventArgs e)
- {
- int day, Month, Year,TotalDays;
-
-
- ServiceReference.Service1Client age = new ServiceReference.Service1Client();
-
-
- day = int.Parse(TextBox1.Text);
- Month = int.Parse(TextBox2.Text);
- Year = int.Parse(TextBox3.Text);
-
-
- TotalDays = age.calculateDays(day, Month, Year);
-
-
- Label1.Text = "You are Currently " + Convert.ToString(TotalDays)+" days old";
- }
- }
Code Explanation
In the code above, I first created the object of the Web Service class named "age" followed by WCF service reference name ("ServiceReference") and WCF Service Client("service1client").
Then I declared the three integer variables "day", "Month" and "Year" to store the values provided by the user as input from Textbox1, Textbox2 and Textbox3.
Now, in the next step, as you know our WCF Service method takes three parameters, so I ed the three input parameters "day", "Month" and "Year" to the WCF Service method "calculateDays".Then I declared another integer variable, "TotalDays", to store the values returned by the WCF Service method "calculateDays".And finally I displayed the values returned by the Web Service method "calculateDays" on the label control using variable "TotalDays" because, as you know, we have stored the returned values of the method into the variable TotalDays, so the final result will be stored in the variable TotalDays.
Now, run the ASP.Net web application and provide the input of day, Month and Year. I will enter my Date of Birth and then I will click on the "Calculate" button, it will show the output as in the following:

In the preceding screen, you see that currently, I am 9143 days old, which means that for the last 9143 days, I have been on this earth.
Note:
- For detailed code please download the zip file attached above.
- Also refer to my previous article about Creating WCF Service.
Summary
I hope that beginners, as well as students, understand the creation and consumption of WCF Service Application in ASP.Net web applications using my two articles. If you have any suggestion regarding this articles then please contact me.




Chulan KumaraPosted May 17, 2019, 1:55 AM
Fantastic simple tutorial that anyone can understand. I was stuck at consuming the created wcf service and was trying to host on iis, run as windows service etc. This really saved a lot of my precious time and aided in my task I was assigned.