Introduction
In this article, we will understand what Model, View, and Controller (MVC) is and create a simple application using it.
Model View Controller
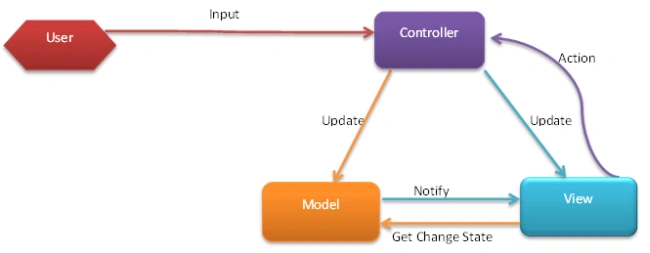
MVC is a software architecture, which separates the logic from the user interface. This is done by separating the application into three parts Model, View, and Controller. MVC is the separation of concern. MVC is also a design pattern.
Model
Represents the logical behavior of data in the application. It represents applications business logic. The model notifies the view and controller whenever there is change in state.
View
Provides the user interface of the application. A view is the one that transforms the state of the model into readable HTML.
Controller
Accepts inputs from the user and instructs the view and model to perform the action accordingly.
Advantages of MVC
- Full control over HTML rendered. No renaming of HTML IDs
- Provides a clean separation of concerns (SoC).
- No ViewState (Stateless).
- Enables Test Driven Development (TDD).
- Easy integration with JavaScript frameworks.
- RESTful URLs that enable SEO. Representational state transfer URLs example User/Comment/1, which is user-friendly, with no URL rewriting required.
- Integration on the client side becomes easy like using JavaScript, jQuery, Ajax, and JSON….
- Supports multiple view engines (aspx, Razor)
Creating a simple application
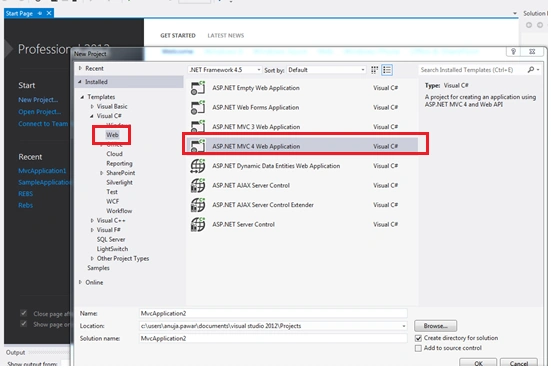
Step 1. From the file menu select Project and select MVC 4.0 application.
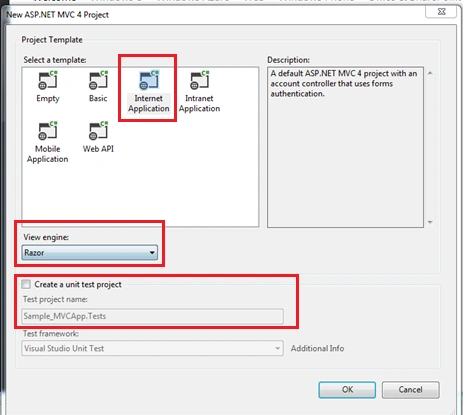
Step 2. Select the template and view engine (Razor, ASPX, NHaml, and Spark). To include a test project check the option "Create unit test project":
A solution with the following structure is added.
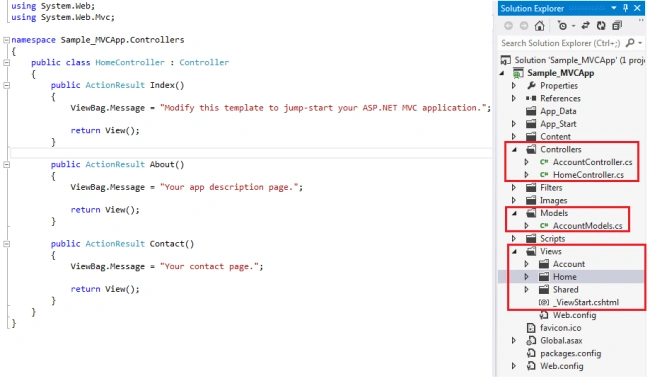
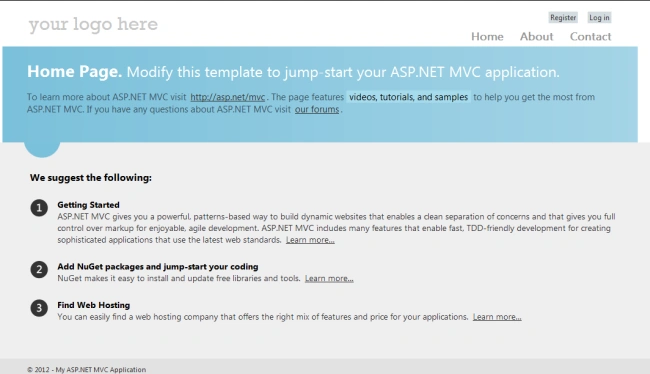
Build and run the application, and you will see the home page of the application. By default, we have the Home, About and Contact sections added.
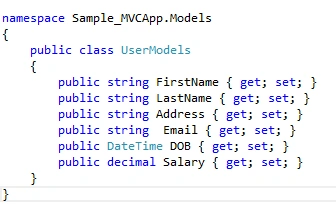
Let's add our own Controller, Model, and View for showing the User's details. Right-click on Model and add a class with the name UserModels.cs with the following structure.
Now let's apply validations on the fields.
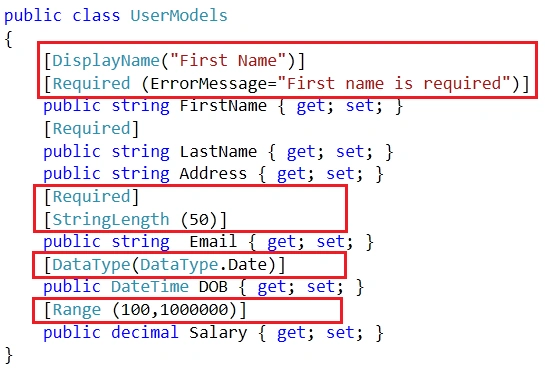
- Required: To make the field value mandatory.
- StringLength: To set the maximum length of the field.
- Range: To set the minimum and maximum value.
- DataType: To set the type supported by the field.
Let's add some default data to our view. For that, we will create a class called user and initialize with some default value.
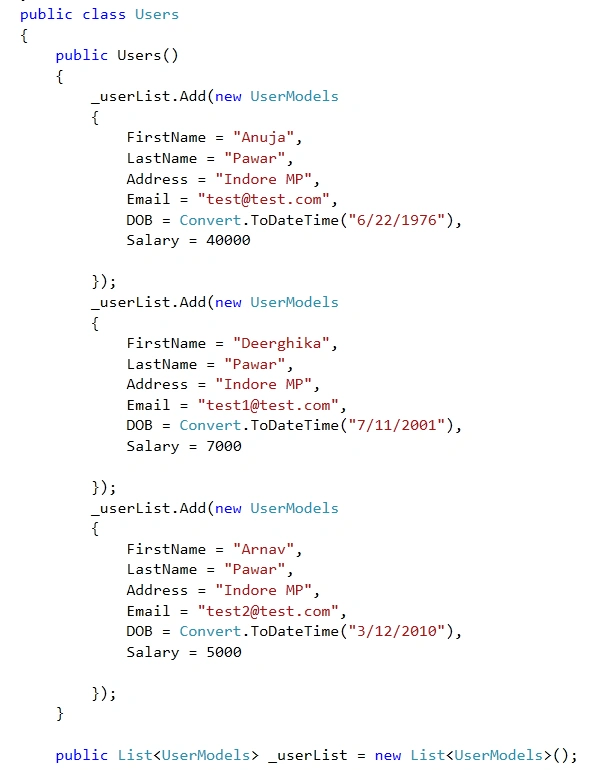
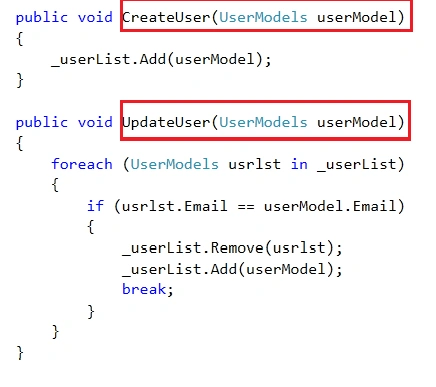
Now let's add methods for adding, updating, and getting the list of all users.
Now let's add a view for our model so we will select a strongly-typed view and select our model class. You will see a list of scaffold templates available. Since we are creating this view to add a new user we will select the Create option.

The moment we click on Add, the following is the cshtml created for the view.

We will see the view has all the fields set in the model along with the validations applied to it.
Now let's add a controller for our view. Right-click on the controller folder and name our controller "User", select Empty MVC controller and Add.
By default, our controller contains an Index method. Right-click on the index method and add a view for this. The Index method can be used to show the list of users available. So we can select the scaffold template type as a list.

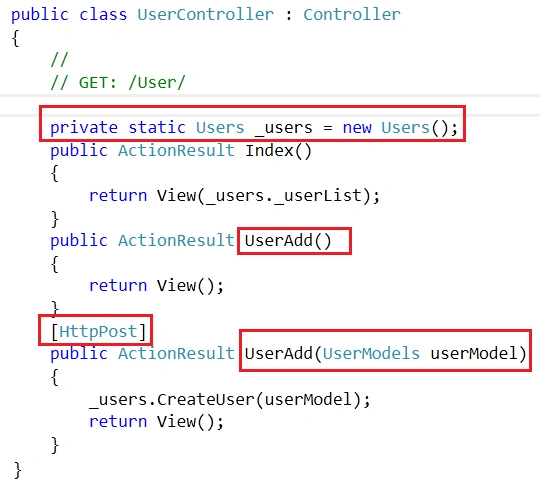
Once the view is added for Index and UserAdd, we have to define its get and post methods in the controller. By default, it always gets, if we want a post method we have to define [httppost] before the method declaration.
HttpGet,will render the form and HttpPost will post the form data. For example, we need to add a new user. First, we need the form to add a user, that is get and when we fill the form with values; we need to post those values so that they can be saved for further access.
Look at our controller structure, it contains two get methods, one to get the list of users (Index) and another to get the UserAdd form, and with the same name it contains its post method.
- ActionResult: An action result represents a command that the framework will perform on behalf of the action method. The ActionResult& class is the base class for action results. Common return Type.
- ContentResult: This can be used to return plain text or user-defined content type.
public ContentResult Test()
{
    return Content("This is my test data");
}
- JsonResult: Used to return JSON, mainly used for Ajax requests.
public JsonResult Test()
{
    return Json("This is my test json data");
}
- PartialViewResul: The PartialViewResult class is inherited from the abstract "ViewResultBase" class and is used to render a partial view.
public PartialViewResult Test()
{
    return PartialView("Result");
}
- ViewResult: It renders a specified view.
public ViewResult Test()
{
    return View("Result");
}
- FileResult: It is used when we want to return the binary content/file as an output.
- RedirectToRouteResult: It is used when we want to redirect to another action method.
- JavaScriptResult: We can use this type if we want our action method to return a script that can be executed on the client side.
Three new types are supported by MVC 3
- HttpNotFound: This returns a 404 error on the client side. It can be useful in situations where the resource is not available and we want to display a 404.
- RedirectResult: It can be a temporary or permanent return code 302 depending upon the boolean flag. Can be used to redirect to the given URL.
- HttpStatusCodeReturn: It can be used when the user wants the choice of error code to be returned from the action method. It can be any code.
Routing with MVC
MVC gives great flexibility for adding user-friendly URLs. Routings are defined under the class RouteConfig. By default, one route is already defined.
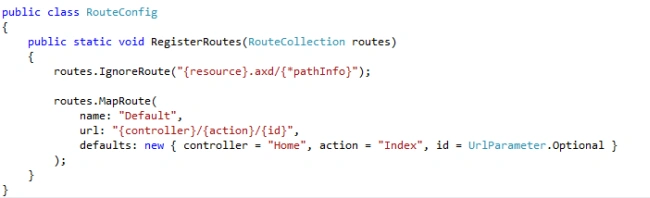
The MVC routing pattern includes "{controller}" and "{action}" placeholders. For more details on routing please refer to this link.
http://msdn.microsoft.com/en-us/library/cc668201.aspx
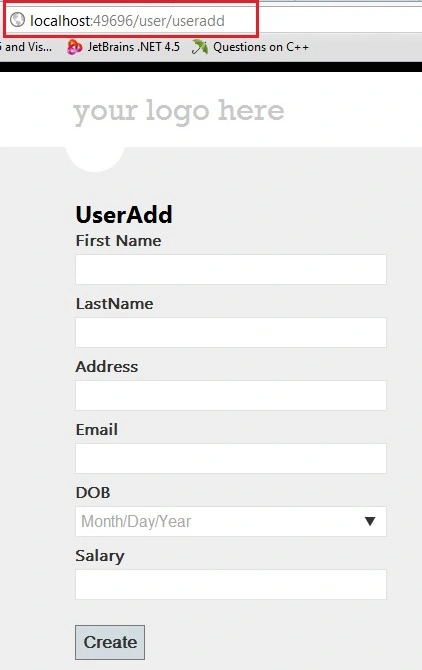
This is how our index page will appear with the URL.

the UserAdd method, here the controller is User and the Action is UserAdd.
Points of Interest
Are you keen on learning MVC 4.0 new features? Let's learn to build a simple application then we can move ahead with advanced features.


Shambhoo KumarPosted Dec 5, 2014, 4:34 AM
Really doing nice work dear, i appreciate your work, keep it up. http://www.solutionforpcthreats.blogspot.in
alpa sarupriaPosted May 20, 2014, 8:48 AM
plz share me your other articles on mvc also
Nandkishor IngavalPosted Jun 12, 2013, 10:12 AM
Nice articals
lalita pophalePosted Apr 30, 2013, 6:58 AM
Excellent article to start asp.net MVC4 with razor Thanks for sharing.
Rohatash KumarPosted Nov 8, 2012, 3:37 AM
Excellent article, To start asp.net mvc application. Thanks
Dorababu MekaPosted Nov 8, 2012, 12:27 AM
Crystal clear explanation, expecting more MVC articles from you Anuja Pawar
David BallackPosted Nov 7, 2012, 10:15 PM
Nice way to create simple application using MVC. Thanks for sharing.
Varesh TuliPosted Nov 7, 2012, 10:09 PM
Nice article, thanks for sharing.