

How to create WCF service with IIS hosting?
In Visual Studio go to "File" -> "New" -> "Project..." then select "C#" -> "WCF" -> "WCF Service Library".
Now set the name of the project as "ProductServiceLibrary" then click "OK".
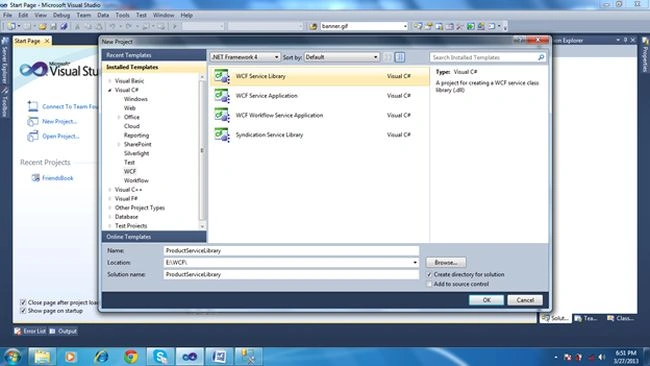
In the next step change the name of the files:
From "IService.cs" to "IProductService.cs"
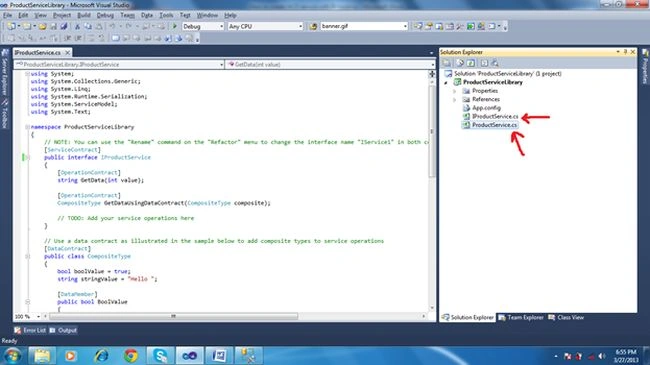
Now in "IProductService.cs" write the following code to implement it with the Service Class i.e. "ProductService.cs":
- using System;
- using System.Collections.Generic;
- using System.Linq;
- using System.Runtime.Serialization;
- using System.ServiceModel;
- using System.Text;
- namespace ProductServiceLibrary
- {
- [ServiceContract]
- public interface IProductService
- {
- [OperationContract]
- List<Product> GetAllProduct();
- [OperationContract]
- Product GetProductByID(string ProductId);
- }
- [DataContract]
- public class Product
- {
- [DataMember]
- public int ProductID
- {
- get;
- set;
- }
- [DataMember]
- public string ProductName
- {
- get;
- set;
- }
- [DataMember]
- public string QuantityPerUnit
- {
- get;
- set;
- }
- [DataMember]
- public decimal UnitPrice
- {
- get;
- set;
- }
- }
- }
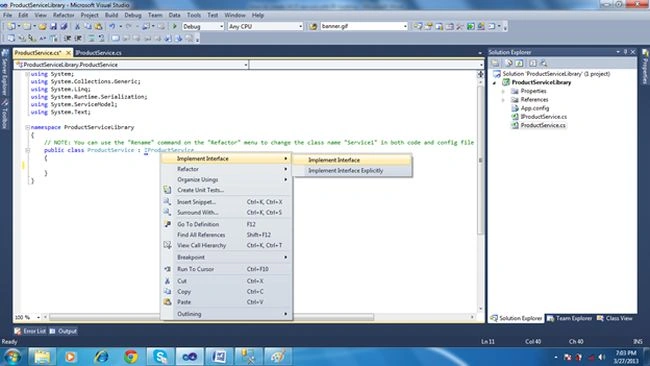
- using System;
- using System.Collections.Generic;
- using System.Linq;
- using System.Runtime.Serialization;
- using System.ServiceModel;
- using System.Text;
- namespace ProductServiceLibrary
- {
- public class ProductService : IProductService
- {
- public List<Product> GetAllProduct()
- {
- throw new NotImplementedException();
- }
- public Product GetProductByID(string ProductId)
- {
- throw new NotImplementedException();
- }
- }
- }
We must write the code to get all the products from the database and one product detail by product ID.
But before this we will set the database connection string in the Project property.
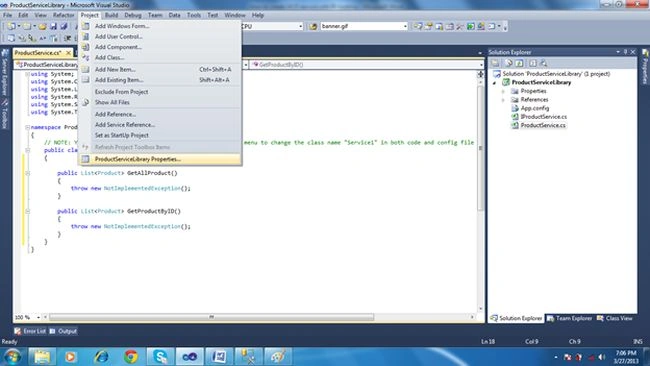
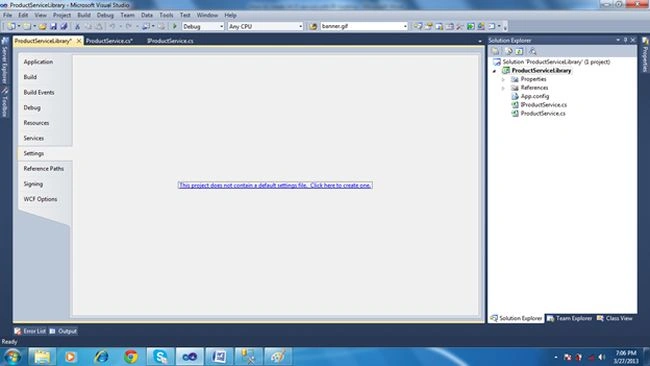
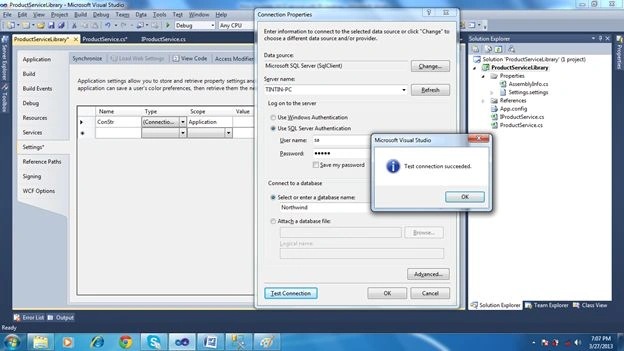
After clicking "Ok" open the "App.config" file and we will see the database connection string.
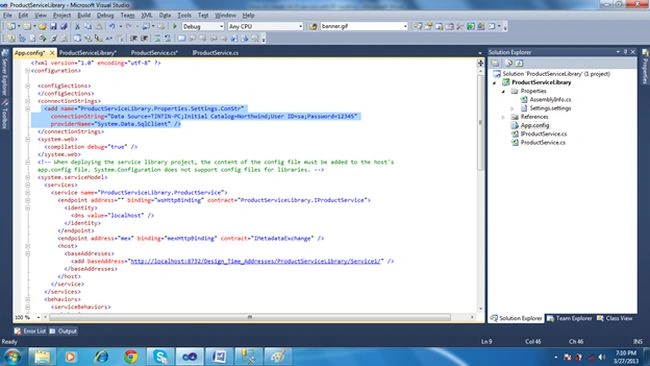
After setting the connection string in the project properties, now we will write code to access the data from the database in the methods we implemented.
So here is the code:
- using System;
- using System.Collections.Generic;
- using System.Linq;
- using System.Runtime.Serialization;
- using System.ServiceModel;
- using System.Text;
- using System.Data.SqlClient;
- namespace ProductServiceLibrary
- {
- public class ProductService : IProductService
- {
- public List<Product> GetAllProduct()
- {
- List<Product> Products = new List<Product>();
- using (SqlConnection con = new SqlConnection(Properties.Settings.Default.ConStr))
- {
- using (SqlCommand cmd = new SqlCommand("Select ProductId,ProductName,QuantityPerUnit,UnitPrice from Products", con))
- {
- con.Open();
- SqlDataReader dr = cmd.ExecuteReader();
- while (dr.Read())
- {
- Product product = new Product();
- product.ProductID = dr.GetInt32(0);
- product.ProductName = dr.GetString(1);
- product.QuantityPerUnit = dr.GetString(2);
- product.UnitPrice = dr.GetDecimal(3);
- Products.Add(product);
- }
- }
- }
- return Products;
- }
- public Product GetProductByID(string ProductId)
- {
- Product product = new Product();
- using (SqlConnection con = new SqlConnection(Properties.Settings.Default.ConStr))
- {
- using (SqlCommand cmd = new SqlCommand("Select ProductId,ProductName,QuantityPerUnit,UnitPrice from Products", con))
- {
- con.Open();
- SqlDataReader dr = cmd.ExecuteReader();
- while (dr.Read())
- {
- product.ProductID = dr.GetInt32(0);
- product.ProductName = dr.GetString(1);
- product.QuantityPerUnit = dr.GetString(2);
- product.UnitPrice = dr.GetDecimal(3);
- }
- }
- }
- return product;
- }
- }
- }
The WCF Test Client will run.
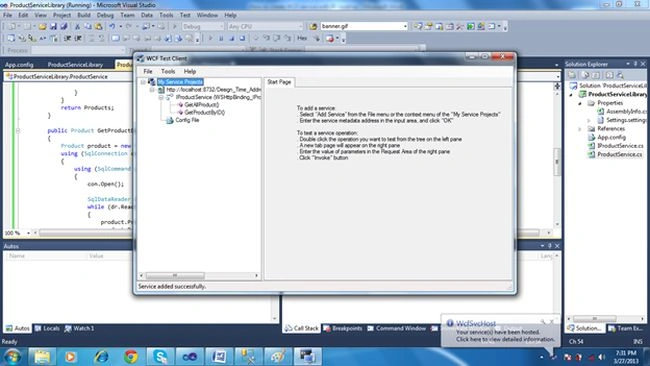
Select the method "GetAllProduct" and click "Invoke".
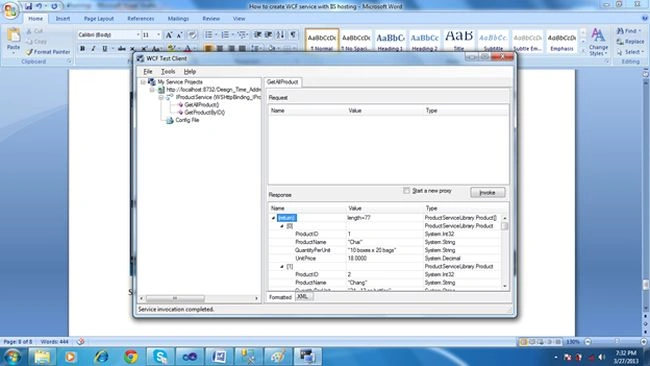
The preceding screen is the indication that the f WCF Service was created successfully.
Now our second step is just to host this WCF Application using IIS.
Click on the solution then right-click then select "Add" -> "New Website".
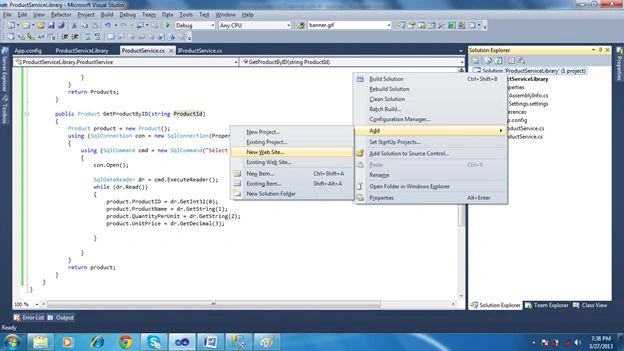
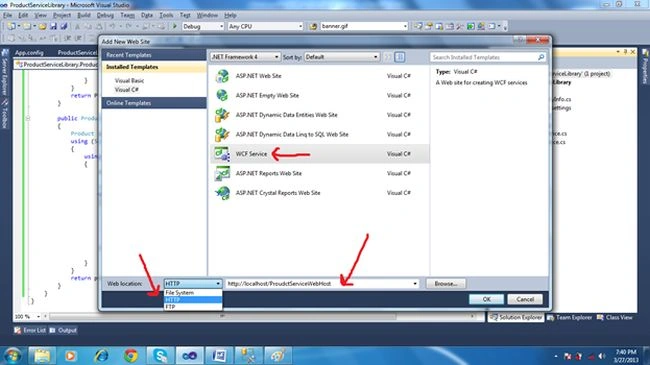
After clicking "OK" the Website application will be added to the solution. Then after it has been added it, two extra files will get generated in the project, i.e. "IService.cs" & "Service.cs". We have, however, already created these file in the WCF Library, so now we will delete them and add the reference to "ProductServiceLibrary.dll".
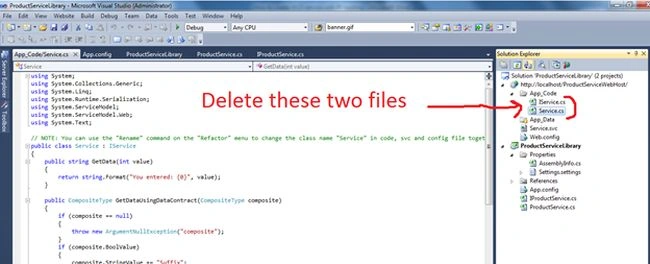
Add the reference to the ProductServiceLibrary.dll in this project.
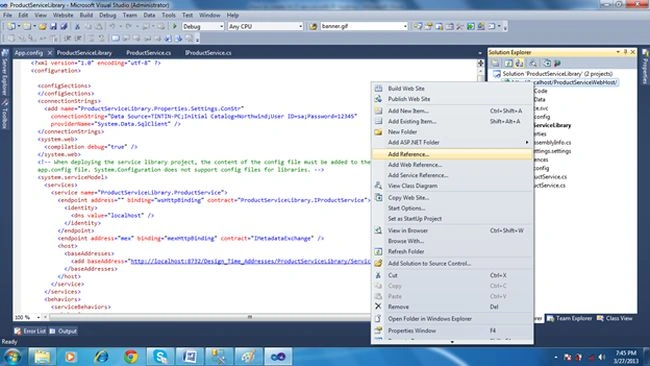
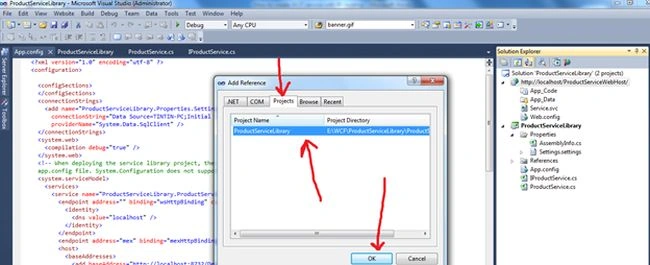
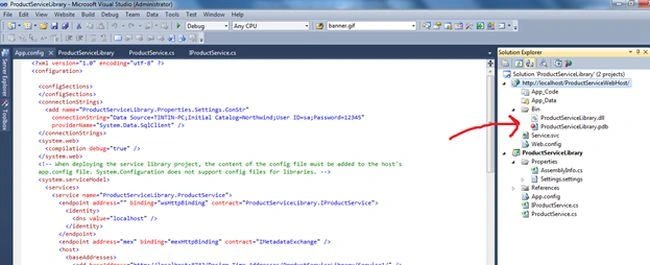
Now open the Service.svc file.
Delete the selected code (in the following image) and the reason is very simple, because in our ProductServiceLibrary.dll we created the ProductService.cs and in the current project we have deleted the Service.cs file from the App_code folder.
And replace the current line with this line of code:
- <%@ ServiceHost Language="C#" Debug="true" Service="ProductServiceLibrary.ProductService" %>
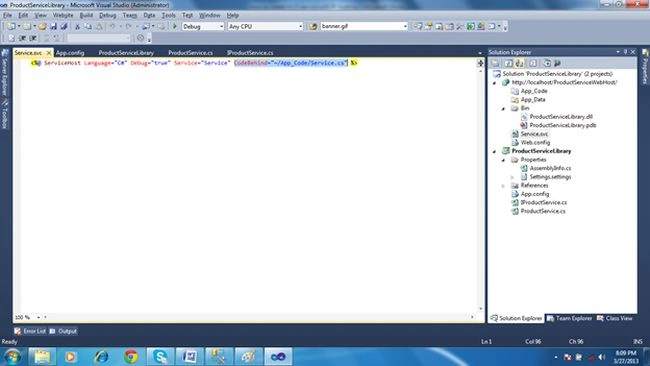
We have altered the .svc file and it is time to add the End Points to Web.Config, as in:
- <?xml version="1.0"?>
- <configuration>
- <system.web>
- <compilation debug="false" targetFramework="4.0" />
- </system.web>
- <system.serviceModel>
- <services>
- <service name="ProductServiceLibrary.ProductService">
- <endpoint address="" binding="wsHttpBinding" contract="ProductServiceLibrary.IProductService">
- <identity>
- <dns value="localhost" />
- </identity>
- </endpoint>
- <endpoint address="mex" binding="mexHttpBinding" contract="IMetadataExchange" />
- </service>
- </services>
- <behaviors>
- <serviceBehaviors>
- <behavior>
- <!-- To avoid disclosing metadata information, set the value below to false and remove the metadata endpoint above before deployment -->
- <serviceMetadata httpGetEnabled="true"/>
- <!-- To receive exception details in faults for debugging purposes, set the value below to true. Set to false before deployment to avoid disclosing exception information -->
- <serviceDebug includeExceptionDetailInFaults="false"/>
- </behavior>
- </serviceBehaviors>
- </behaviors>
- <serviceHostingEnvironment multipleSiteBindingsEnabled="true" />
- </system.serviceModel>
- <system.webServer>
- <modules runAllManagedModulesForAllRequests="true"/>
- </system.webServer>
- </configuration>
For that please use the following steps in the following image:
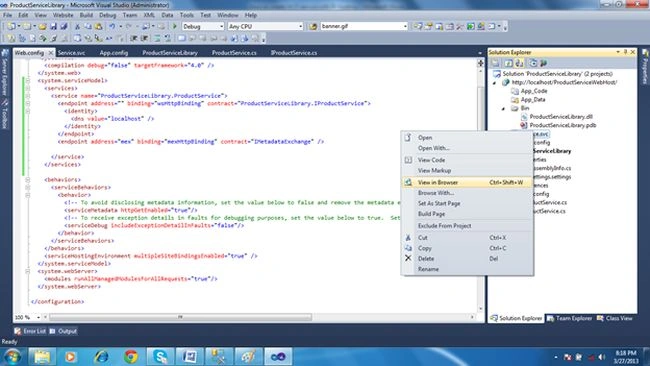
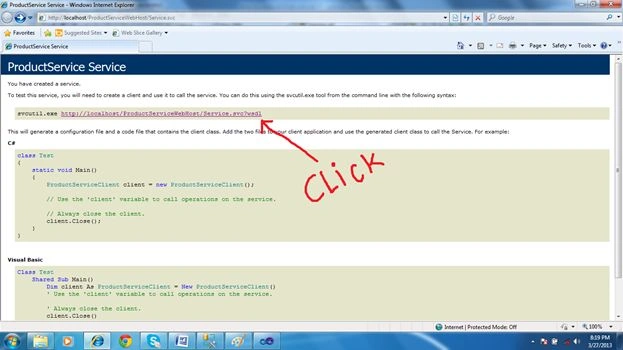
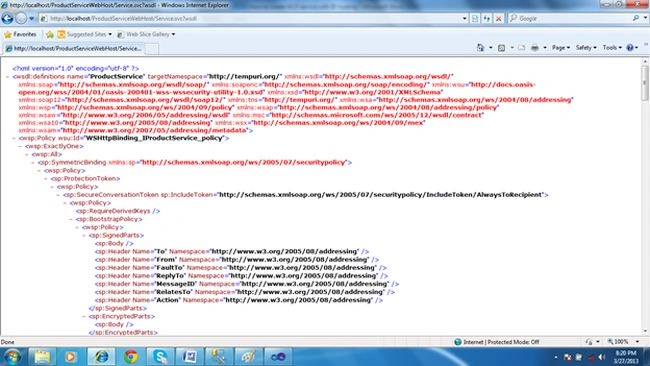
The preceding color full page is the indication of successfully hosting WCF in IIS.
Now our next step is to consume this WCF IIS hosted service in a client application and this is a very easy task.
Consume WCF IIS hosted service
So let's proceed to our last step.
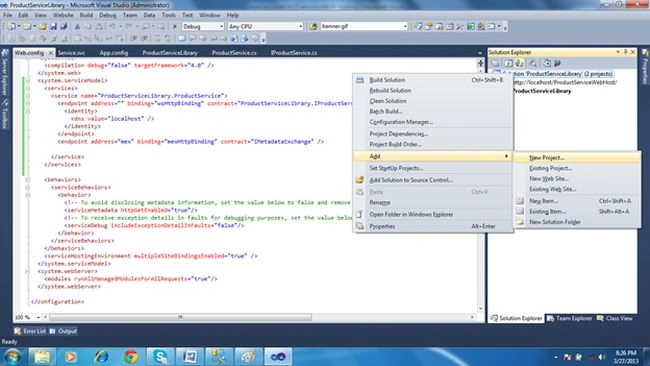
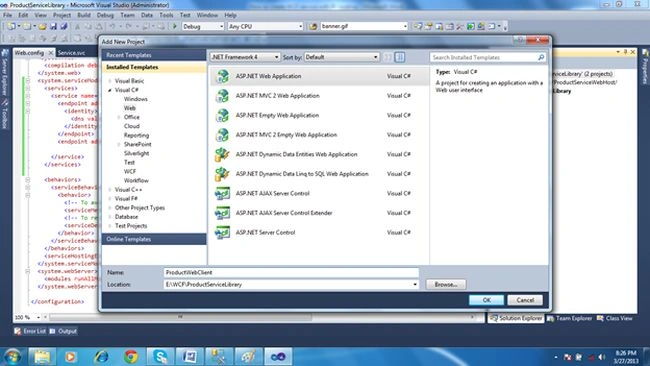
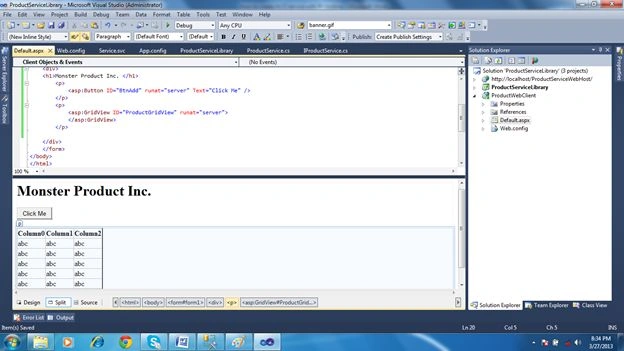
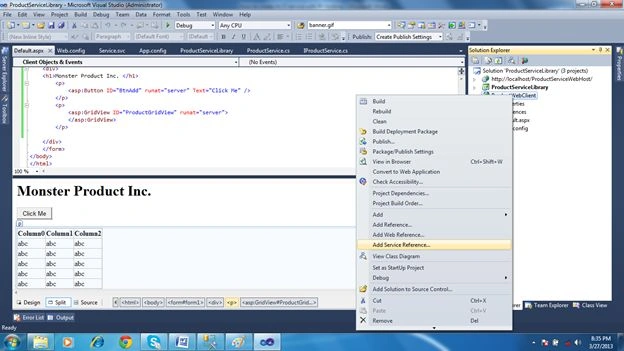
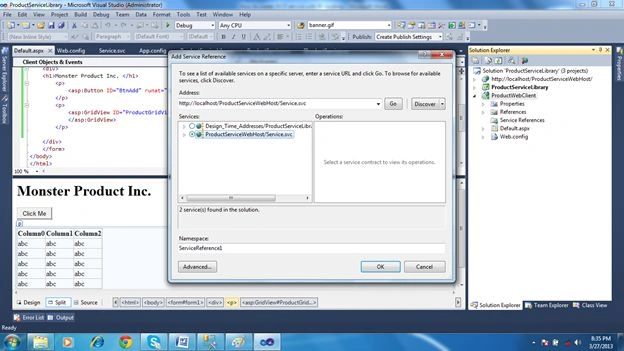
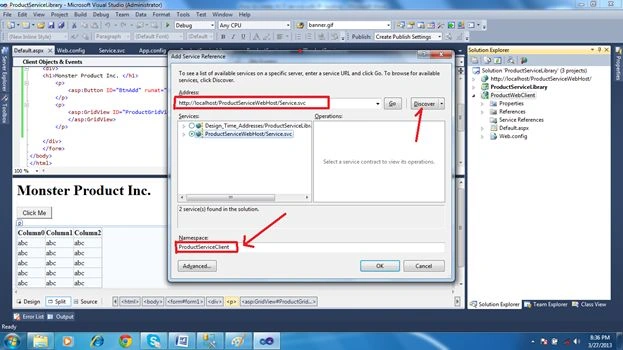
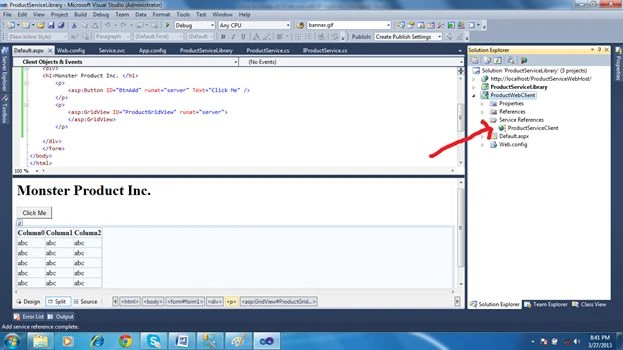
On the Default.aspx.cs page write the code:
- using System;
- using System.Collections.Generic;
- using System.Linq;
- using System.Web;
- using System.Web.UI;
- using System.Web.UI.WebControls;
- using ProductWebClient.ProductServiceClient;
- namespace ProductWebClient
- {
- public partial class Default : System.Web.UI.Page
- {
- protected void Page_Load(object sender, EventArgs e)
- {
- }
- protected void BtnAdd_Click(object sender, EventArgs e)
- {
- ProductServiceClient.ProductServiceClient proxy = new ProductServiceClient.ProductServiceClient();
- ProductGridView.DataSource= proxy.GetAllProduct();
- ProductGridView.DataBind();
- }
- }
- }
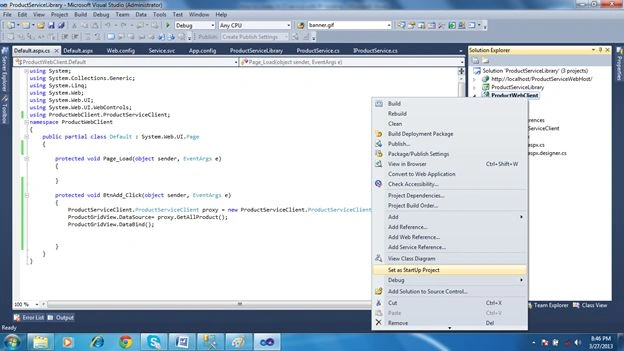
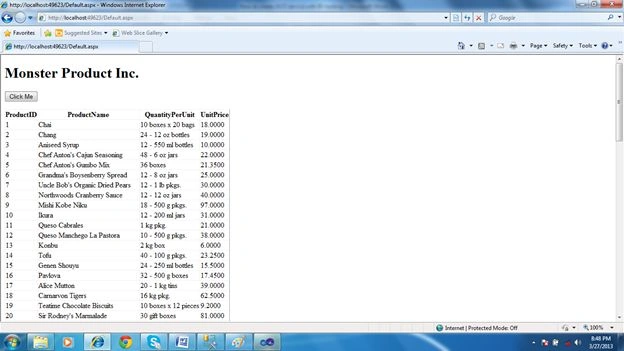
Set the ProductWebClient as "Set as StartUp Project" and press F5 and here is the result.
ENJOY!
Pankajkumar PatelPosted Sep 4, 2019, 11:47 PM
Good one ...
Test UserPosted Apr 2, 2018, 2:15 AM
How can i add new web site host in same project for service library generated for provide service with http
Marjorie BumpPosted Nov 4, 2016, 11:48 AM
There is one thing that was overlooked in this article....where is the source code for the default.aspx page? I can make out parts of it from the screen shots, but the <form> line is not displayed.
Mohammed AriefPosted Jun 16, 2016, 8:53 AM
will you help to fix the below exception while calling GridView1.DataSource = proxy.GetAllData(); An exception of type 'System.ServiceModel.FaultException' occurred in mscorlib.dll but was not handled in user code Additional information: The server was unable to process the request due to an internal error. For more information about the error, either turn on IncludeExceptionDetailInFaults (either from ServiceBehaviorAttribute or from the <serviceDebug> configuration behavior) on the server in order to send the exception information back to the client, or turn on tracing as per the Microsoft .NET Framework SDK documentation and inspect the server trace logs.
santosh tiwariPosted Apr 20, 2016, 8:19 AM
Nice article.
Vetri Chelvan IndrajithPosted Apr 6, 2016, 5:44 AM
well explained. keep it goimg
kalu singh raoPosted Mar 7, 2016, 10:56 AM
Nice...
vikram obuPosted Dec 16, 2015, 11:05 AM
I am getting the above error, Can you please ASSIST. Thanks in Advance.
vikram obuPosted Dec 16, 2015, 11:03 AM
Could not load file or assembly 'ProductServiceLibrary' or one of its dependencies. An attempt was made to load a program with an incorrect format.
Harminder SinghPosted Nov 29, 2015, 3:36 AM
Good Article ...
mohamed aliPosted Dec 19, 2014, 4:30 AM
Good work, but How to Create Callback Service in WCF
navido mangumoPosted Jul 22, 2014, 9:36 AM
Very nice article, its simple and direct!
Jayaprakash TatagariPosted May 31, 2013, 1:34 AM
Great Work....
Ninad GPosted May 30, 2013, 2:07 PM
I am getting error-The type 'ProductServiceLibrary.ProductService', provided as the Service attribute value in the ServiceHost directive, or provided in the configuration element system.serviceModel/serviceHostingEnvironment/serviceActivations could not be found. What canbe wrong?
Sachin KaliaPosted May 26, 2013, 8:34 AM
Elegantly describe...
Mahesh AllePosted Apr 3, 2013, 1:48 AM
Thanks for posting this article. This article help me a lot.