

Introduction
In Visual Studio 2017, we can develop Cross Platform apps, using Xamarin. Xamarin is a platform to develop apps for multiple mobile operating systems by a shared code base. In Xamarin, we can develop separate UI apps or shared UI apps. Shared UI apps are developed through Xamarin forms.
In this article, we will do some data binding in xamarin.forms.
Target audience
Beginners with basic C# and XAML coding knowledge.
Technical requirements
- Windows 10 OS.
- Visual Studio 2017.
- Developer mode should be enabled on your OS.
Installation
Download Visual Studio Installer from here (https://www.visualstudio.com)
You can install Visual Studio 2017 with Xamarin workload.
Data binding
Data binding is the process, which establishes a connection between the Application user interface and an Application logic. We may bind the data with the elements and if binding is done correctly, it can reflect changes automatically.

The main benefit of Data binding is that you no longer have to worry about synchronizing the data between your views and data source.
Binding has several properties including.
- Path
- Mode
Binding Path
Path is used to specify property name of the source object, which is used for binding.
Binding Mode
Mode is used to provide the direction in which property value changes are made.
- OneWay
In One way binding, the changes are made from its source to the target.
- TwoWay
In Two way binding, the changes are made in both the directions and Two way binding makes sure that the source and the target are always synchronized.
- OneWayToSource
Changes are made from the target to the source and are mainly used for read-only bind able properties. In Xamarin.Forms Mode property is default set to OneWay.
Binding example
Here, we can link properties of two views on a single page.
Let’s go through its example,
XAML
- <StackLayout>
- <Slider x:Name="slider" Maximum="360"></Slider>
- <Label Text="Rotation"
- BindingContext="{x:Reference Name=slider}"
- Rotation="{Binding Path=Value}"
- HorizontalOptions="CenterAndExpand"
- ></Label>
- </StackLayout>
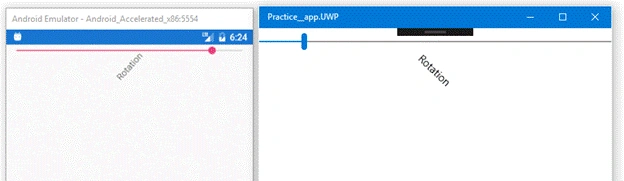
Here, we bind the value property of slider with rotation property of the label with Oneway binding, which is set by default, so, when we move the slider, label starts rotating and maximum value of slider is set to 360.
Output on an Android and Windows desktop is given below.
ashok yadavPosted Jun 11, 2019, 8:08 AM
Can you provide example for oneway and twoway binding.