

Introduction
- Arduino
-
4*4 Matrix Keypad
-
Servo
-
2k ohm Resistor
-
Red Led
-
Green Led
-
Hookup wires.
Keypad
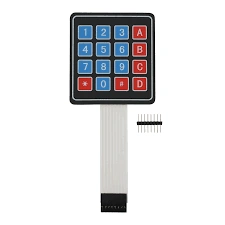
Figure 1: Keypad
-
It is a miniature keyboard.
-
This is the keypad of the 3*4 matrix.
-
It consists of buttons for operating a portable electronic device, telephone, or other equipment.
- The keypad consists of numeric numbers for the door password.
Servo

Figure 2: Servo
-
The servomotor is a rotary actuator or linear actuator that allows precise control of the angular or linear position.
-
It can consist of a suitable motor coupled to a sensor for feedback.
Connection From Keypad To Arduino
-
The connection from the * is to the digital pin 09,08 to the Arduino board.
-
The connection from the 0 is to the digital pin 07,06 to the Arduino board.
-
The connection from the # is to the digital pin 05,04 to the Arduino board.
-
The connection from the D is to the digital pin 03,02 to the Arduino board.
Connection From Servo To Arduino
-
The first pin can be connected to the digital pin 13 to the Arduino board.
-
The center pin can be connected to the Vcc of 5v to the Arduino board.
- The third pin can be connected to the Gnd to the Arduino board.
Connection from LED to Arduino
-
The red led can be connected to the positive pin of digital pin 12 to the Arduino board and negative pin to the Gnd.
-
The green led can be connected to the positive pin of digital pin 11 to the Arduino board and negative pin to the Gnd.
Instruction
Before starting add the library of the following:
Programming
- #include < password.h >
- #include < keypad.h >
- #include < servo.h >
- password = Password("0000"); //password to unlock, can be changed
- const byte ROWS = 4;
- // Four rows const byte COLS = 4;
- // columns
- // Define the Keymap
- char keys[ROWS][COLS] =
- {
- {
- '1',
- '2',
- '3'
- },
- {
- '4',
- '5',
- '6'
- },
- {
- '7',
- '8',
- '9'
- },
- {
- '*',
- '0',
- '#'
- }
- };
- // Connect keypad ROW0, ROW1, ROW2 and ROW3 to these Arduino pins. byte
- rowPins[ROWS] =
- {
- 9,
- 8,
- 7,
- 6
- }; // Connect keypad COL0, COL1 and COL2 to these Arduino pins. byte
- colPins[COLS] = {
- 5,
- 4,
- 3
- };
- // Create the Keypad
- Keypad keypad = Keypad(makeKeymap(keys), rowPins, colPins, ROWS, COLS);
- void setup()
- {
- Serial.begin(9600);
- Serial.write(254);
- Serial.write(0x01);
- delay(200);
- pinMode(11, OUTPUT); //green light
- pinMode(12, OUTPUT); //red light
- myservo.attach(13); //servo on digital pin 9
- }
- void loop()
- {
- keypad.getKey();
- myservo.write(0);
- }
- //take care of some special events void keypadEvent(KeypadEvent eKey)
- {
- switch (keypad.getState())
- {
- case PRESSED:
- Serial.print("Enter:");
- Serial.println(eKey);
- delay(10);
- Serial.write(254);
- switch (eKey)
- {
- case '*':
- checkPassword();
- delay(1);
- break;
- case '#':
- password.reset();
- delay(1);
- break;
- default:
- password.append(eKey);
- delay(1);
- }
- }
- }
- void checkPassword()
- {
- if (password.evaluate())
- {
- //if password is right open Serial.println("Accepted");
- Serial.write(254);
- delay(10); //Add code to run if it works myservo.write(150); //deg
- digitalWrite(11, HIGH); //turn on delay(5000);
- //wait 5 seconds
- digitalWrite(11, LOW); // turn off
- }
- else
- {
- Serial.println("Denied"); //if passwords wrong keep locked Serial.write(254);
- delay(10); //add code to run if it did not work myservo.write(0);
- digitalWrite(12, HIGH); //turn on delay(500);
- //wait 5 seconds
- digitalWrite(12, LOW); //turn off
- }
- }
Explanation
-
This implementation can be used for home security by door locking using servo meter.
-
The programming will work in a way when the password is correct then the green light will turn on and the door opens.
-
When the password is wrong it can't open the door and the red led turn on.
-
You can also set the delay time for 5 seconds.
Output
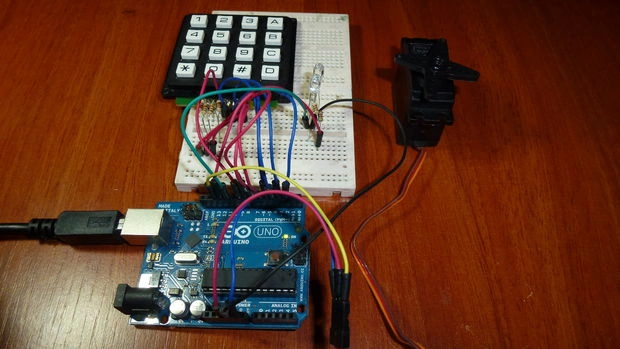
Figure 3: Output
Read more articles on Arduino:
Mooad MalkawiPosted Jan 19, 2018, 8:00 AM
Hello, that's an amazing project but I have to do almost the same idea but more complicated than this project the ideas is like this : in this project we want to design and implement an automated system to manage the rooms' doors within a facility. Each of the doors is to be equipped by a control unit and an electronic lock. The control unit is assumed to have network connectivity in order to receive commands and send possible messages to central server on which server-side application is installed. The control unit should be able to determine whether the door is shut or not and behave accordingly. The server-side application is used by the administrator to perform different relevant tasks such as : adding/removing doors, locking /unlocking doors remotely adding/removing users and monitoring the status of the doors. From the users's perspective , they can lock or unlock the doors through the internet or using Bluetooth using an application on their cell phones where only legitimate users can access the rooms. Using the cell phone eliminates the need to have keys , access card or pass codes . The user only needs to sign in , select the room to access and communicate with the server through the network or with the control unit through Bluetooth to perform the desired actions. I know it will take too long time to achieve so I hope if you will provide me with good references or any related projects like this . Thanks!
Sr KarthigaPosted Feb 29, 2016, 7:36 PM
thank you asfend sir
Sr KarthigaPosted Feb 29, 2016, 7:35 PM
thank you jithil sir
Sr KarthigaPosted Feb 29, 2016, 7:35 PM
thnk you asfend sir
Sr KarthigaPosted Feb 29, 2016, 7:35 PM
thnk you jithil sir
Sr KarthigaPosted Feb 29, 2016, 7:34 PM
Thnk you asfend sir
Asfend YarPosted Feb 29, 2016, 2:24 PM
nice
Jithil JohnPosted Feb 15, 2016, 10:55 PM
Good one
Sr KarthigaPosted Feb 11, 2016, 1:47 AM
Thank you jaco
Jaco ZwartsPosted Feb 11, 2016, 1:40 AM
Thank you for sharing
Sr KarthigaPosted Feb 10, 2016, 11:17 PM
Thank you Debendra Dash sir
Debendra DashPosted Feb 10, 2016, 10:55 PM
good one...
Sr KarthigaPosted Feb 9, 2016, 10:13 PM
Thank you Yadav sir
Praveen KumarPosted Feb 9, 2016, 10:12 PM
Very interesting, Karthiga
Sr KarthigaPosted Feb 9, 2016, 8:52 PM
Thank you santhakumar sir
Santhakumar MunuswamyPosted Feb 9, 2016, 11:51 AM
Thanks for nice article. Keep it up
Sr KarthigaPosted Feb 9, 2016, 8:52 AM
Thank you raja sir
Raja TPosted Feb 9, 2016, 8:45 AM
Nice, Thanks for sharing..
Sibeesh VenuPosted Feb 9, 2016, 7:15 AM
Nice Share
Sr KarthigaPosted Feb 9, 2016, 3:39 AM
Thank you jithilsir
Jithil JohnPosted Feb 9, 2016, 3:33 AM
Good one
Sr KarthigaPosted Feb 9, 2016, 3:06 AM
Thank you shubham sir
Shubham KumarPosted Feb 9, 2016, 12:49 AM
interesting very nice
Mahesh ChandPosted Feb 8, 2016, 11:45 PM
Very nice. Good to see young students learning and implementing latest technologies.
Sr KarthigaPosted Feb 8, 2016, 7:36 PM
Thank you jaco sir
Sr KarthigaPosted Feb 8, 2016, 7:35 PM
Thank you mohammed sir
Sr KarthigaPosted Feb 8, 2016, 7:34 PM
Thank you kumaresh sir
Jaco ZwartsPosted Feb 8, 2016, 2:06 PM
Thank you for sharing
Mohammed IbrahimPosted Feb 8, 2016, 1:45 PM
nice
Kumaresh RajalingamPosted Feb 8, 2016, 1:38 PM
Nice share