

Introduction
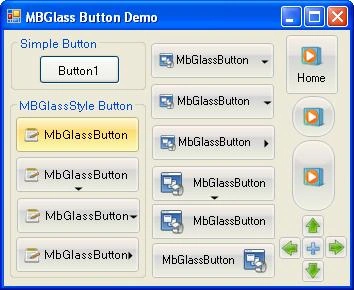
Why another Button? The standard Button is too limited in functionality and I couldn't find a custom control written that did all that I wanted. This is a User Control with many properties and versatility. It is simple to use, just drop it onto the form, adjust the design time properties and use it like the normal Button.
Background
MBGlassButton is a Button that inherits all the properties of a simple Button control. I added some extra functionalities in MBGlassButton like Glow, Split, Highlight and so on. The language used is VB.NET.
Control Properties
Here is the list of properties available in MBGlassButton:
Arrow: This property sets the arrow on theMBGlassButton.BaseColor: This property sets the Base Color ofthe.MBGlassButtonBaseStrokeColor: This property sets the Base Stroke color of theMBGlassButton.OnColor: This property sets the on color of theMBGlassButton.OnStrokeColor: This property sets the On Stroke color of theMBGlassButton.PressColor: This property sets the Press Color of theMBGlassButton.PressStrokeColor: This property sets the Press Stroke Color of theMBGlassButton.ShowBase: This property shows the Glow on theMBGlassButton.Radius: This property sets the corner Radius of theMBGlassButton.SplitButton: This property splits theMBGlassButtoninto two parts.SplitDistance: This property sets the Split Distance of theMBGlassButton.SplitLocation: This property splits theMBGlassButtonat a specific location.
Code

Button came from the Vista "Button" or Windows 7 “Button”. I organized my paint event into layers like this: - Protected Overrides Sub OnPaint(ByVal pevent As System.Windows.Forms.PaintEventArgs)
- Dim g As Graphics = pevent.Graphics
- g.SmoothingMode = SmoothingMode.HighQuality
- g.InterpolationMode = InterpolationMode.High
- Dim r As Rectangle = New Rectangle(New Point(-1, -1), _
- New Size(Me.Width + _radius, Me.Height + _radius))
- Dim path As GraphicsPath = New GraphicsPath
- Dim rp As Rectangle = New Rectangle(New Point(0, 0), _
- New Size(Me.Width - 1, Me.Height - 1))
- DrawArc(rp, path)
- FillGradients(g, path)
- DrawImage(g)
- DrawText(g)
- DrawArrow(g)
- End Sub
MBGlassButton. This method draws the background for the MBGlassButton. - Protected Overrides Sub OnCreateControl()
- MyBase.OnCreateControl()
- A0 = BaseColor.A
- R0 = BaseColor.R
- G0 = BaseColor.G
- B0 = BaseColor.B
- _colorStroke = _baseStroke
- Dim r As Rectangle = New Rectangle(New Point(-1, -1), _
- New Size(Me.Width + _radius, Me.Height + _radius))
- If Me.Size <> Nothing Then
- Dim pathregion As GraphicsPath = New GraphicsPath
- DrawArc(r, pathregion)
- Me.Region = New Region(pathregion)
- End If
- End Sub
MBGlassButton: - Public Sub DrawShadow(ByVal re As Rectangle, ByVal pa As GraphicsPath)
- Dim _radiusX0Y0 As Integer = _radius, _radiusXFY0 _
- As Integer = _radius, _radiusX0YF _
- As Integer = _radius, _radiusXFYF As Integer = _radius
- Select Case _grouppos
- Case MB_GroupPos.Left
- _radiusXFY0 = 1
- _radiusXFYF = 1
- Case MB_GroupPos.Center
- _radiusX0Y0 = 1
- _radiusX0YF = 1
- _radiusXFY0 = 1
- _radiusXFYF = 1
- Case MB_GroupPos.Right
- _radiusX0Y0 = 1
- _radiusX0YF = 1
- Case MB_GroupPos.Top
- _radiusX0YF = 1
- _radiusXFYF = 1
- Case MB_GroupPos.Bottom
- _radiusX0Y0 = 1
- _radiusXFY0 = 1
- End Select
- pa.AddArc(re.X, re.Y, _radiusX0Y0, _radiusX0Y0, 180, 90)
- pa.AddArc(re.Width - _radiusXFY0, re.Y, _radiusXFY0, _radiusXFY0, 270, 90)
- pa.AddArc(re.Width - _radiusXFYF, _
- re.Height - _radiusXFYF, _radiusXFYF, _radiusXFYF, 0, 90)
- pa.AddArc(re.X, re.Height - _radiusX0YF, _radiusX0YF, _radiusX0YF, 90, 90)
- pa.CloseFigure()
- End Sub
MBGlassButton: - Protected Overrides Sub OnRenderMenuItemBackground_
- (ByVal e As System.Windows.Forms.ToolStripItemRenderEventArgs)
- If e.Item.Selected Then
- Dim g As Graphics = e.Graphics
- g.SmoothingMode = SmoothingMode.HighQuality
- Dim pa As GraphicsPath = New GraphicsPath()
- Dim rect As Rectangle = New Rectangle_
- (2, 1, e.Item.Size.Width - 2, e.Item.Size.Height - 1)
- DrawArc(rect, pa)
- Dim lgbrush As LinearGradientBrush = New LinearGradientBrush_
- (rect, Color.White, Color.White, LinearGradientMode.Vertical)
- Dim pos As Single() = New Single(3) {0.0F, 0.4F, 0.45F, 1.0F}
- Dim colors As Color() = New Color(3) {GetRendererColor(0, 50, 100), _
- GetRendererColor(0, 0, 30), Color.FromArgb(R0, G0, B0), _
- GetRendererColor(0, 50, 100)}
- Dim mix As ColorBlend = New ColorBlend()
- mix.Colors = colors
- mix.Positions = pos
- lgbrush.InterpolationColors = mix
- g.FillPath(lgbrush, pa)
- g.DrawPath(New Pen(StrokeColor), pa)
- lgbrush.Dispose()
- Else
- MyBase.OnRenderMenuItemBackground(e)
- End If
- End Sub
Using the Code
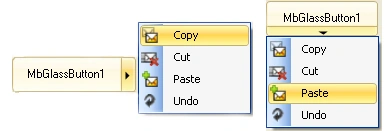
Just add a new Context Menu Strip to the application and set it to
MBGlassButton Context Menu Strip Property. 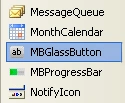
It is very easy to use the
MBGlassButton in your application. Simply add the reference of the provided DLL to your application and just drag and drop.
History
- 12 April 2015 :
MBGlassButtonVersion 1.0
Afzaal Ahmad ZeeshanPosted Jul 5, 2015, 3:52 PM
Good article, but you need to stick to actual terms. You need to use term, "Transparent" instead of "Glass". That would help technical users also. :)