

Introduction
In my "HTML For Beginners: Part 1" I provided an introduction to HTML and explained HTML Text Formatting elements.
In this, the part second of the HTML beginners series, we will cover the following topics:
- <img> element in html
- src, alt and title attributes of img element
- Width and Height for an image
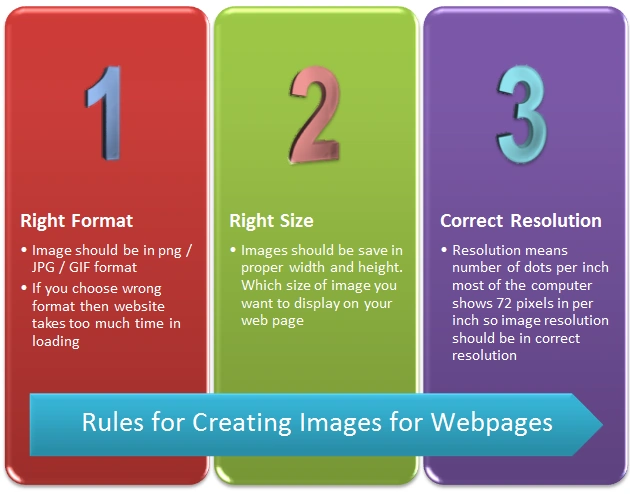
- Rules for creating an image for a webpage
- <a> (anchor tag)
- Absolute and Relative linking
- link to an email
- How to open links in a new tab or window

- Links within a single page
Images
Images imply many things. If we read the description it takes too much time and most people don't like to read such a long description so If proper images exist on a webpage then it can say many things about the documents, so images are very useful. Some of the things you should always remember when inserting an image into an HTML document are as in the following.
- Images should be proper and relevant to the document.
- It should be informative to help visitors become familiar with the document, without reading the document.
- It should be properly formatted.
- The image extension should be correct.
Where to store website images
If you are creating a website then it is a very good practice to keep all the images in a folder and that folder should be inside your website folder. If you have many images then in that images folder you create some sub-folders as categories.
How to add Images to an HTML document
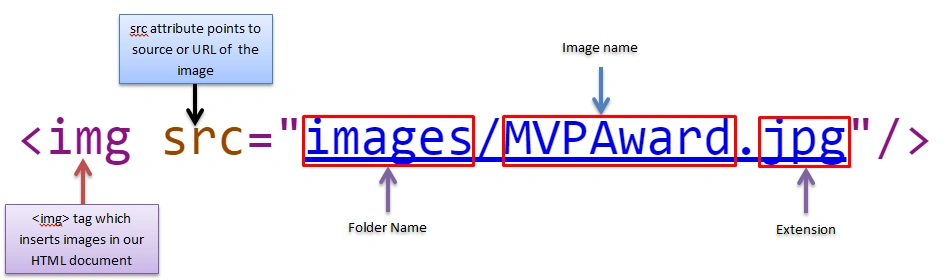
HTML uses an <img> tag to add an image to a webpage. A <img> tag is an empty element, in other words, it does not have a closing tag. An HTML image tag always contains an "src" attribute.
Src: This attribute tells the browser where the image is. In other words, the src attribute contains the path of the image or URL of the image that will point to the images that you want to be in your HTML document.
Example
Output

alt: The alt attribute specifies an alternate text for an image if the images cannot be displayed. If a user cannot view an image then the alt attribute provides a piece of alternate information for any image. The alt attribute text will be shown when:
- A slow internet connection is used by the visitor.
- When an error exists in the src attribute.
- The image is no longer available or is deleted from that specific path.
- If the user is using screen reader software.
Example
- <img src="images/MVPAward.jpg" alt="MVP Award" width="200" />
Output
I have deleted my image from the images folder and the output will be as in the following:

title: To create a tooltip for an image, we can use the title attribute with the image. The title text will be shown only if the mouse hovers over the image.
Example
Output

- <img src="images/MVPAward.jpg" alt="MVP Award" title="Getting MVP (Most Valuable Professional) Award From Mahesh Chand Sir"/>
- Height: By using this attribute you can specify the height of the image.
- Width: By using this attribute you can specify the width of the image.
Example
- <img src="images/MVPAward.jpg" alt="MVP Award" title="Getting MVP (Most Valuable Professional) Award From Mahesh Chand Sir" height="200" width="300"/>
Links in HTML Document: Links are a very good feature of an HTML document because links allow you to move from one page to another page or another website or on the same page. Links enable browsing or surfing on websites.
For links we will cover the following topics:
- Link from one website to another website.
- Linking in the pages within the same website.
- Email Link.
- Links that will open a new browser window and tab.
- Link one section to another section on the same page.
By including an <a> (Anchor) element, you can place a link into the HTML document. And when the visitor clicks that link he will be moved from that location to the other location. One of the most important attributes of the <a> element is href. href stands for Hypertext REFerence. It specifies the link's destination.
By default, a link will be shown as follows in all browsers.
- Unvisited Links: Underlined and color will be Blue.
- Active Link (when we mouse down on the link): Underlined and the color will be Red.
- Visited Link: Underlined and the color will be Purple.
To understand this please see the following animation:


Link from one website to another website: To link from one website to another website just use a URL as a value of the href attribute. If you provide the complete URL to the href then this type of linking is called absolute linking. A link from one website to another website will always be absolute linking.
Example

- <a href="http://www.c-sharpcorner.com/">C-sharp Corner</a>
Output

Linking in the pages within the same website: To link one page to another page of the same website you will just provide the name of the page you want to jump to, you will not provide the complete path of the URL. Linking within the same website pages are called Relative Linking.
Example: I have created 2 pages, page1.html, and page2.html. I have written the following code in page1.html and page2.html.
page1.html Code
- <html>
- <head>
- <title>Links in HTML</title>
- </head>
- <body>
- <a href="page2.html">Go to Page 2</a>
- </body>
- </html>
- <html>
- <head>
- <title>Links in HTML</title>
- </head>
- <body>
- <a href="page1.html">Go to Page 1</a>
- </body>
- </html>
Shresthi JaiswalPosted Sep 23, 2016, 3:02 AM
Thanks Sir :)
SubashPosted Sep 23, 2016, 12:32 AM
Very nice
Prashanth Kumar ThadakaPosted Jul 6, 2015, 6:50 AM
Nice
Gowtham RajamanickamPosted Apr 11, 2015, 1:13 PM
good one
Shresthi JaiswalPosted Apr 8, 2015, 9:01 AM
Thankq... !! :-)
Karthik Muthu KaruppanPosted Apr 2, 2015, 11:07 AM
good one
Rakesh KalluriPosted Apr 2, 2015, 6:25 AM
like Foreign Characters
Gowtham RajamanickamPosted Apr 1, 2015, 11:05 PM
good
Santhakumar MunuswamyPosted Apr 1, 2015, 10:33 PM
Thanks for nice one
Sanjay SinghPosted Apr 1, 2015, 3:05 PM
good work ... !!!