

Introduction
In this article I am going to describe about the different types of on screen keyboard for Windows Phone Applications. Basically I will describe the property "InputScope" which is the most common property of TextBox in XAML programming.
As we know TextBox is a basic control of XAML and it is simply a best way to collect input from the user. When users tap on the TextBox, the default on screen keyboard is opened automatically. For a developer it is easy to control the type of input scopes according to the requirement. Before going to know more about the InputScope property of XAML TextBox, let us do a quick recap about the control "TextBox".
In this article I am going to describe about the different types of on screen keyboard for Windows Phone Applications. Basically I will describe the property "InputScope" which is the most common property of TextBox in XAML programming.
As we know TextBox is a basic control of XAML and it is simply a best way to collect input from the user. When users tap on the TextBox, the default on screen keyboard is opened automatically. For a developer it is easy to control the type of input scopes according to the requirement. Before going to know more about the InputScope property of XAML TextBox, let us do a quick recap about the control "TextBox".
Note
Here we're talking about the TextBox control of XAML only where XAML stands for Extended Applications Markup Language which is used to create the user interface for windows application.
Here we're talking about the TextBox control of XAML only where XAML stands for Extended Applications Markup Language which is used to create the user interface for windows application.
TextBox with InputScope

Requirement Tools
Before going to start this article, we should have the following tools
- Visual Studio 2012 (at least)
- Windows 8 Operating System
- Windows Device or Emulator (To see the output)
Note:
For this article, I am using the following tools for app development
For this article, I am using the following tools for app development
- Visual Studio Express for Windows Phone
- Windows 8.1 Operation System
- Windows Device (Phone)
Values of InputScope
As we read above, InputScope is a property of TextBox control which is used to control the keyboards type using the different values of InputScope. For example, we may use Numeric Keyboard only if we only need to input number in a textbox or we may use e-mail supported keyboard if we only need to input email address which provides easiest way to access symbol @.
Like above InputScope, Microsoft provides a lot of keyboard types but in this article I am going to describe about some most useful types which are used frequently in a application. Now I am going to describe the values of InputScope which are listed below,
As we read above, InputScope is a property of TextBox control which is used to control the keyboards type using the different values of InputScope. For example, we may use Numeric Keyboard only if we only need to input number in a textbox or we may use e-mail supported keyboard if we only need to input email address which provides easiest way to access symbol @.
Like above InputScope, Microsoft provides a lot of keyboard types but in this article I am going to describe about some most useful types which are used frequently in a application. Now I am going to describe the values of InputScope which are listed below,
- Number
- Text
- Emotions
- Search
- EmailNameOrAddress
- Url
- TelephoneNumber
All these are the type of keyboard which are used as value for InputScope of a textbox control. So firstly, let's start with Number type.
Note:
Basically the main purpose of using different types of on screen keyboard is to provide the facilities to end user to access the applications fast and smooth. Suppose Indian Railways has developed an application to check train PNR status (for train birth status ). When user tap on textbox and if it shows a keyboard of type text, then it is not best for users. Let us see the example screenshot,
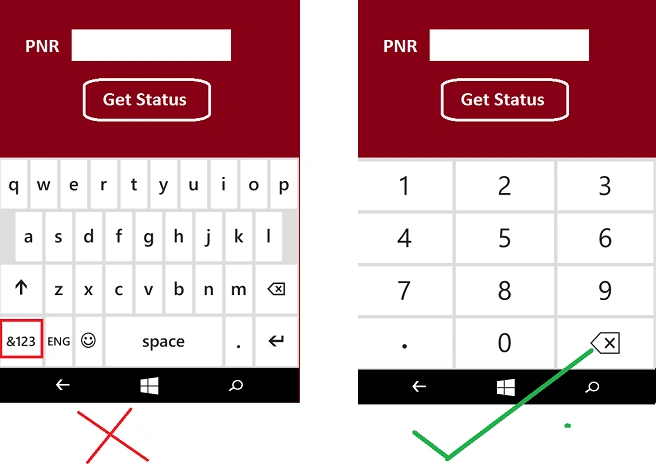
Figure 1: Left keyboard in not more comfortable than right screen keyboard which has only numeric keyword. Developers know that PNR should only be numeric. So, we should show "Numeric Keyword" only instead of text keyword.
Note:
Basically the main purpose of using different types of on screen keyboard is to provide the facilities to end user to access the applications fast and smooth. Suppose Indian Railways has developed an application to check train PNR status (for train birth status ). When user tap on textbox and if it shows a keyboard of type text, then it is not best for users. Let us see the example screenshot,
Figure 1: Left keyboard in not more comfortable than right screen keyboard which has only numeric keyword. Developers know that PNR should only be numeric. So, we should show "Numeric Keyword" only instead of text keyword.
Implementations
Step 1:Create a windows application through the following steps,
Visual Studio 2012 For Windows Phone - File, then New Project.
And select language as Visual C# from left and select "Windows Phone". After that select "Windows Phone App" form the listed template.
And type the name of application as you wish (I have typed InputScopeDemoApp for this article).
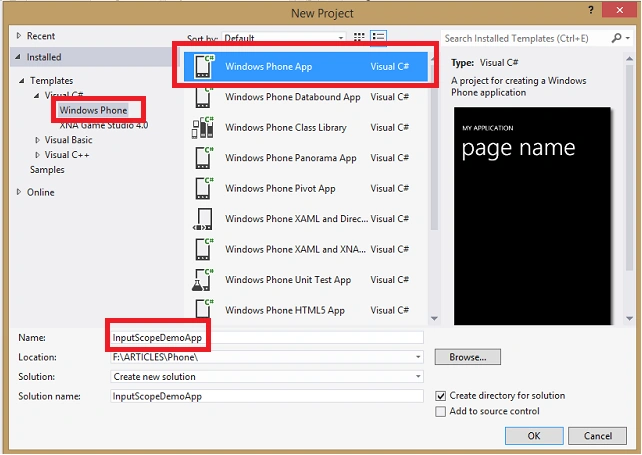
Figure 2: (Steps to Create New Project for Windows Application)
Step 2: Now go to the Solution Explores of this project, you get a page named "MainPage.xaml" which is the default page created. So we will type the example code inside this page or you may create another page as well.
And type the name of application as you wish (I have typed InputScopeDemoApp for this article).
Figure 2: (Steps to Create New Project for Windows Application)
Step 2: Now go to the Solution Explores of this project, you get a page named "MainPage.xaml" which is the default page created. So we will type the example code inside this page or you may create another page as well.
Note:
I have modified this page as pivot page (Where pivot page is type of page in XAML that provides the feature to create multiple page view using a single physical page. Let us see the following syntax which is used to design a pivot page.
Code Snippet for PivotItems
I have modified this page as pivot page (Where pivot page is type of page in XAML that provides the feature to create multiple page view using a single physical page. Let us see the following syntax which is used to design a pivot page.
Code Snippet for PivotItems
- <Grid x:Name="LayoutRoot" Background="SeaGreen">
- <phone:Pivot Title="Demo Application">
- <phone:PivotItem Header="Page1">
- <!--Put content for page1 here-->
- </phone:PivotItem>
- <phone:PivotItem Header="Page2">
- <!--put content for page2 here-->
- </phone:PivotItem>
- <phone:PivotItem Header="Page3">
- <!--put content for page3 here-->
- </phone:PivotItem>
- </phone:Pivot>
- </Grid>
Basically "Pivot" is a control that is a container for another control called "PivotItem" control where a PivotItem control represents an individual page contents. In the above code snippet, there are three pivot items where each pivot item represents a page. Let us see the visual look for above code snippet.
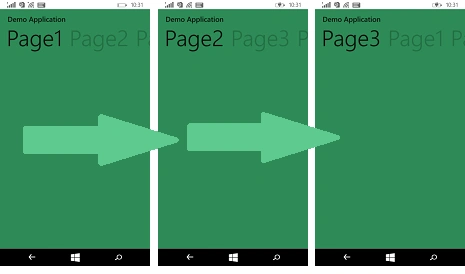
Figure 3: Pivot Page
Let's start the main theme of this article and for that first start with on screen keyboard type "Number".
Let's start the main theme of this article and for that first start with on screen keyboard type "Number".
We may use numeric keyword where we need to take input as Numeric value only. So to know about the numeric keyboard let's see the following code snapshot,
We can see that in this code snap there is a TextBox control with property "InputScope" having a value Number. So if we put a property InputScope with the value as Number, it will display the onscreen keyboard for Number only (not alphabets).
Note: Please note the above line of code with InputScope is the simplest syntax but there is an issue with this line of code, we cannot see the IntelliSense at the time of typing the values for InputScope. So let's see the following code snippet which gives us the IntelliSense for various InputScope values which is provided by Microsoft.
- <TextBox Name="txtInputNumber" Height="100" Grid.Row="1" Background="White" Foreground="Orange" >
- <TextBox.InputScope>
- <InputScope>
- <InputScopeName NameValue="Number" />
- </InputScope>
- </TextBox.InputScope>
- </TextBox>
We can follow the syntax like above code snippet if we like to see the IntelliSense for InputScope values. Let's see the following screenshots which shows the IntelliSense windows with various values like numbers and others.
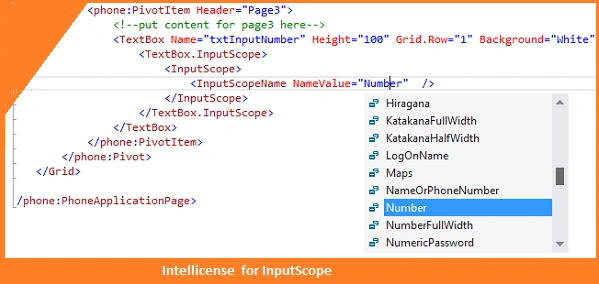
Figure 4: IntelliSense for InputScope
Now we can execute this application to watch the type of on-screen keyboard on tap event of TextBox. (Before going to execute this application first connect your device with machine (computer) if you're not using emulator.
Figure 4: IntelliSense for InputScope
Now we can execute this application to watch the type of on-screen keyboard on tap event of TextBox. (Before going to execute this application first connect your device with machine (computer) if you're not using emulator.
Note: Please mind that I have slightly modified the code content to make the design structure better. The following is the final code after modification. I have added five pivot items for keyboard type (Number, Text, Email,Suggestion and Emotions). The following is the complete code snippet,
- <phone:PhoneApplicationPage
- x:Class="InputScopeDemo.PivotPage1"
- xmlns="http://schemas.microsoft.com/winfx/2006/xaml/presentation"
- xmlns:x="http://schemas.microsoft.com/winfx/2006/xaml"
- xmlns:phone="clr-namespace:Microsoft.Phone.Controls;assembly=Microsoft.Phone"
- xmlns:shell="clr-namespace:Microsoft.Phone.Shell;assembly=Microsoft.Phone"
- xmlns:d="http://schemas.microsoft.com/expression/blend/2008"
- xmlns:mc="http://schemas.openxmlformats.org/markup-compatibility/2006"
- mc:Ignorable="d"
- FontFamily="{StaticResource PhoneFontFamilyNormal}"
- FontSize="{StaticResource PhoneFontSizeNormal}"
- Foreground="{StaticResource PhoneForegroundBrush}"
- SupportedOrientations="Portrait" Orientation="Portrait"
- shell:SystemTray.IsVisible="True">
- <!--LayoutRoot is the root grid where all page content is placed-->
- <Grid x:Name="LayoutRoot" Background="#FF494646">
- <phone:Pivot Title="InputScope in Windows Aplicatons." Foreground="White" >
- <phone:PivotItem Header="number">
- <Grid Background="Transparent">
- <Grid.RowDefinitions>
- <RowDefinition Height="60" />
- <RowDefinition Height="100" />
- <RowDefinition Height="*" />
- </Grid.RowDefinitions>
- <TextBlock Grid.Row="0" Text="Phone Number" FontSize="35" Padding="10"></TextBlock>
- <TextBox Name="txtInputNumber" Height="100" Grid.Row="1" Background="White" Foreground="Orange" >
- <TextBox.InputScope>
- <InputScope>
- <InputScopeName NameValue="Number" />
- </InputScope>
- </TextBox.InputScope>
- </TextBox>
- </Grid>
- </phone:PivotItem>
- <phone:PivotItem Header="text">
- <!--put content for page2 here-->
- </phone:PivotItem>
- <phone:PivotItem Header="Suggestions">
- <!--put content for page3 here-->
- </phone:PivotItem>
- <phone:PivotItem Header="Suggestions">
- <!--put content for page3 here-->
- </phone:PivotItem>
- <phone:PivotItem Header="email">
- <!--put content for page3 here-->
- </phone:PivotItem>
- <phone:PivotItem Header="emotions">
- <!--put content for page3 here-->
- </phone:PivotItem>
- </phone:Pivot>
- </Grid>
- </phone:PhoneApplicationPage>
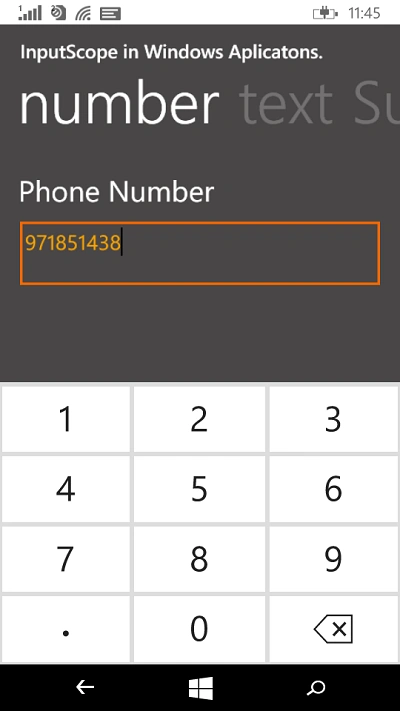
Figure 5: Numeric Keyboard
Programmatically
Now I am going to describe how to set InputScope programmatically in Visual C#. Let's see the following code snippet.
- //For Input Scope
- using System.Windows.Input;
- namespace InputScopeDemo
- {
- public partial class MainPage : PhoneApplicationPage
- {
- // Constructor
- public MainPage()
- {
- InitializeComponent();
- //First way
- InputScope scope = new InputScope();
- InputScopeName name = new InputScopeName();
- name.NameValue = InputScopeNameValue.Number;
- scope.Names.Add(name);
- txtInputNumber.InputScope = scope;
- }
- }
- }
- // txtInputNumber - is a textbox
- txtInputNumber.InputScope =
- new InputScope()
- {
- Names = { new InputScopeName() { NameValue = InputScopeNameValue.Number } }
- };
I have written the above code in MainPage.xaml.cs where txtInputNumber is the ID of TextBox control. So either we can set the input scope at xaml or programmatically. Now let's see about the another type: Text
System.Windows.Input; : is required if we are setting the InputScope programmatically.
Text
Text is another type for on screen keyboard in windows phone applications, basically we used this type when we need to get input from a textbox as alphabets with combinations of symbols and other characters. Let's see the following code snippet in which I am using the type Text for InputScope values.
Text is another type for on screen keyboard in windows phone applications, basically we used this type when we need to get input from a textbox as alphabets with combinations of symbols and other characters. Let's see the following code snippet in which I am using the type Text for InputScope values.
Code Snippet
(MainPage.xaml)
(MainPage.xaml)
- <phone:PivotItem Header="text">
- <Grid Background="Transparent">
- <Grid.RowDefinitions>
- <RowDefinition Height="60" />
- <RowDefinition Height="100" />
- <RowDefinition Height="*" />
- </Grid.RowDefinitions>
- <TextBlock Grid.Row="0" Text="Comment" FontSize="35" Padding="10"></TextBlock>
- <TextBox Name="txtInputText" Height="100" Grid.Row="1" Background="White" Foreground="Orange" >
- <TextBox.InputScope>
- <InputScope>
- <InputScopeName NameValue="Text" />
- </InputScope>
- </TextBox.InputScope>
- </TextBox>
- </Grid>
- </phone:PivotItem>

Output
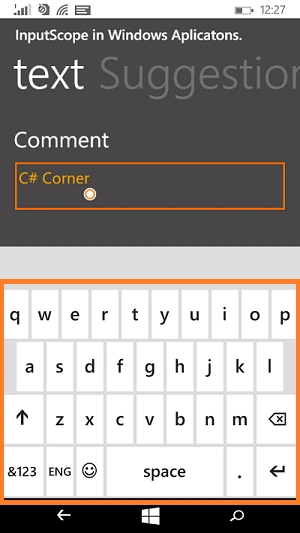
Figure 6: Text Keyboard
EmailNameOrAddress
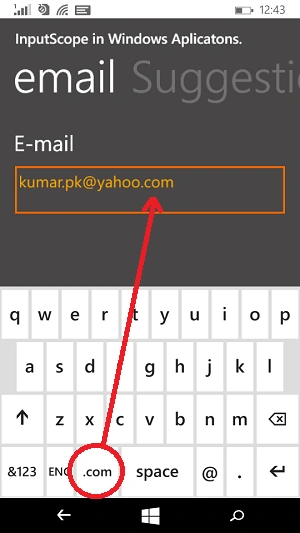
EmailNameOrAddress is another type for InputScope. Basically we can use this type of keyboard when we need to get input from the text box as e-mail address as well as to make more feasible to user to type e-mail address shortly.
Note: Basically this keyboard has a key with a combination of key for internet domain like .com, .in or others - it's dependent on the language of device/phone which you are using.
Code Snippet
- <phone:PivotItem Header="email">
- <Grid Background="Transparent">
- <Grid.RowDefinitions>
- <RowDefinition Height="60" />
- <RowDefinition Height="100" />
- <RowDefinition Height="*" />
- </Grid.RowDefinitions>
- <TextBlock Grid.Row="0" Text="E-mail" FontSize="35" Padding="10"></TextBlock>
- <TextBox Name="txtInputEmail" Height="100" Grid.Row="1" Background="White" Foreground="Orange" >
- <TextBox.InputScope>
- <InputScope>
- <InputScopeName NameValue="EmailNameOrAddress" />
- </InputScope>
- </TextBox.InputScope>
- </TextBox>
- </Grid>
- </phone:PivotItem>
Output
Search
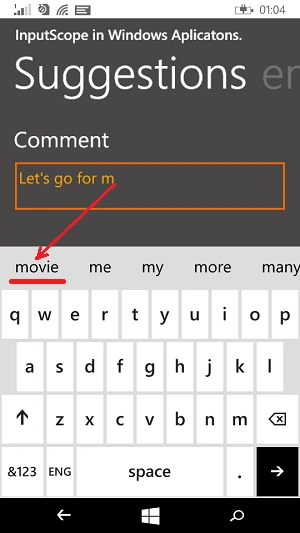
If we use search as a InputScope for a TextBox, it provide the facilities for word suggestion at the time of typing. Suppose we have to type programming, so if we are using this keyboard type as we type pro or prog or progr it will display some suggestions just above the keyboard as programming, progra, any word which start with the word that you have typed yet.
If we use search as a InputScope for a TextBox, it provide the facilities for word suggestion at the time of typing. Suppose we have to type programming, so if we are using this keyboard type as we type pro or prog or progr it will display some suggestions just above the keyboard as programming, progra, any word which start with the word that you have typed yet.
Code Snippet
- <phone:PivotItem Header="Suggestions">
- <Grid Background="Transparent">
- <Grid.RowDefinitions>
- <RowDefinition Height="60" />
- <RowDefinition Height="100" />
- <RowDefinition Height="*" />
- </Grid.RowDefinitions>
- <TextBlock Grid.Row="0" Text="Comment" FontSize="35" Padding="10"></TextBlock>
- <TextBox Name="txtInputWithSuggestions" Height="100" Grid.Row="1" Background="White" Foreground="Orange" >
- <TextBox.InputScope>
- <InputScope>
- <InputScopeName NameValue="Search" />
- </InputScope>
- </TextBox.InputScope>
- </TextBox>
- </Grid>
- </phone:PivotItem>
Chat
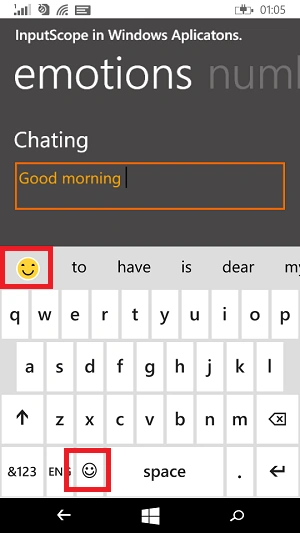
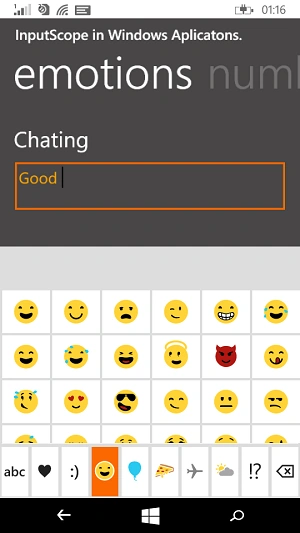
When we do chat with our friends and we need some symbols to represent our emotions, like smile, sad, etc. So if we are developing a application for chat purpose or where we need to accept input as emotions with some text then we can use this type of InputScope values.
By default this options is available with type Text.
Code Snippet
- <phone:PivotItem Header="emotions">
- <Grid Background="Transparent">
- <Grid.RowDefinitions>
- <RowDefinition Height="60" />
- <RowDefinition Height="100" />
- <RowDefinition Height="*" />
- </Grid.RowDefinitions>
- <TextBlock Grid.Row="0" Text="Chating" FontSize="35" Padding="10"></TextBlock>
- <TextBox Name="txtInputWithEmotion" Height="100" Grid.Row="1" Background="White" Foreground="Orange">
- <TextBox.InputScope>
- <InputScope>
- <InputScopeName NameValue="Chat" />
- </InputScope>
- </TextBox.InputScope>
- </TextBox>
- </Grid>
- </phone:PivotItem>
Summary
In this article we read about the different types of on screen keyboard for windows phone development. Here we read about some most popular values of InputScope (Keyboard types).
In this article we read about the different types of on screen keyboard for windows phone development. Here we read about some most popular values of InputScope (Keyboard types).
Ibrahim ErsoyPosted Mar 3, 2016, 3:06 AM
Detailed Article.I like it! Great job :)
Lalit KumarPosted Dec 21, 2015, 5:37 AM
Good Post
Humayun Kabir MamunPosted Dec 20, 2015, 1:29 AM
Nice...
Anoop Kumar SharmaPosted Dec 19, 2015, 8:23 AM
Nice Article!!
Ajay GandhiPosted Dec 19, 2015, 5:54 AM
Nice ....Thank you
Santhakumar MunuswamyPosted Dec 19, 2015, 5:17 AM
Thank you praveen kumar
Santhakumar MunuswamyPosted Dec 18, 2015, 9:55 AM
Can you upload source code it will be helpful for the beginner
Santhakumar MunuswamyPosted Dec 18, 2015, 9:54 AM
Good work.