

Introduction
- Arduino UNO
- LCD 1602 Display
- DHT11 Temperature Module
- Jumper Wires
- 1 k Ohms Resistor
Background
In my last article, I articulated the DHT sensor coding. Whereas in this article we will use the same concept of DHT.h to display the sensor data to the LCD 1602 Display, instead of a serial monitor and you can carry it outdoors and see the various temperatures around.
Before we do anything, ensure you have completed all the connections. Since it's a bit difficult to have an easy connection for the LCD because of 16 pins. Still, have keen eyes while doing it.
Connection Layout
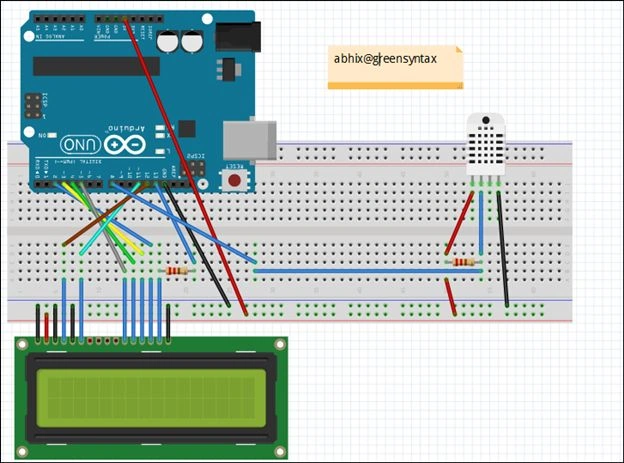 You may say that it's a complex connection but bear with it. Either buy a compact LCD module or get your LCD on green PCB that will reduce the complexity and bulk of wires.
Note: We will explain the LCD 1602 individually in a future article.
As far as we are concerned about the connection layout, the DHT PIN has a data pin that is connected to PIN8. And the others are the same for the DHT.
Try to follow the mockup.
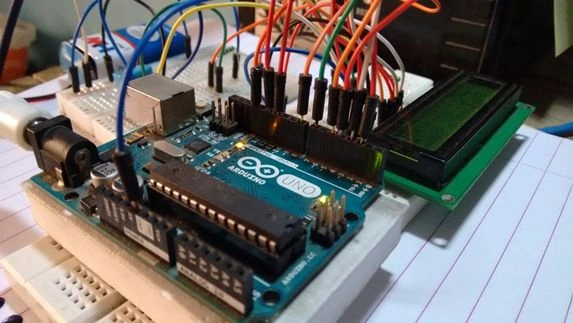
The following is how it really looks:
You may say that it's a complex connection but bear with it. Either buy a compact LCD module or get your LCD on green PCB that will reduce the complexity and bulk of wires.
Note: We will explain the LCD 1602 individually in a future article.
As far as we are concerned about the connection layout, the DHT PIN has a data pin that is connected to PIN8. And the others are the same for the DHT.
Try to follow the mockup.
The following is how it really looks:
 Procedures
First, do a connection as shown in the breadboard. Make sure you have correct the data pins with the Vcc and Grounds attached to the same Arduino PIN.
Sketch
Procedures
First, do a connection as shown in the breadboard. Make sure you have correct the data pins with the Vcc and Grounds attached to the same Arduino PIN.
Sketch
- #include < LiquidCrystal.h > #include < DHT.h >
- /*
- Title: Temperature Detector
- Author: ABhishek Kumar Ravi
- @greenSyntax
- Date: 13th May 2015
- Modules Used:
- # DHT11
- # LCD 1602 Display
- */
- LiquidCrystal lcd(12, 11, 5, 4, 3, 2);
- #define PIN 8#define TYPE DHT11
- // Prototype Declartion
- DHT dht(PIN, TYPE);
- void setup() {
- Serial.begin(9600);
- lcd.begin(16, 2);
- lcd.clear();
- //Start
- dht.begin();
- }
- void loop() {
- // Maitain a diffrence of 2 seconds
- float humidity = dht.readHumidity();
- float temp_cel = dht.readTemperature(); // in Clecius
- float temp_farh = dht.readTemperature(true);
- // Id Failed to Read Data
- if (isnan(humidity) || isnan(temp_cel) || isnan(temp_farh)) {
- //isnan = is NOT A NUMBER which return true when it is not a number
- Serial.println("# Sorry, Failed to Read Data From DHT Module");
- return;
- }
- else {
- // For Humidity
- Serial.print("Humidity : ");
- Serial.print(humidity);
- Serial.println(" % ");
- lcd.setCursor(0, 0);
- lcd.print("Humidity: ");
- lcd.print(humidity);
- // For Temprature
- Serial.print("Temparture : ");
- Serial.print(temp_cel);
- Serial.print(" C - ");
- Serial.print(temp_farh);
- Serial.println(" F ");
- lcd.setCursor(0, 1);
- lcd.print("Temp. : ");
- lcd.print(temp_cel);
- }
- delay(5000);
- }
Apart from the LCD code, we have discussed all the sections of the DHT in our previous article. For the rest, we have used a few new functions, like lcd.print() to print on the LCD and then lcd.setCusor() to point the cursor on the LCD. We have used (0,1) as an argument because that specifies the 0th column and first row.
Since our LCD is of 2 rows and 16 columns, it's given the following name: 16 column x 02 rows, in other words, 1602 Display.
Pictures
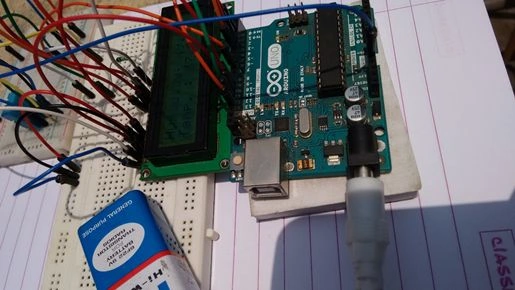
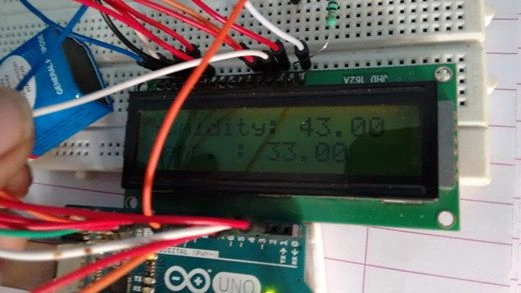 It's a very fundamental project to do using Arduino. The next article explains all the nuts and bolts of the LCD 1602 Display. And until then, enjoy your very own Temperature Detector. In version 2.0 of this project, I will try to add a Twitter API with this that can send you a tweet when it goes above a certain temperature. Until then Keep Calm and Love Coding.
Munish APosted Jun 5, 2018, 9:45 PM
Nice article
Santhakumar MunuswamyPosted May 14, 2015, 3:20 PM
Good work
Sam HobbsPosted May 14, 2015, 2:51 PM
Looks useful and fun to do. Something else that could be useful is to make the temperature available over the WiFi. Perhaps later other sensors could be added, such as humidity. I think a wind speed would be awesome but that would not be so easy.
Gopi ChandPosted May 14, 2015, 2:12 PM
Good practical work..
NitinPosted May 14, 2015, 12:46 PM
excellent
Sumantro MukherjeePosted May 14, 2015, 9:39 AM
Awesome !!