

Introduction
- When we starts with registering users on any application or website.One thing is to care about that is security of data.
- Passwords is the most sensitive information to travel throughout the internet ,so that should be securely transfered to the internet.
- This article tells how to encrypt the password and registers the user with other information.
- ADO.NET model is used as data access technique here,MVC is used with angularjs.
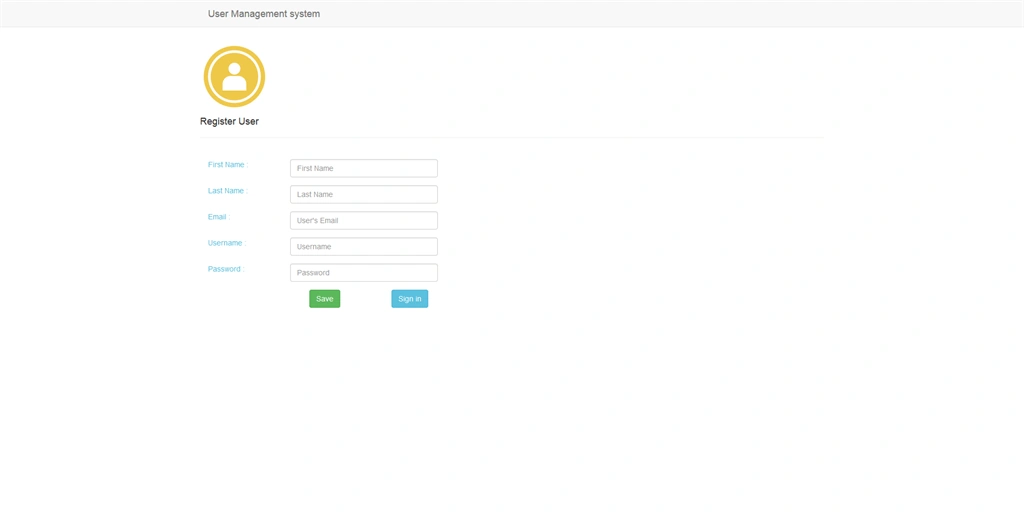
Create database and tables
- Firstly Create database named TestData.
- After creating the database create a table with the name Logins.
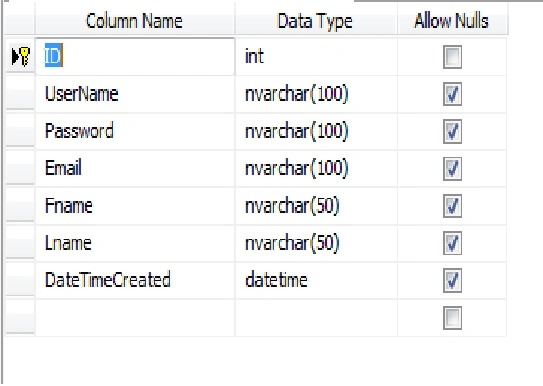
- Set the Id column as primary key and auto increment id in every table.
- That's it with the database.
Download JS and CSS files from given links
- Download AngularJs min file from here.
- Download Bootstrap css and js from here.
- Download Bootstrap.theme.min.css from here.
Are you new with AngularJS ?
- Visit this link for more information on AngularJS.
Start writing code
- Open the VS2012 ,Create New ASP.Net MVC4 Web Application and give the Name AuthenticationAngularMvcApp.
- Go to Models Folder in the solution explorer of visual studio.
- Right click the Models folder and find ADD >>> ADO.NET Entity Data Model. Select ADO.NET Entity Data Model.
- Provide the name DbModel. After that pop up will appear .
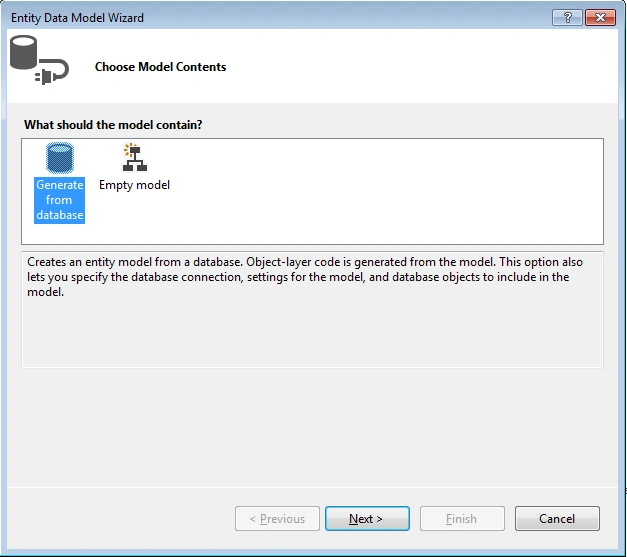
- Select generate from database, click Next.
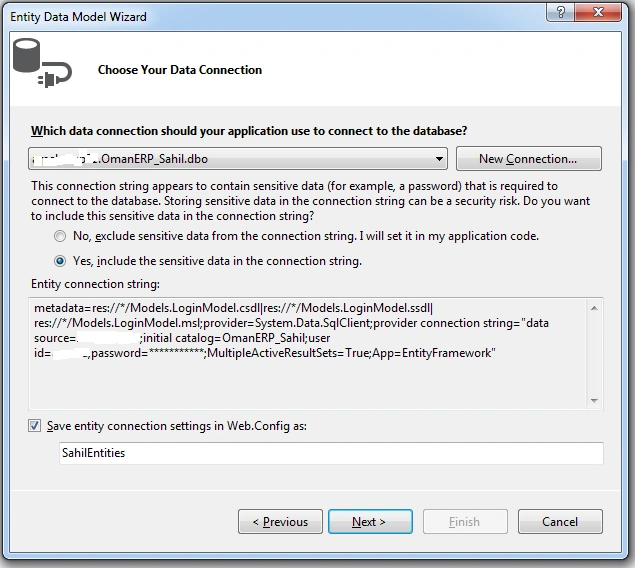
- In the given box type entity name as SahilEntities and After that click New connection.
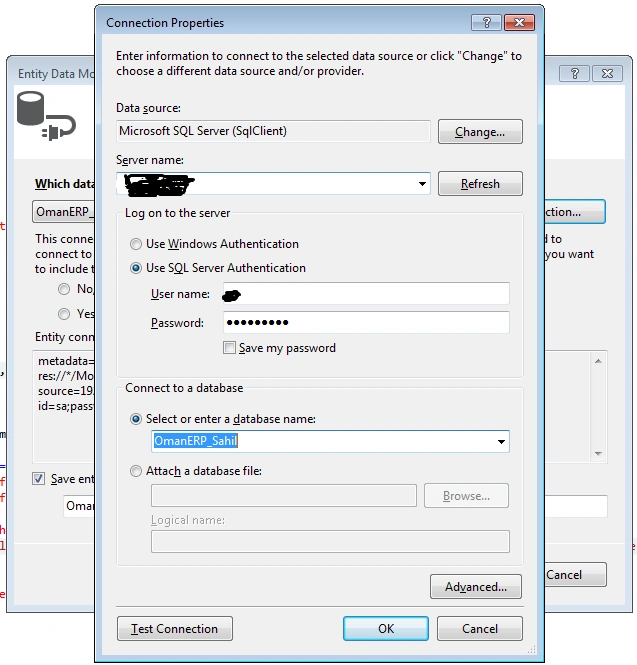
- Select Sql server authentication and fill the credentials like server name ,user name ,password,and then select your database from the database list.
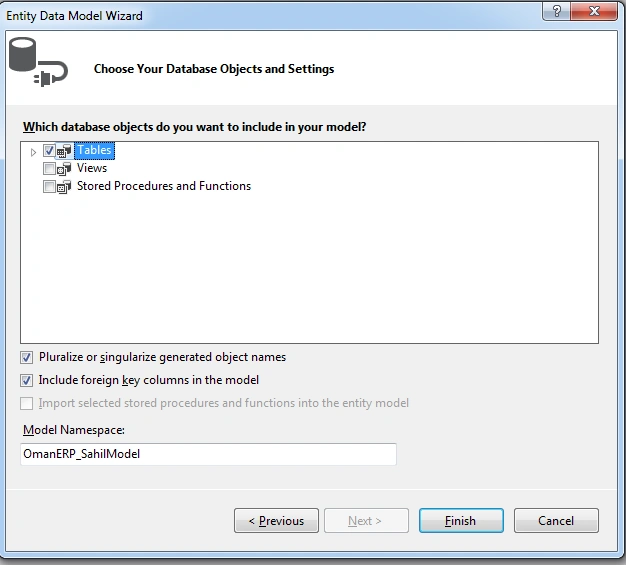
- Check the checkboxes of tables and click on finish.
Register CSS and JS in Bundle.Config
- Go to the App_Start folder find BundleConfig.cs write the below given code.
- using System.Web;
- using System.Web.Optimization;
- namespace AuthenticationAngularMvc
- {
- public class BundleConfig
- {
- public static void RegisterBundles(BundleCollection bundles)
- {
- RegisterScript(bundles);
- RegisterStyle(bundles);
- }
- public static void RegisterScript(BundleCollection bundles)
- {
- bundles.Add(new ScriptBundle("~/js")
- .Include("~/Scripts/jquery-{version}.js")
- .Include("~/Scripts/jquery-ui-{version}.js")
- .Include("~/Scripts/bootstrap.js"));
- }
- public static void RegisterStyle(BundleCollection bundles)
- {
- bundles.Add(new StyleBundle("~/css")
- .Include("~/Content/bootstrap.css")
- .Include("~/Content/site.css"));
- }
- }
- }
Utility class to encrypt password
- Right click on the Refrence folder ,select Manage NuGet Packages.
- Search for Bcrypt,install by click on install button.
- Bcrypt is a cross platform file encryption utility.it calculates the hash algorithm for the plain text.
- It compares the hash at the time of login of user to give access.
- The biggest advantage of this algorithm is ,we cannot decrypt the password to plain text only hash is compared of 2 passwords.
- Add a folder named Utilities in the solution explorer.
- Create a class named Utility.Import namespace using BCrypt.Net; to access methods under Bcrypt namespace.
- using System;
- using System.Collections.Generic;
- using System.Linq;
- using System.Web;
- using System.Web.Mvc;
- using BCrypt.Net;
- namespace AuthenticationAngularMVC.Utilities
- {
- public static class Utility
- {
- public static string Encryptpassword(string password)
- {
- string hashedPassword = BCrypt.Net.BCrypt.HashPassword(password, BCrypt.Net.BCrypt.GenerateSalt(12));
- return hashedPassword;
- }
- public static bool CheckPassword(string enteredPassword, string hashedPassword)
- {
- bool pwdHash = BCrypt.Net.BCrypt.Verify(enteredPassword, hashedPassword);
- return pwdHash;
- }
- }
- }
- Here first method is used to encrypt password and second method is used to compare the password at the time of login.
- In first method plain text password is passed to the method.
- In second method plain text password and hashed password from database is passed for comparison.
Start with Controller code
- Go to the controller folder and create RegisterController in the folder.
- Replace the Index ActionResult with Register.
- Create CheckUser method with username as parameter to check the existence of user.
- Create method for AddUser with Login class as parameter.
- Here first we check if the data is present in the usr instance or not.
- Then check if user is already present or not by CheckUser method.
- Then create object of Logins class to store the data in fields.
- Encrypt the password by using utility class and passing entered password in the utility class.
- Utitliy class is a static class and it can be directly accessed without creating the object.
- using System;
- using System.Collections.Generic;
- using System.Linq;
- using System.Web;
- using System.Web.Mvc;
- using AuthenticationAngularMvc.Models;
- namespace AuthenticationAngularMvc.Controllers
- {
- public class RegisterController : Controller
- {
- public ActionResult Register()
- {
- return View();
- }
- //To check that user entered is already present or not.
- public bool CheckUser(string user)
- {
- bool Exists = false;
- using (SahilEntities context = new SahilEntities())
- {
- var uName = context.Logins1.Where(x => x.UserName == user).ToList();
- if (uName.Count != 0)
- {
- Exists = true;
- }
- }
- return Exists;
- }
- //For saving the user details in database table.
- public string AddUser(Login1 usr)
- {
- if (usr != null)
- {
- if (CheckUser(usr.UserName) == false)
- {
- using (SahilEntities context = new SahilEntities())
- {
- Login1 createUser = new Login1();
- createUser.UserName = usr.UserName;
- createUser.Fname = usr.Fname;
- createUser.Lname = usr.Lname;
- createUser.Email = usr.Email;
- createUser.DateTimeCreated = DateTime.Now;
- createUser.Password = Utility.Encryptpassword(usr.Password);
- context.Logins1.Add(createUser);
- context.SaveChanges();
- }
- return "User created !";
- }
- else
- {
- return "User already present !";
- }
- }
- else
- {
- return "Invalid Data !";
- }
- }
- }
- }
Change path of default controller
- Find RouteConfig.cs in App_Start folder and change the default Controller and Action.
- using System;
- using System.Collections.Generic;
- using System.Linq;
- using System.Web;
- using System.Web.Mvc;
- using System.Web.Routing;
- namespace AuthenticationAngularMvc
- {
- public class RouteConfig
- {
- public static void RegisterRoutes(RouteCollection routes)
- {
- routes.IgnoreRoute("{resource}.axd/{*pathInfo}");
- routes.MapRoute(
- name: "Default",
- url: "{controller}/{action}/{id}",
- defaults: new { controller = "Register", action = "Register", id = UrlParameter.Optional }
- );
- }
- }
- }
Start with AngularJS code
- Add Module.js,Controller.js,Service.js in content folder.
- In Module.js start writing code.
- var app = angular.module("myApp", []);
- app.Controller registers the angular controller with name myCntrl.
- $scope is used to refers the application.Data passed in the $scope is accessible in view.
- myService used to access the methods in the Service.js file.
- In SaveUser function, Object User is used to store entered inputs by user.
- Then response is used to store the response returned by AddUser method in the service.
- At last message should be displayed on the screen according to the data returned from the service.
- app.controller("myCntrl", function ($scope, myService) {
- $scope.SaveUser = function () {
- $("#divLoading").show();
- var User = {
- FName: $scope.fName,
- LName: $scope.lName,
- Email: $scope.uEmail,
- Password: $scope.uPwd,
- UserName: $scope.uName
- };
- var response = myService.AddUser(User);
- response.then(function (data) {
- if (data.data == "1") {
- $("#divLoading").hide();
- clearFields();
- alert("User Created !");
- window.location.href = "/Register/Login";
- }
- else if (data.data == "-1") {
- $("#divLoading").hide();
- alert("user alraedy present !");
- }
- else {
- $("#divLoading").hide();
- clearFields();
- alert("Invalid data entered !");
- }
- });
- }
- function clearFields() {
- $scope.fName = "";
- $scope.lName = "";
- $scope.Email = "";
- $scope.Password = "";
- $scope.UserName = "";
- }
- });
- In Service.js app.Service is used to register the service with the application.
- $http is used to call the server methods by providing url ,method,and data.
- Returned response is then passed from where the function is called.
- app.Service("myService", function ($http) {
- this.AddUser = function (User) {
- var response = $http({
- method: "post",
- url: "/Register/AddUser",
- data: JSON.stringify(User),
- dataType: "json"
- });
- return response;
- }
- });
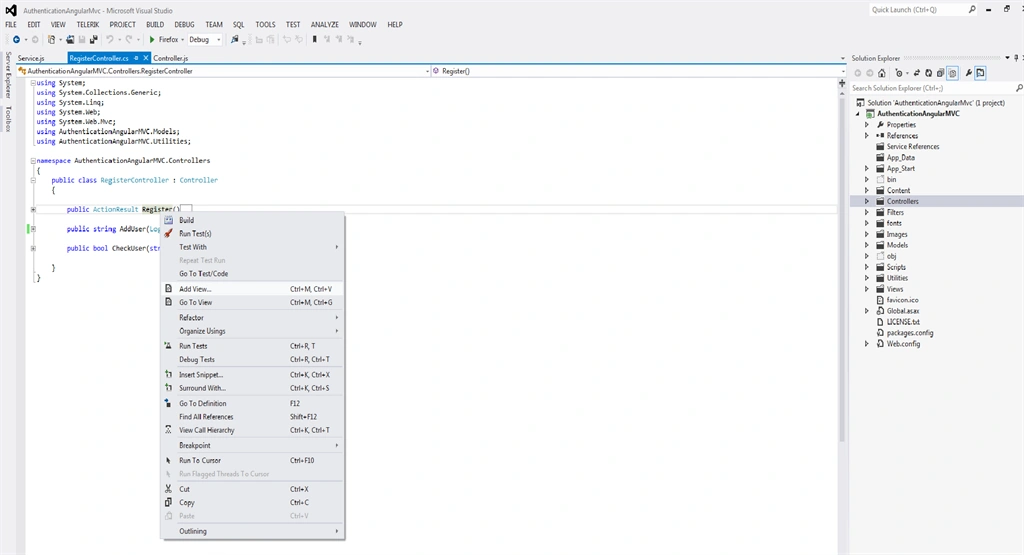
- Go to the RegisterController ,right click on the Register Action, select AddView option.
- Start writing code in RegisterView.
- @{
- ViewBag.Title = "Register";
- }
- <html ng-app="myApp">
- <head>
- <title>Register</title>
- <script src="~/Content/Module.js"></script>
- <script src="~/Content/Service.js"></script>
- <script src="~/Content/Controller.js"></script>
- </head>
- <body>
- <div class="container" ng-controller="myCntrl">
- <br />
- <div class="row">
- <img src="~/Content/Images/user.png" /><h4>Register User</h4>
- <hr />
- <br />
- <div class="col-md-6">
- <form name="userForm" novalidate>
- <div class="form-horizontal">
- <div class="form-group">
- <div class="row">
- <div class="col-md-3" style="margin-left: 15px; color: #5bc0de;">
- First Name :
- </div>
- <div class="col-md-6">
- <input type="text" class="form-control" placeholder="First Name" name="fName" ng-model="fName" required autofocus />
- </div>
- </div>
- </div>
- <div class="form-group">
- <div class="row">
- <div class="col-md-3" style="margin-left: 15px; color: #5bc0de;">
- Last Name :
- </div>
- <div class="col-md-6">
- <input type="text" class="form-control" placeholder="Last Name" name="lName" ng-model="lName" required autofocus />
- </div>
- </div>
- </div>
- <div class="form-group">
- <div class="row">
- <div class="col-md-3" style="margin-left: 15px; color: #5bc0de">
- Email :
- </div>
- <div class="col-md-6">
- <input type="email" class="form-control" placeholder="User's Email" name="uEmail" ng-model="uEmail" required autofocus />
- </div>
- </div>
- </div>
- <div class="form-group">
- <div class="row">
- <div class="col-md-3" style="margin-left: 15px; color: #5bc0de;">
- Username :
- </div>
- <div class="col-md-6">
- <input type="text" class="form-control" placeholder="Username" name="uName" ng-model="uName" required autofocus />
- </div>
- </div>
- </div>
- <div class="form-group">
- <div class="row">
- <div class="col-md-3" style="margin-left: 15px; color: #5bc0de;">
- Password :
- </div>
- <div class="col-md-6">
- <input type="password" class="form-control" placeholder="Password" name="uPwd" ng-model="uPwd" required autofocus />
- </div>
- </div>
- </div>
- <div class="form-group">
- <div class="row">
- <div class="col-md-4"></div>
- <div class="col-md-3">
- <input type="button" value="Save" ng-click="SaveUser();" class="btn btn-success" />
- </div>
- <div class="col-md-3">
- @Html.ActionLink("Sign in", "Login", "Register", new {@class="btn btn-info" })
- </div>
- </div>
- </div>
- <div class="form-group">
- <div class="row">
- <div class="col-md-6">
- <div id="divLoading" style="margin: 0px; padding: 0px; position: fixed; right: 0px; top: 0px; width: 100%; height: 100%; background-color: #666666; z-index: 30001; opacity: .8; filter: alpha(opacity=70); display: none">
- <p style="position: absolute; top: 30%; left: 45%; color: White;">
- please wait...<img src="~/Content/images/load.png">
- </p>
- </div>
- </div>
- </div>
- </div>
- </div>
- </form>
- </div>
- </div>
- </div>
- </body>
- </html>
- As we discussed earlier ,ng-app is a directive that is used to initialize the app with this module.
- Drag and drop script files in head tag.
- ng-controller is used with the div tag to initialize with the controller.
- In the form write code for all the fields.
- On the Save click call the method SaveUser in controller.js.
Change the layout of project
- Find _Layout.cshtml file in the shared folder under views folder.
- Write code as given below.
- <!DOCTYPE html>
- <html lang="en">
- <head>
- <meta charset="utf-8" />
- <title>@ViewBag.Title</title>
- <link href="~/favicon.ico" rel="shortcut icon" type="image/x-icon" />
- <meta name="viewport" content="width=device-width" />
- <script src="~/Scripts/angular1.2.18.min.js"></script>
- @Styles.Render("~/css")
- </head>
- <body>
- <div class="navbar navbar-default navbar-fixed-top">
- <div class="container">
- <div class="navbar-header">
- <button type="button" class="navbar-toggle" data-toggle="collapse" data-target=".navbar-collapse">
- <span class="icon-bar"></span>
- <span class="icon-bar"></span>
- <span class="icon-bar"></span>
- </button>
- <a class="navbar-brand" href="#">User Management system</a>
- </div>
- </div>
- </div>
- <div id="body">
- @RenderSection("featured", required: false)
- <section class="content-wrapper main-content clear-fix">
- @RenderBody()
- </section>
- </div>
- @Scripts.Render("~/js")
- @RenderSection("scripts", required: false)
- </body>
- </html>
Start your own app
Ankit ShuklaPosted Jul 14, 2017, 4:41 AM
Sorry Sir, But I did not get code of "controller.js"
Thiruppathi RPosted May 31, 2016, 3:03 AM
Thanks a lot..
Pradeep SahooPosted May 9, 2016, 10:18 PM
Nice . Thanks for sharing
Vignesh ManiPosted May 7, 2016, 8:46 AM
nice