

Before reading this article, please go through the articles mentioned below.
- Introduction To Universal Windows Platform (UWP) App Development Using Windows 10 And Visual Studio 2015
- Getting Started With Microsoft Azure Cognitive Services - Text Analytics API
Microsoft Cognitive Services (formerly Project Oxford) are a set of APIs, SDKs and Services are available to the developers to make their Applications more intelligent, engaging and discoverable. Microsoft Cognitive Services expands on Microsoft’s evolving portfolio of machine learning API's and enables the developers to easily add intelligent features. Microsoft Cognitive Services allows you to build apps with the powerful algorithms, using few lines of code. They work across the devices and platforms such as iOS, Android and Windows, keep improving and are easy to set up.
Text Analytics API, as described by Microsoft, is designed to detect sentiment, key phrases, topics and language from your text.
Detect Language - API returns the detected language and a numeric score between 0 and 1. It scores close to 1 and indicates 100% certainty, which identified the language as true. A total of 120 languages are supported.
After reading this article, you will know how to detect the languages in the given text, using Cognitive Service Text Analytics API, Universal Windows Apps development with Azure, XAML and Visual C#.
The important tools required to develop UWP are shown below.
- Windows 10 (Recommended)
- Visual Studio 2015 Community Edition (It is a free software available online)
- Cognitive Service Text Analytics API Key, using Azure (Getting Started With Microsoft Azure Cognitive Services - Text Analytics API)
Now, we can discuss step by step app development.
Step 1
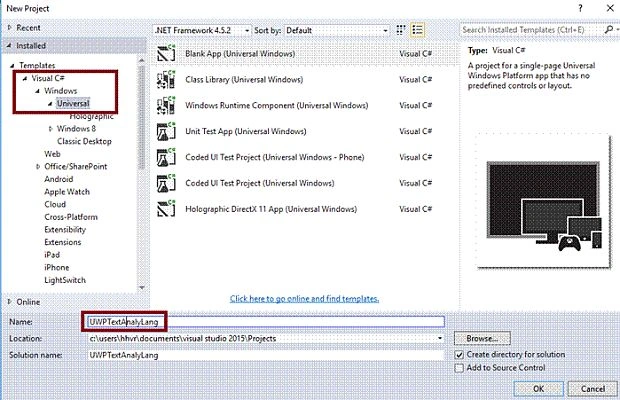
Open Visual Studio 2015 -> Start -> New Project-> Select Universal (under Visual C#->Windows)-> Blank app -> Give the suitable name for your app (UWPTextAnalyLang)->OK.
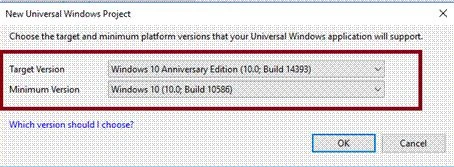
After choosing the Target and minimum platform version for your Windows Universal, Application will support and the project creates App.xaml and MainPage.xaml.
Step 2
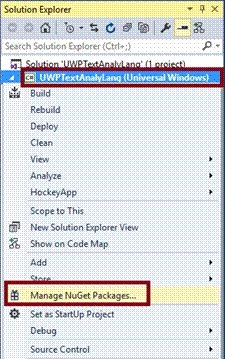
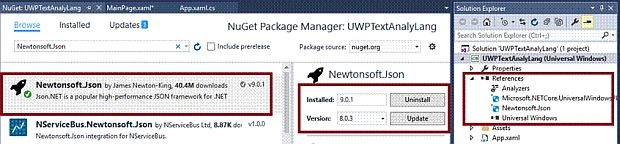
Open (double click) the file MainPage.xaml in the Solution Explorer and add the Newtonsoft.Json reference in the project. Right click your project (UWPTextAnalyLang) and select Manage NuGet Packages.
To add Newtonsoft.Json reference, choose browse and search Newtonsoft.Json. Select the package and install it.
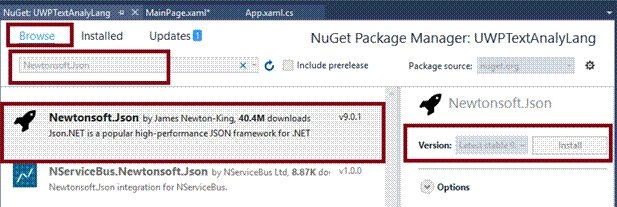
The reference is added to your project.
Step 3
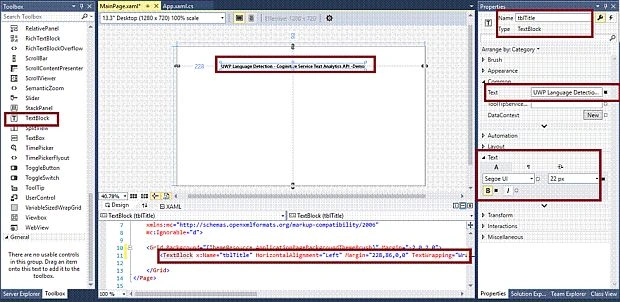
Add a TextBlock control, change the Name and Text property for Title.
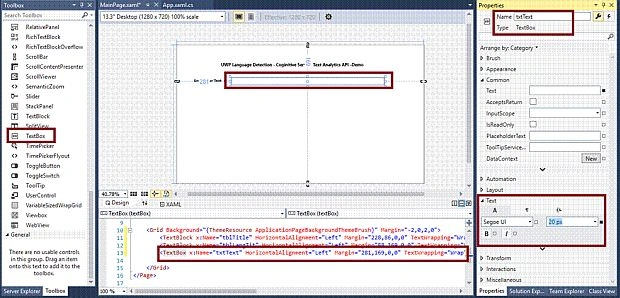
Add a TextBlock and TextBox control, change the Name and clear the text property to get input text.
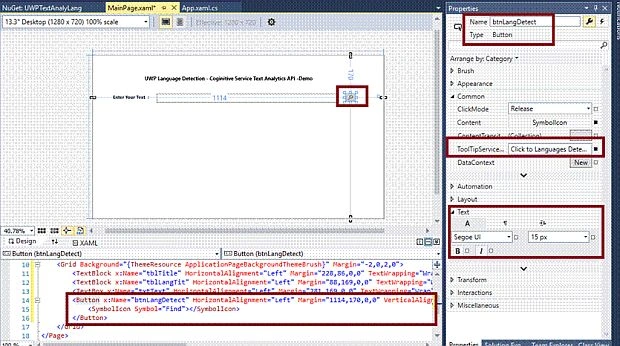
Add a Button Control, set the Name and add the Edit icon for Language Detection.
Step 4
Add GridView Resources, using the code, mentioned below.
- <Grid.Resources>
- <CollectionViewSource x:Name="LanguageResultsCol" Source="{x:Bind LanguageResults}" IsSourceGrouped="False" /> </Grid.Resources>
- <GridView x:Name="gvLang" ItemsSource="{Binding Source={StaticResource LanguageResultsCol}}" SelectionMode="None" IsItemClickEnabled="False" HorizontalAlignment="Left" Height="276" Margin="96,233,0,0" VerticalAlignment="Top" Width="1054">
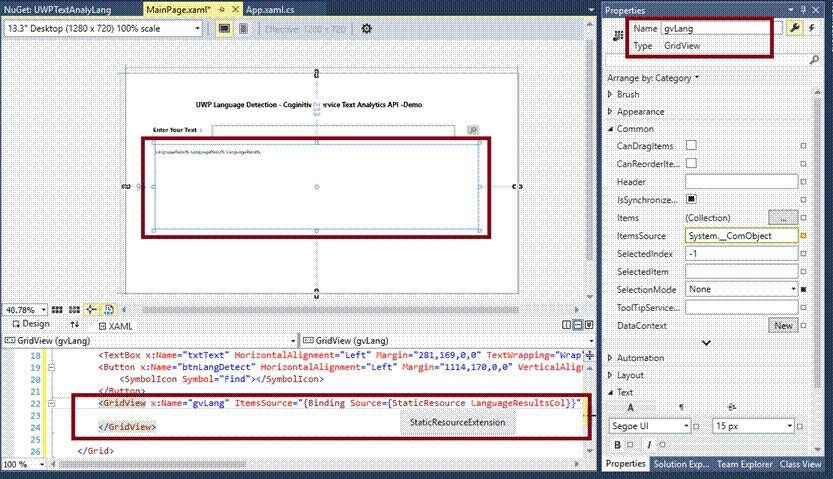
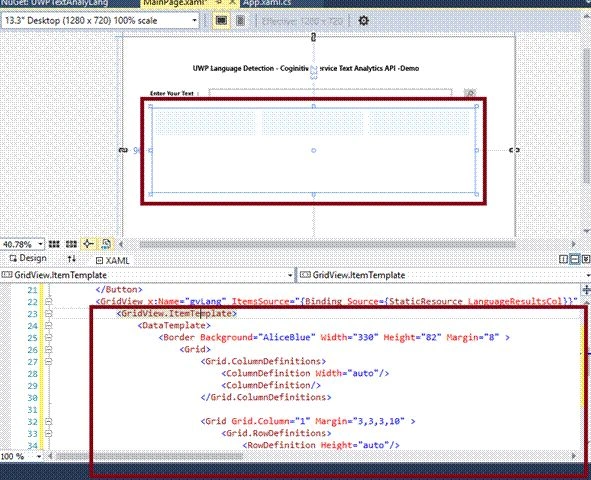
Add the code, mentioned below for Grid View Item Template for Phrase list.
- <GridView.ItemTemplate>
- <DataTemplate>
- <Border Background="AliceBlue" Width="330" Height="82" Margin="8">
- <Grid>
- <Grid.ColumnDefinitions>
- <ColumnDefinition Width="auto" />
- <ColumnDefinition/> </Grid.ColumnDefinitions>
- <Grid Grid.Column="1" Margin="3,3,3,10">
- <Grid.RowDefinitions>
- <RowDefinition Height="auto" /> </Grid.RowDefinitions>
- <StackPanel Margin="0,0,0,-143">
- <TextBlock TextWrapping="Wrap" Text="{Binding lgco.name}" Style="{StaticResource CaptionTextBlockStyle}" Height="28" />
- <TextBlock TextWrapping="Wrap" Text="{Binding lgco.isoname}" Style="{StaticResource CaptionTextBlockStyle}" Height="28" />
- <TextBlock TextWrapping="Wrap" Text="{Binding lgco.score}" Style="{StaticResource CaptionTextBlockStyle}" Height="28" /> </StackPanel>
- </Grid>
- </Grid>
- </Border>
- </DataTemplate>
- </GridView.ItemTemplate>
Step 5
Add the Click event method for button to detect a language.
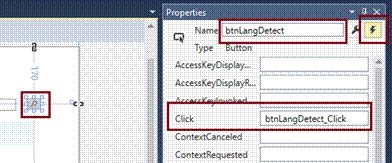
Note
Automatically, the code, mentioned below will be generated in XAML code view, while we are done in the design view.
<Page
- x: Class = "UWPTextAnalyLang.MainPage"
- xmlns = "http://schemas.microsoft.com/winfx/2006/xaml/presentation"
- xmlns: x = "http://schemas.microsoft.com/winfx/2006/xaml"
- xmlns: local = "using:UWPTextAnalyLang"
- xmlns: d = "http://schemas.microsoft.com/expression/blend/2008"
- xmlns: mc = "http://schemas.openxmlformats.org/markup-compatibility/2006"
- mc: Ignorable = "d" > < Grid Background = "{ThemeResource ApplicationPageBackgroundThemeBrush}"
- Margin = "-2,0,2,0" > < Grid.Resources > < CollectionViewSource x: Name = "LanguageResultsCol"
- Source = "{x:Bind LanguageResults}"
- IsSourceGrouped = "False" / > < /Grid.Resources> < TextBlock x: Name = "tblTitle"
- HorizontalAlignment = "Left"
- Margin = "228,86,0,0"
- TextWrapping = "Wrap"
- Text = "UWP Language Detection - Coginitive Service Text Analytics API -Demo"
- VerticalAlignment = "Top"
- FontSize = "22"
- FontWeight = "Bold" / > < TextBlock x: Name = "tblLangTit"
- HorizontalAlignment = "Left"
- Margin = "88,169,0,0"
- TextWrapping = "Wrap"
- Text = "Enter Your Text :"
- VerticalAlignment = "Top"
- Height = "32"
- Width = "165"
- FontWeight = "Bold"
- FontSize = "20" / > < TextBox x: Name = "txtText"
- HorizontalAlignment = "Left"
- Margin = "281,169,0,0"
- TextWrapping = "Wrap"
- Text = ""
- VerticalAlignment = "Top"
- Width = "794"
- FontSize = "20" / > < Button x: Name = "btnLangDetect"
- HorizontalAlignment = "Left"
- Margin = "1114,170,0,0"
- VerticalAlignment = "Top"
- Click = "btnLangDetect_Click"
- RenderTransformOrigin = "3.6,0.312"
- ToolTipService.ToolTip = "Click to Languages Detection" > < SymbolIcon Symbol = "Find" > < /SymbolIcon> < /Button> < GridView x: Name = "gvLang"
- ItemsSource = "{Binding Source={StaticResource LanguageResultsCol}}"
- SelectionMode = "None"
- IsItemClickEnabled = "False"
- HorizontalAlignment = "Left"
- Height = "276"
- Margin = "96,233,0,0"
- VerticalAlignment = "Top"
- Width = "1054" > < GridView.ItemTemplate > < DataTemplate > < Border Background = "AliceBlue"
- Width = "330"
- Height = "82"
- Margin = "8" > < Grid > < Grid.ColumnDefinitions > < ColumnDefinition Width = "auto" / > < ColumnDefinition / > < /Grid.ColumnDefinitions> < Grid Grid.Column = "1"
- Margin = "3,3,3,10" > < Grid.RowDefinitions > < RowDefinition Height = "auto" / > < /Grid.RowDefinitions> < StackPanel Margin = "0,0,0,-143" > < TextBlock TextWrapping = "Wrap"
- Text = "{Binding lgco.name}"
- Style = "{StaticResource CaptionTextBlockStyle}"
- Height = "28" / > < TextBlock TextWrapping = "Wrap"
- Text = "{Binding lgco.isoname}"
- Style = "{StaticResource CaptionTextBlockStyle}"
- Height = "28" / > < TextBlock TextWrapping = "Wrap"
- Text = "{Binding lgco.score}"
- Style = "{StaticResource CaptionTextBlockStyle}"
- Height = "28" / > < /StackPanel> < /Grid> < /Grid> < /Border> < /DataTemplate> < /GridView.ItemTemplate> < /GridView> < /Grid> < /Page>
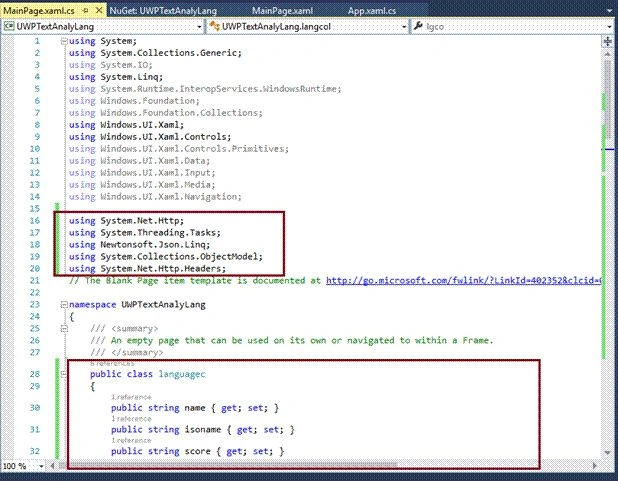
Add the namespaces, mentioned below in Mainpage.xaml.cs for sentiment analysis.
- using System.Net.Http;
- using System.Threading.Tasks;
- using Newtonsoft.Json.Linq;
- using System.Collections.ObjectModel;
- using System.Net.Http.Headers;
Add Text Analytics Client keys use Azure service and Generate it (For More Information, Please refer to the article Getting Started With Microsoft Azure Cognitive Services - Text Analytics API).
Text Analytics API – Detect Language endpoint
https://westus.api.cognitive.microsoft.com/text/analytics/v2.0/languages?
Add the code, mentioned below with Azure generated key for Language Detection.
- public class languagec {
- public string name {
- get;
- set;
- }
- public string isoname {
- get;
- set;
- }
- public string score {
- get;
- set;
- }
- }
- public class langcol {
- public languagec lgco {
- get;
- set;
- }
- }
- static string requestString, text;
- public ObservableCollection < langcol > LanguageResults {
- get;
- set;
- } = new ObservableCollection < langcol > ();
- private async void btnLangDetect_Click(object sender, RoutedEventArgs e) {
- Text = txtText.Text;
- var lg = await getLanguage();
- for (int i = 0; i < lg.Count(); i++) {
- languagec lc = lg.ElementAt(i);
- LanguageResults.Add(new langcol {
- lgco = lc
- });
- }
- }
- static async Task < IEnumerable < languagec >> getLanguage() {
- List < languagec > lang = new List < languagec > ();
- var client = new HttpClient();
- string[] input = new string[] {
- Text
- };
- if (input != null) {
- // Request body.
- requestString = "{\"documents\":[";
- for (int i = 0; i < input.Length; i++) {
- requestString += string.Format("{{\"id\":\"{0}\",\"text\":\"{1}\"}}", i, input[i].Replace("\"", "'"));
- if (i != input.Length - 1) {
- requestString += ",";
- }
- }
- requestString += "]}";
- }
- client.DefaultRequestHeaders.Add("Ocp-Apim-Subscription-Key", "268bab39afce4c8d8e944de02ed722e2");
- var uri = "https://westus.api.cognitive.microsoft.com/text/analytics/v2.0/languages?numberOfLanguagesToDetect=5";
- HttpResponseMessage response;
- byte[] byteData = System.Text.Encoding.UTF8.GetBytes(requestString);
- using(var content = new ByteArrayContent(byteData)) {
- content.Headers.ContentType = new MediaTypeHeaderValue("application/json");
- response = await client.PostAsync(uri, content);
- }
- string content1 = await response.Content.ReadAsStringAsync();
- if (!response.IsSuccessStatusCode) {
- throw new Exception("Text Analytics failed. " + content1);
- }
- dynamic data = JObject.Parse(content1);
- if (data.documents != null) {
- for (int i = 0; i < data.documents.Count; i++) {
- for (int j = 0; j < data.documents[i].detectedLanguages.Count; j++) {
- lang.Add(new languagec {
- name = data.documents[i].detectedLanguages[j].name,
- isoname = data.documents[i].detectedLanguages[j].iso6391Name,
- score = data.documents[i].detectedLanguages[j].score,
- });
- }
- }
- }
- return lang;
- }
Step 8
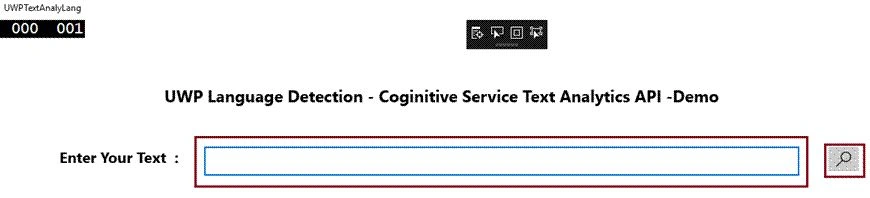
Deploy your app in the local machine and the output of the UWPTextAnalyLang app is given below.
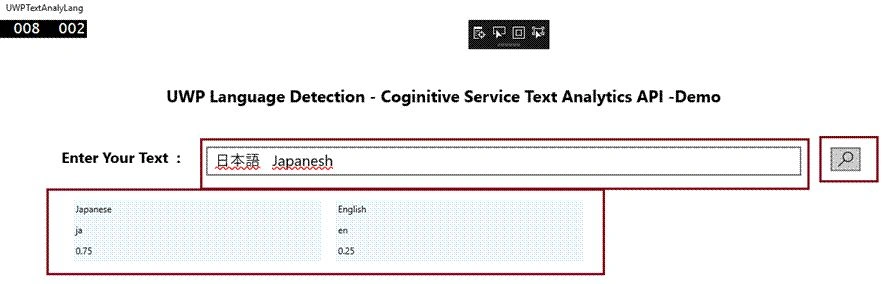
After detecting Japanese language, the screenshot will be, as shown below.
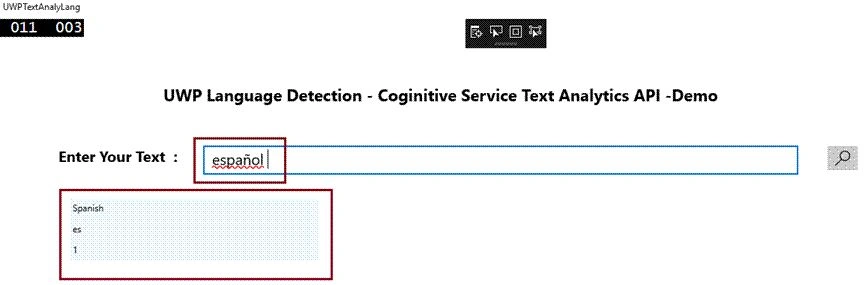
After detecting Spanish language, the output will be, as shown below.
Summary
Now, you have successfully detected the language from the given text, using Cognitive Service Text Analytics API, Azure, XAML and C# with UWP environment.
If you are interested, please read UWP Cognitive Service articles, mentioned below.
- UWP Key Phrase Extraction Using Cognitive Service Text Anaytics API
- Cognitive Service Bing Spell Check API Using Azure, XAML And C#
- Calchistogram Method In Cognitive Service Academic Knowledge API
- Interpret Method Output Value To Evaluate Method Expression In Cognitive Service Academic Knowledge API
- Cognitive Service Academic Knowledge API - Evaluate Method Using UWP With Azure, XAML And C#
- Cognitive Service Bing Web Search API Using UWP With Azure, XAML And C#
- Cognitive Service Bing Video Search API Using UWP With Azure, XAML And C#
- Cognitive Service Bing Image Search API Using UWP With Azure, XAML And C#
- Cognitive Service Bing News Search API Using UWP With Azure, XAML And C#
- Cognitive Service Bing AutoSuggest API Using UWP With Azure, XAML And C#
- Multiple People Emotions In UWP With Cognitive Service Emotion API, Azure, XAML And C#
- Cognitive Service Emotion API In UWP With Azure, XAML And C#
- Retrieving Face Attributes Using Cognitive Service Face API In UWP With Azure, XAML And C#
- Cognitive Service Face API, Using UWP With Azure, XAML And C#
Join the conversation! Your thoughts help the community grow.