

Introduction
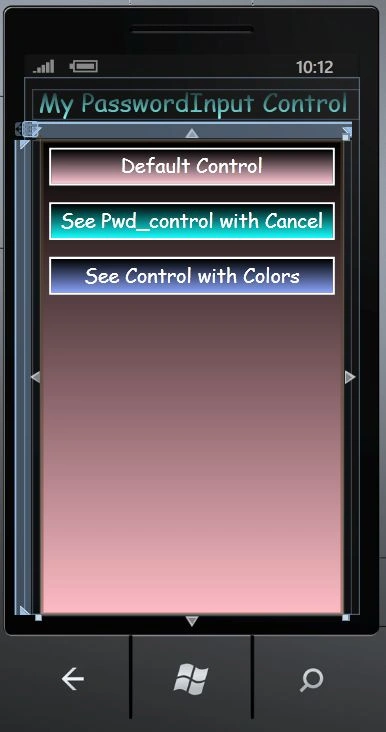
In this article we are going to discuss the PasswordInputPrompt in Windows Phone 7. This article will also discuss in details how it is possible to work with that type of control in Windows Phone 7. Further as we have discussed before basically the PasswordInputPrompt is an UI component derived from the toolkit`s UserPrompt class. We can see here that as its name implies it is a kind of extended popup that prompts the user to enter password input. In this we are going to talk about the functionality it has; whatever we enter into the control is not visible, only password characters that represent the text are displayed. If you want to implement such that then you should follow the steps given below. Before you proceed to make it, let me tell you that you will have to download the Coding4Fun toolkit from here.
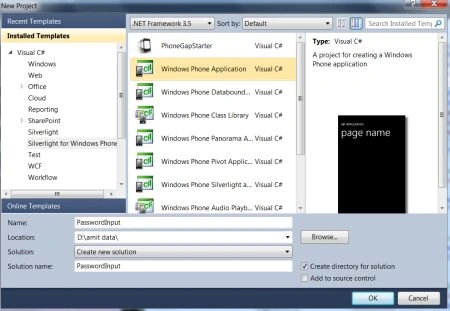
Step 1: In this step first of all we have to create a Windows Phone application; let's see how to create it:
- Go to Visual Studio 2010
- File->New->Project
- Select the template named Silverlight for Windows Phone
- Select the Windows Phone application
- Give it a name as you want.

Step 2: In this step we will see from where you add the assembly reference which is shown in the figures given below.
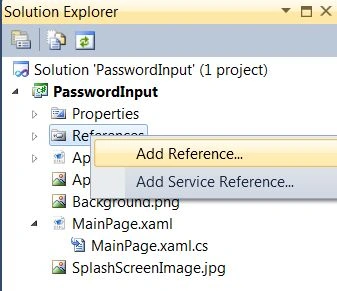
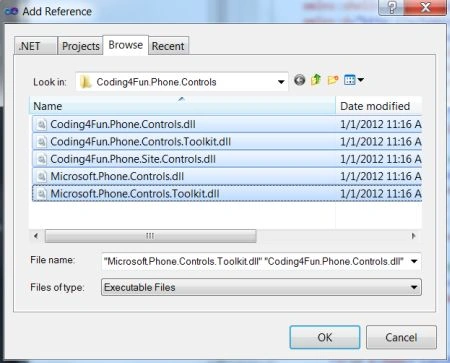
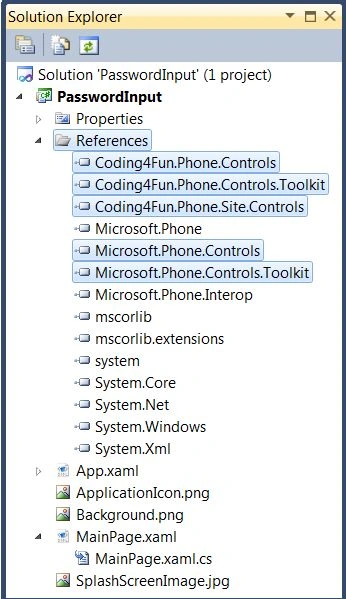
Step 3: In this step you will add a namespace to the MainPage.xaml.cs file which is shown below.

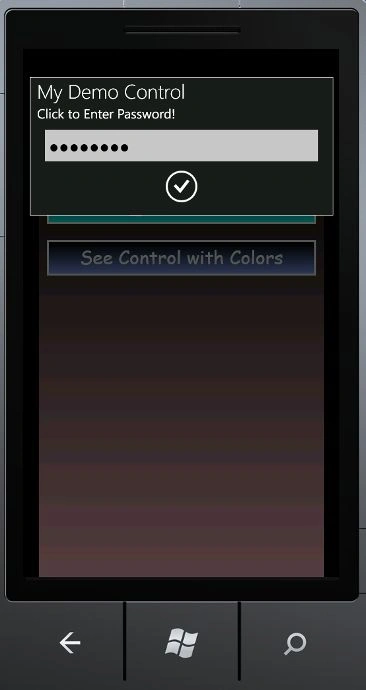
Step 4: In this step you will see the code for the btn1_click which is shown below.
Code:
private void btn1_Click(object sender, RoutedEventArgs e)
{
PasswordInputPrompt Pwd_Input = new PasswordInputPrompt();
Pwd_Input.Title = "My Demo Control";
Pwd_Input.Message = "Click to Enter Password!";
Pwd_Input.Completed += Myinput_Completed;
Pwd_Input.Show();
}
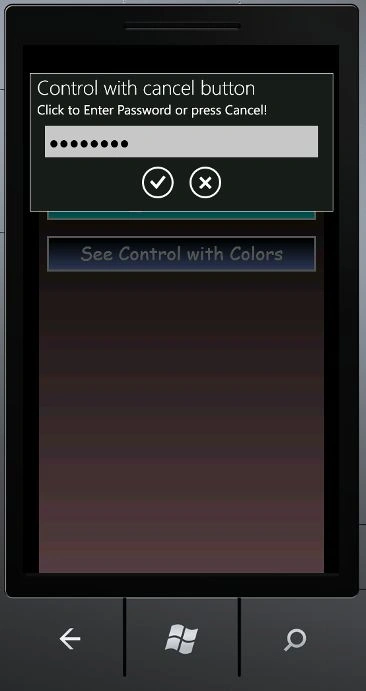
Step 5: In this step you will see the code for the second button which shows the PasswordInputPrompt control with a cancel button given below.
Code:
private void btn2_Click(object sender, RoutedEventArgs e)
{
PasswordInputPrompt Pwd_Input = new PasswordInputPrompt();
Pwd_Input.Title = "Control with cancel button";
Pwd_Input.Message = "Click to Enter Password or press Cancel!";
Pwd_Input.IsCancelVisible = true;
Pwd_Input.Completed += Myinput_Completed;
Pwd_Input.Show();
}
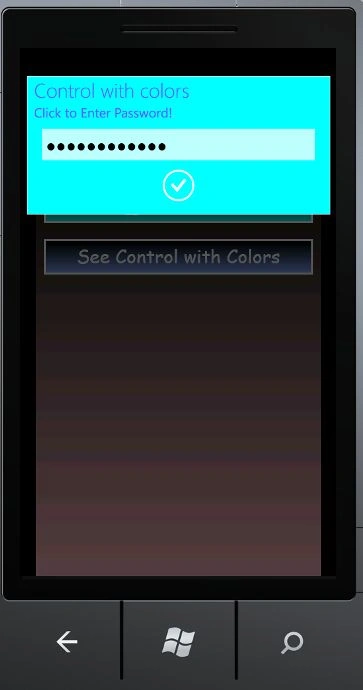
Step 6: In this step you just see the code for the third Button which shows you a PasswordInputPrompt control with color as given below.
Code:
private void btn3_Click(object sender, RoutedEventArgs e)
{
PasswordInputPrompt Pwd_Input = new PasswordInputPrompt();
Opacity=5;
Pwd_Input.Title = "Control with colors";
Pwd_Input.Message = "Click to Enter Password!";
Pwd_Input.Background = new SolidColorBrush(Colors.Yellow);
Pwd_Input.Foreground = new SolidColorBrush(Color.FromArgb(0, 0, 0, 0));
Pwd_Input.Completed += Myinput_Completed;
Pwd_Input.Show();
}
Step 7: In this step you will see the Complete MainPage.xaml.cs file code which is shown below.
Code:
using System;
using System.Collections.Generic;
using System.Linq;
using System.Net;
using System.Windows;
using System.Windows.Controls;
using System.Windows.Documents;
using System.Windows.Input;
using System.Windows.Media;
using System.Windows.Media.Animation;
using System.Windows.Shapes;
using Microsoft.Phone.Controls;
using Coding4Fun.Phone.Controls;
namespace PasswordInput
{
public partial class MainPage : PhoneApplicationPage
{
// Constructor
public MainPage()
{
InitializeComponent();
}
private void btn1_Click(object sender, RoutedEventArgs e)
{
PasswordInputPrompt Pwd_Input = new PasswordInputPrompt();
Pwd_Input.Title = "My Demo Control";
Pwd_Input.Message = "Click to Enter Password!";
Pwd_Input.Completed += Myinput_Completed;
Pwd_Input.Show();
}
void Myinput_Completed(object sender, PopUpEventArgs<string, PopUpResult> e)
{
//add some code here
}
private void btn2_Click(object sender, RoutedEventArgs e)
{
PasswordInputPrompt Pwd_Input = new PasswordInputPrompt();
Pwd_Input.Title = "Control with cancel button";
Pwd_Input.Message = "Click to Enter Password or press Cancel!";
Pwd_Input.IsCancelVisible = true;
Pwd_Input.Completed += Myinput_Completed;
Pwd_Input.Show();
}
private void btn3_Click(object sender, RoutedEventArgs e)
{
PasswordInputPrompt Pwd_Input = new PasswordInputPrompt();
Opacity=5;
Pwd_Input.Title = "Control with colors";
Pwd_Input.Message = "Click to Enter Password!";
Pwd_Input.Background = new SolidColorBrush(Colors.Yellow);
Pwd_Input.Foreground = new SolidColorBrush(Color.FromArgb(0, 0, 0, 0));
Pwd_Input.Completed += Myinput_Completed;
Pwd_Input.Show();
}
}
}
Step 8: In this step you just see the code for the MainPage.xaml file which is shown below.
Code:
<phone:PhoneApplicationPage
x:Class="PasswordInput.MainPage"
xmlns="http://schemas.microsoft.com/winfx/2006/xaml/presentation"
xmlns:x="http://schemas.microsoft.com/winfx/2006/xaml"
xmlns:phone="clr-namespace:Microsoft.Phone.Controls;assembly=Microsoft.Phone"
xmlns:shell="clr-namespace:Microsoft.Phone.Shell;assembly=Microsoft.Phone"
xmlns:d="http://schemas.microsoft.com/expression/blend/2008"
xmlns:mc="http://schemas.openxmlformats.org/markup-compatibility/2006"
mc:Ignorable="d" d:DesignWidth="480" d:DesignHeight="768"
FontFamily="{StaticResource PhoneFontFamilyNormal}"
FontSize="{StaticResource PhoneFontSizeNormal}"
Foreground="{StaticResource PhoneForegroundBrush}"
SupportedOrientations="Portrait" Orientation="Portrait"
Join the conversation! Your thoughts help the community grow.