

Introduction 
You can also view my previous articles related to AngularJs using MVC and the WCF Rest Serice.
- MVC, AngularJS and WCF Rest Service For Master Detail Grid
- MVC AngularJS and WCF Rest Service For Mind Reader Quiz
This article will explain in detail how to create an AngularJS Filter, Sort and Simple Animation using WCF Rest Service.
Here we can see some basics and reference links for Windows Communication Foundation (WCF). WCF is a framework for building service-oriented applications.
Service-oriented application
Using a protocol the service can be shared and used over a network.
For example, let's consider we are now working on a project and we need to create a common database function and those functions need to be used in multiple projects and the projects are in a different place and connected by the internet.
In this case we can create a WCF service and we can write all our common database functions in our WCF service class. We can deploy our WCF in IIS and use the URL in our application to do database functions. In the code part let's see how to create a WCF REST service and use it in our AngularJS application.
If you are interested in reading more about WCF then kindly go through this link.
https://msdn.microsoft.com/en-in/library/dd203052.aspx
AngularJS
We might be be familiar with what the Model, View, View Model (MVVM) and what Model, View and Controller (MVC) are. AngularJS is a JavaScript framework that is purely based on HTML, CSS and JavaScript.
The AngularJS Model View Whatever (MVW) pattern is similar to the MVC and MVVM patterns. In our example I have used Model, View and Service. In the code part let's see how to install and create AngularJS in our MVC application.
Since this article explains how to use Filter, Sort and Simple Animation in AngularJS let's see one by one here.
- How to create a WCF Rest service and retrieve data from a database.
- How to install the AngularJS Package into a MVC application.
- How to create our AngularJS application to create our own Master Detail Grid.
- How to use a WCS service in AngularJS to use Filter, Sort and Animation.
Here we can see some basics and reference links for Windows Communication Foundation (WCF). WCF is a framework for building service-oriented applications.
Service-oriented application
Using a protocol the service can be shared and used over a network.
For example, let's consider we are now working on a project and we need to create a common database function and those functions need to be used in multiple projects and the projects are in a different place and connected by the internet.
In this case we can create a WCF service and we can write all our common database functions in our WCF service class. We can deploy our WCF in IIS and use the URL in our application to do database functions. In the code part let's see how to create a WCF REST service and use it in our AngularJS application.
If you are interested in reading more about WCF then kindly go through this link.
https://msdn.microsoft.com/en-in/library/dd203052.aspx
AngularJS
We might be be familiar with what the Model, View, View Model (MVVM) and what Model, View and Controller (MVC) are. AngularJS is a JavaScript framework that is purely based on HTML, CSS and JavaScript.
The AngularJS Model View Whatever (MVW) pattern is similar to the MVC and MVVM patterns. In our example I have used Model, View and Service. In the code part let's see how to install and create AngularJS in our MVC application.
Since this article explains how to use Filter, Sort and Simple Animation in AngularJS let's see one by one here.
ng-repeat: First we start with ng-repeat. This can be used to display the array of data one by one within our Table td or within a List, for example let's consider we want to display the data from 1 to 10. Usualy we do a loop and display the value one by one or we add values from 1 to 10 to an array and display using a loop.To use looping and display the data one by one in AngularJs we use ng-repeat.
For example let's see the preceding case to display the data from 1 to 10 in a table so the code will be like this.
- <table>
- <tbody ng-repeat="Numbers in [1, 2, 3, 4,5,6,7,8,9,10] ">
- <tr>
- <td>
- {{Numbers}}
- </td>
- </tr>
- </tbody>
- </table>
- <table>
- <tbody ng-repeat="Names in ['Shanu','Afraz','Raja','Afreen','Mak','Albert'] ">
- <tr>
- <td>
- {{Names}}
- </td>
- </tr>
- </tbody>
- </table>
The complete code will be like this.
Here we can see that first we have added the angular.js reference.
- <html ng-app="MyAngularModule" xmlns="http://www.w3.org/1999/xhtml">
- <head runat="server">
- <title></title>
- <script src="http://code.angularjs.org/1.2.2/angular.js"></script>
- <script>
- angular.module('MyAngularModule', [])
- .controller('myAngularController', function (
- $scope
- ) {
- });
- </script>
- </head>
- <body ng-controller="myAngularController">
- <table>
- <tbody ng-repeat="Numbers in [1, 2, 3, 4,5,6,7,8,9,10] ">
- <tr>
- <td>
- {{Numbers}}
- </td>
- </tr>
- </tbody>
- </table>
- <table>
- <tbody ng-repeat="Names in ['Shanu','Afraz','Raja','Afreen','Mak','Albert'] ">
- <tr>
- <td>
- {{Names}}
- </td>
- </tr>
- </tbody>
- </table>
- </body>
- </html>
- Filter
For example we can consider the preceding example where we display the names of the array using the ng-repeat. Now we can add the filter for the preceding example.
Here we can see with ng-repeat we have added the filter and for the filter we have given the TextBox Model id. When the user presses the key on the TextBox the filter will be applied for the loop and display the appropriate value as in the following:
- ng-repeat="Names in ['Shanu','Afraz','Raja','Afreen','Mak','Albert'] | filter:myNameFilters
- <html ng-app="MyAngularModule" xmlns="http://www.w3.org/1999/xhtml">
- <head runat="server">
- <title></title>
- <script src="http://code.angularjs.org/1.2.2/angular.js"></script>
- <script>
- angular.module('MyAngularModule', [])
- .controller('myAngularController', function (
- $scope
- ) {
- });
- </script>
- </head>
- <body ng-controller="myAngularController">
- Filter By NAme : <input type="text" ng-model="myNameFilters">
- <table border=1>
- <tbody ng-repeat="Names in ['Shanu','Afraz','Raja','Afreen','Mak','Albert'] | filter:myNameFilters ">
- <tr>
- <td>
- {{Names}}
- </td>
- </tr>
- </tbody>
- </table>
- </body>
- </html>
- Sort
The same as for a filter we add the orderBy with field and reverse value in ng-repat using the pipe symbol.
The OrderBy can be added with the ng-repeat using the pipe symbol, for example let's consider the preceding example.
Where we have displayed the names of the array using the ng-repeat. Now we can add the filter for the preceding example.
Here in the first Tr and Td, I display the Table Heading and in the click event I display the order by names in ascending and descending order.
Complete Code
The OrderBy can be added with the ng-repeat using the pipe symbol, for example let's consider the preceding example.
Where we have displayed the names of the array using the ng-repeat. Now we can add the filter for the preceding example.
Here in the first Tr and Td, I display the Table Heading and in the click event I display the order by names in ascending and descending order.
- ng-repeat="nme in Names | filter:myNameFilters | orderBy:predicate:reverse
- <html ng-app="MyAngularModule" xmlns="http://www.w3.org/1999/xhtml">
- <head runat="server">
- <title></title>
- <script src="http://code.angularjs.org/1.2.2/angular.js"></script>
- <script>
- angular.module('MyAngularModule', [])
- .controller('myAngularController', function (
- $scope
- ) {
- });
- </script>
- </head>
- <body ng-controller="myAngularController" ng-init="Names = [{name:'Shanu'},
- {name:'Afraz'},
- {name:'Afreen'},
- {name:'Vijay'},
- {name:'Mak'},
- {name:'Raja'}]">
- Filter By NAme : <input type="text" ng-model="myNameFilters">
- <table border=1>
- <tr>
- <td ng-click="predicate = 'name'; reverse=!reverse">
- <b>Toy Code</b>
- </td>
- </tr>
- <tbody ng-repeat="nme in Names | filter:myNameFilters | orderBy:predicate:reverse">
- <tr>
- <td>
- {{nme.name}}
- </td>
- </tr>
- </tbody>
- </table>
- </body>
- </html>
- Animation
For using the Animation in AngularJs we must include “angular-animate.min.js” and in the module we my must pass the parameter “ngAnimate”
The code will look as in this:
The code will look as in this:
- Add the refreance:
- <script src="http://code.angularjs.org/1.2.2/angular-animate.min.js"></script>
- <script src="http://code.angularjs.org/1.2.2/angular-animate.min.js"></script>
- Pass the parameter in Module as "ngAnimate":
- angular.module('MyAngularModule', ['ngAnimate'])
- angular.module('MyAngularModule', ['ngAnimate'])
- Add your animation CSS to your HTML page. Here in my example I will be get a fade In and out of the display of the text that is binding using ng-repeat.
Complete Code
- <html ng-app="MyAngularModule" xmlns="http://www.w3.org/1999/xhtml">
- <head runat="server">
- <title></title>
- <script src="http://code.angularjs.org/1.2.2/angular.js"></script>
- <script src="http://code.angularjs.org/1.2.2/angular-animate.min.js"></script>
- <style>
- .ng-enter
- {
- -webkit-transition: 1s;
- transition: 3s;
- opacity: 0;
- }
- .ng-enter-active
- {
- opacity: 1;
- }
- .ng-leave
- {
- -webkit-transition: 1s;
- transition: 2s;
- }
- .ng-leave-active {
- opacity: 0;
- }
- </style>
- <script>
- angular.module('MyAngularModule', ['ngAnimate'])
- .controller('myAngularController', function (
- $scope
- ) {
- });
- </script>
- </head>
- <body ng-controller="myAngularController" ng-init="Names = [{name:'Shanu'},
- {name:'Afraz'},
- {name:'Afreen'},
- {name:'Vijay'},
- {name:'Mak'},
- {name:'Raja'}]">
- Filter By NAme : <input type="text" ng-model="myNameFilters">
- <table border=1>
- <tr>
- <td ng-click="predicate = 'name'; reverse=!reverse">
- <b>Toy Code</b>
- </td>
- </tr>
- <tbody ng-repeat="nme in Names | filter:myNameFilters | orderBy:predicate:reverse">
- <tr>
- <td>
- {{nme.name}}
- </td>
- </tr>
- </tbody>
- </table>
- </body>
- </html>
Reference links:
http://www.w3schools.com/angular/default.asp
https://docs.angularjs.org/api/ng/filter/filter
These are a few simple examples using HTML. Now let's see in detail how to implement this in our MVC application using a WCF rest service.
Code Part
http://www.w3schools.com/angular/default.asp
https://docs.angularjs.org/api/ng/filter/filter
These are a few simple examples using HTML. Now let's see in detail how to implement this in our MVC application using a WCF rest service.
Code Part
- Create Database and Table
We will create a ToysDetails table under the Database ToysDB. The following is the script to create a database, table and sample insert query. Run this script in your SQL Server. I have used SQL Server 2012.
The following is a script to create a database, table and a sample to insert data:
- USE MASTER
- GO
The following checks whether a database exists. If the database exists then drop it and create a new database.
- IF EXISTS (SELECT [name] FROM sys.databases WHERE [name] = 'ToysDB' )
- DROP DATABASE ToysDB
- GO
- CREATE DATABASE ToysDB
- GO
- USE ToysDB
- GO
- ToysDetails table
The following creates the Table ToysDetails. This table will be used to store the details like Toys Information.
- IF EXISTS ( SELECT [name] FROM sys.tables WHERE [name] = 'ToysDetails' )
- DROP TABLE Professional_Type
- GO
- CREATE TABLE ToysDetails
- (
- Toy_ID VARCHAR(20) NOT NULL,
- Toy_Name VARCHAR(100) NOT NULL,
- Toy_Price int NOT NULL,
- Image_Name VARCHAR(100) NOT NULL,
- Item_Date DateTime NOT NULL,
- AddedBy VARCHAR(100) NOT NULL,
- CONSTRAINT [PK_ToysDetails] PRIMARY KEY CLUSTERED
- (
- [Toy_ID] ASC
- )WITH (PAD_INDEX = OFF, STATISTICS_NORECOMPUTE = OFF, IGNORE_DUP_KEY = OFF, ALLOW_ROW_LOCKS = ON, ALLOW_PAGE_LOCKS = ON) ON [PRIMARY]
- ) ON [PRIMARY]
- GO
Use the following to insert the sample records into the ToysDetails table.
- Insert into ToysDetails(Toy_ID,Toy_Name,Toy_Price,Image_Name,Item_Date,AddedBy) values('Toy001','Abacus',250,'Abacus.png',getdate(),'Shanu')
- Insert into ToysDetails(Toy_ID,Toy_Name,Toy_Price,Image_Name,Item_Date,AddedBy) values('Toy002','Babel Fish',350,'Babelfish.png',getdate()-10,'Afraz')
- Insert into ToysDetails(Toy_ID,Toy_Name,Toy_Price,Image_Name,Item_Date,AddedBy) values('Toy003','Base Ball',1400,'Baseball.png',getdate()-24,'Shanu')
- Insert into ToysDetails(Toy_ID,Toy_Name,Toy_Price,Image_Name,Item_Date,AddedBy) values('Toy004','Basket Ball',1390,'BasketballBall.png',getdate()-36,'Raj')
- Insert into ToysDetails(Toy_ID,Toy_Name,Toy_Price,Image_Name,Item_Date,AddedBy) values('Toy005','Blue Fish',450,'BlueFish.png',getdate()-90,'Afraz')
- Insert into ToysDetails(Toy_ID,Toy_Name,Toy_Price,Image_Name,Item_Date,AddedBy) values('Toy006','Brown Bear',1250,'BrownBear.png',getdate()-34,'Mak')
- Insert into ToysDetails(Toy_ID,Toy_Name,Toy_Price,Image_Name,Item_Date,AddedBy) values('Toy007','CabrioletRed Car',950,'CabrioletRed.png',getdate()-20,'Albert')
- Insert into ToysDetails(Toy_ID,Toy_Name,Toy_Price,Image_Name,Item_Date,AddedBy) values('Toy008','Chevelot Car',1150,'Chevelot.png',getdate()-26,'Gowri')
- Insert into ToysDetails(Toy_ID,Toy_Name,Toy_Price,Image_Name,Item_Date,AddedBy) values('Toy009','Duck',399,'Duck.png',getdate()-44,'Afraz')
- Insert into ToysDetails(Toy_ID,Toy_Name,Toy_Price,Image_Name,Item_Date,AddedBy) values('Toy010','FireEscape Van',897,'FireEscape.png',getdate()-12,'Shanu')
- Insert into ToysDetails(Toy_ID,Toy_Name,Toy_Price,Image_Name,Item_Date,AddedBy) values('Toy011','Mini Car',750,'MiniCar.png',getdate(),'Shanu')
- Insert into ToysDetails(Toy_ID,Toy_Name,Toy_Price,Image_Name,Item_Date,AddedBy) values('Toy012','Nemo',675,'Nemo.png',getdate()-1,'Kim')
- Insert into ToysDetails(Toy_ID,Toy_Name,Toy_Price,Image_Name,Item_Date,AddedBy) values('Toy013','Old Car',1950,'OldCar.png',getdate()-3,'Jack')
- Insert into ToysDetails(Toy_ID,Toy_Name,Toy_Price,Image_Name,Item_Date,AddedBy) values('Toy014','Red Car',679,'RedCar.png',getdate(),'Lee')
- Insert into ToysDetails(Toy_ID,Toy_Name,Toy_Price,Image_Name,Item_Date,AddedBy) values('Toy015','Soccer Ball',950,'SoccerBall.png',getdate(),'Shanu')
- Insert into ToysDetails(Toy_ID,Toy_Name,Toy_Price,Image_Name,Item_Date,AddedBy) values('Toy016','Tennis Ball',350,'TennisBall.png',getdate()-29,'Afraz')
- select * from ToysDetails
- Create WCF REST Service
Open Visual Studio 2013 then select File - New - Project then select WCF Service Application then select your project path and provide a name for your WCF service and click OK.

Once we created our WCF Service we can see “IService.CS” and “Service1.svc” in the Solution Explorer as in the following.

IService.CS: In “IService.CS” we can see 3 Contracts by default.
[ServiceContract]: Describes the Methods or any operations available for the service. Service Contract is an interface and the methods can be declared inside the service interface using the Operation Contract attribute.
[OperationContract]: is similar to the web service [WEBMETHOD]
[DataContract]: describes the data exchange between the client and the service.
[ServiceContract]
The following code will be automatically created for all the IService.CS files. We can change and write our own code here.
Once we created our WCF Service we can see “IService.CS” and “Service1.svc” in the Solution Explorer as in the following.
IService.CS: In “IService.CS” we can see 3 Contracts by default.
[ServiceContract]: Describes the Methods or any operations available for the service. Service Contract is an interface and the methods can be declared inside the service interface using the Operation Contract attribute.
[OperationContract]: is similar to the web service [WEBMETHOD]
[DataContract]: describes the data exchange between the client and the service.
[ServiceContract]
The following code will be automatically created for all the IService.CS files. We can change and write our own code here.
- public interface IService1
- {
- [OperationContract]
- string GetData(int value);
- [OperationContract]
- CompositeType GetDataUsingDataContract(CompositeType composite);
- // TODO: Add your service operations here
- }
- // Use a data contract as illustrated in the sample below to add composite types to service operations.
- [DataContract]
- public class CompositeType
- {
- bool boolValue = true;
- string stringValue = "Hello ";
- [DataMember]
- public bool BoolValue
- {
- get { return boolValue; }
- set { boolValue = value; }
- }
- [DataMember]
- public string StringValue
- {
- get { return stringValue; }
- set { stringValue = value; }
- }
- }
Data Contract
In our example we need to get all the Toys details, so I have created a Data Contract “ToyItemDataContract”. Here we can see we have decelerated our entire Table column name as Data Member.
- public class ToysDetailDataContract
- {
- [DataContract]
- public class ToyItemDataContract
- {
- [DataMember]
- public string Toy_ID { get; set; }
- [DataMember]
- public string Toy_Name { get; set; }
- [DataMember]
- public string Toy_Price { get; set; }
- [DataMember]
- public string Image_Name { get; set; }
- [DataMember]
- public string Item_Date { get; set; }
- [DataMember]
- public string AddedBy { get; set; }
- }
- }
Service Contract
In Operation Contract we can see “WebInvoke” and “WebGet” that retrieves the data from the database in the REST Serivce.
In Operation Contract we can see “WebInvoke” and “WebGet” that retrieves the data from the database in the REST Serivce.
- RequestFormat = WebMessageFormat.Json,
- ResponseFormat = WebMessageFormat.Json,
Here we can see both the request and response format. Here I have used the JSON format.
JSON: JavaScript Object Notation; it is a lightweight data interchange format.
UriTemplate is our method name and here our method return type is List.
Here I have declared a “GetToyDetails” method for getting the details of all the Toys from the database.
JSON: JavaScript Object Notation; it is a lightweight data interchange format.
UriTemplate is our method name and here our method return type is List.
Here I have declared a “GetToyDetails” method for getting the details of all the Toys from the database.
- [ServiceContract]
- public interface IService1
- {
- [OperationContract]
- [WebInvoke(Method = "GET",
- RequestFormat = WebMessageFormat.Json,
- ResponseFormat = WebMessageFormat.Json,
- UriTemplate = "/GetToyDetails/")]
- List<ToysDetailDataContract.ToyItemDataContract> GetToyDetails();
- }
The following is the complete source code of Iservice.Cs:
- using System;
- using System.Collections.Generic;
- using System.Linq;
- using System.Runtime.Serialization;
- using System.ServiceModel;
- using System.ServiceModel.Web;
- using System.Text;
- namespace Shanu_AngularJsFilterWcfService
- {.
- [ServiceContract]
- public interface IService1
- {
- [OperationContract]
- [WebInvoke(Method = "GET",
- RequestFormat = WebMessageFormat.Json,
- ResponseFormat = WebMessageFormat.Json,
- UriTemplate = "/GetToyDetails/")]
- List<ToysDetailDataContract.ToyItemDataContract> GetToyDetails();
- }
- public class ToysDetailDataContract
- {
- [DataContract]
- public class ToyItemDataContract
- {
- [DataMember]
- public string Toy_ID { get; set; }
- [DataMember]
- public string Toy_Name { get; set; }
- [DataMember]
- public string Toy_Price { get; set; }
- [DataMember]
- public string Image_Name { get; set; }
- [DataMember]
- public string Item_Date { get; set; }
- [DataMember]
- public string AddedBy { get; set; }
- }
- }
- }
Add Database using ADO.NET Entity Data Model
Right-click your WCF project and select Add New Item then select ADO.NET Entity Data Model and click Add.

Select EF Designer from Database and click Next.

Click New Connection.
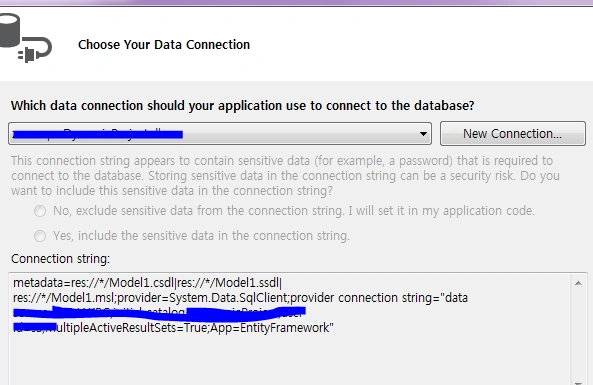
Here we can select our Database Server Name and enter our database server's SQL Server Authentication User ID and Password. We have already created our database as “ToysDB” so we can select the database and click OK.

Click Next and select the tables we need and click Finish.
Here we can see now we have created our shanuToyDetailsModel.

Service1.SVC
In “Service.SVC.CS” implements the IService Interface and overrides and defines all the methods of Operation Contract.
For example here we can see I have implemented the IService1 in the Service1 class. I created the object for our Entity model and in the GetToyDetailsusing LINQ Query.
Right-click your WCF project and select Add New Item then select ADO.NET Entity Data Model and click Add.
Select EF Designer from Database and click Next.
Click New Connection.
Here we can select our Database Server Name and enter our database server's SQL Server Authentication User ID and Password. We have already created our database as “ToysDB” so we can select the database and click OK.
Click Next and select the tables we need and click Finish.
Here we can see now we have created our shanuToyDetailsModel.
Service1.SVC
In “Service.SVC.CS” implements the IService Interface and overrides and defines all the methods of Operation Contract.
For example here we can see I have implemented the IService1 in the Service1 class. I created the object for our Entity model and in the GetToyDetailsusing LINQ Query.
- public class Service1 : IService1
- {
- shanuToysDBEntities OME;
- public Service1()
- {
- OME = new shanuToysDBEntities();
- }
- public List<ToysDetailDataContract.ToyItemDataContract> GetToyDetails()
- {
- var query = (from a in OME.ToysDetails
- select a).Distinct();
- List<ToysDetailDataContract.ToyItemDataContract> ToyDetailList = new List<ToysDetailDataContract.ToyItemDataContract>();
- query.ToList().ForEach(rec =>
- {
- ToyDetailList.Add(new ToysDetailDataContract.ToyItemDataContract
- {
- Toy_ID = rec.Toy_ID,
- Toy_Name = rec.Toy_Name,
- Toy_Price = Convert.ToString(rec.Toy_Price),
- Image_Name = rec.Image_Name,
- Item_Date = Convert.ToString(rec.Item_Date),
- AddedBy = rec.AddedBy
- });
- });
- return ToyDetailList;
- }
“Service.SVC.CS”: Complete Source Code
- using System;
- using System.Collections.Generic;
- using System.Linq;
- using System.Runtime.Serialization;
- using System.ServiceModel;
- using System.ServiceModel.Web;
- using System.Text;
- using shanu_AngularJsFilter.Model;
- namespace shanu_AngularJsFilter
- {
- public class Service1 : IService1
- {
- shanuToysDBEntities OME;
- public Service1()
- {
- OME = new shanuToysDBEntities();
- }
- public List<ToysDetailDataContract.ToyItemDataContract> GetToyDetails()
- {
- var query = (from a in OME.ToysDetails
- select a).Distinct();
- List<ToysDetailDataContract.ToyItemDataContract> ToyDetailList = new List<ToysDetailDataContract.ToyItemDataContract>();
- query.ToList().ForEach(rec =>
- {
- ToyDetailList.Add(new ToysDetailDataContract.ToyItemDataContract
- {
- Toy_ID = rec.Toy_ID,
- Toy_Name = rec.Toy_Name,
- Toy_Price = Convert.ToString(rec.Toy_Price),
- Image_Name = rec.Image_Name,
- Item_Date = Convert.ToString(rec.Item_Date),
- AddedBy = rec.AddedBy
- });
- });
- return ToyDetailList;
- }
- }
- }
Web.Config
In the WCF project “Web.Config”:
In the WCF project “Web.Config”:
- Change <add binding="basicHttpsBinding" scheme="https" /> to <add binding="webHttpBinding" scheme="http" />
- Replace the </behaviors> to:
- <behavior>
- <endpointBehaviors>
- <webHttp helpEnabled="True"/>
- </behavior>
- </endpointBehaviors>
- </behaviors>
Run WCF Service: Now we have created our WCF Rest service, let's run and test our service. In our service URL we can add our method name and we can see the JSON result data from the database.

Create MVC Web Application
So now we have completed our WCF and now it's time to create our MVC AngularJS application.
We can add a new project to our existing project and create a new MVC web application as in the following.
Right-click your solution and click Add New Project then enter your project name and click OK.
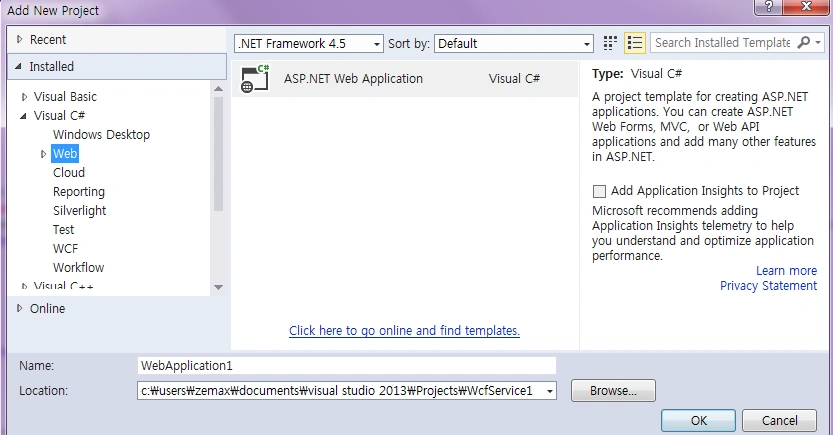
Select MVC and Click OK.

Now we have created our MVC application and it's time to add our WCF Service and install the AngularJS package to our solution.
Add WCF Service: Right-click MVC Solution and click Add then click Service Reference.

Enter your WCF URL and click GO. Here my WCF URL is http://localhost:5029/Service1.svc/
Add your name and click OK.
Now we have successfully added our WCF Service to our MVC Application.

Procedure to Install AngularJS package
Right-click your MVC project and click Manage NuGet Packages.

Select Online and Search for AngularJS. Select the AngularJs and click Install.

Now we have Installed AngularJS package to our MVC Project. Now let's create our AngularJs.
Create MVC Web Application
So now we have completed our WCF and now it's time to create our MVC AngularJS application.
We can add a new project to our existing project and create a new MVC web application as in the following.
Right-click your solution and click Add New Project then enter your project name and click OK.
Select MVC and Click OK.
Now we have created our MVC application and it's time to add our WCF Service and install the AngularJS package to our solution.
Add WCF Service: Right-click MVC Solution and click Add then click Service Reference.
Enter your WCF URL and click GO. Here my WCF URL is http://localhost:5029/Service1.svc/
Add your name and click OK.
Now we have successfully added our WCF Service to our MVC Application.
Procedure to Install AngularJS package
Right-click your MVC project and click Manage NuGet Packages.
Select Online and Search for AngularJS. Select the AngularJs and click Install.
Now we have Installed AngularJS package to our MVC Project. Now let's create our AngularJs.
- Modules.js
- Controllers.js
- Services.js
Procedure to Create AngularJs Script Files
Right-click the Script folder and create your own folder to create our AngularJs Model/Controller and Service JavaScript. In your script folder add three JavaScript files and name them Modules.js, Controllers.js and Services,js as in the following.

Modules.js: Here we add the reference to the Angular.js JavaScript. In our application we will use AngularJs animation. To use the animation we need to add the “angular-animate.js” and “angular-animate.min.js” files. We provide our module name as “RESTClientModule” and to use the animation we need to pass the parameter to our module as "ngAnimate".
Right-click the Script folder and create your own folder to create our AngularJs Model/Controller and Service JavaScript. In your script folder add three JavaScript files and name them Modules.js, Controllers.js and Services,js as in the following.
Modules.js: Here we add the reference to the Angular.js JavaScript. In our application we will use AngularJs animation. To use the animation we need to add the “angular-animate.js” and “angular-animate.min.js” files. We provide our module name as “RESTClientModule” and to use the animation we need to pass the parameter to our module as "ngAnimate".
- /// <reference path="../angular.js" />
- /// <reference path="../angular.min.js" />
- /// <reference path="../angular-animate.js" />
- /// <reference path="../angular-animate.min.js" />
- var app;
- (function ()
- {
- app = angular.module("RESTClientModule", ['ngAnimate']);
- })();
Services.js: Here we add the reference to the Angular.js JavaScript and our Module.js.
Here we provide a name of our service and we use this name in controllers.js. Here for the Angular service I have given the name as "AngularJs_WCFService". You can provide your own name but be careful about changing the name in Controllers.js. Here we can see in the method since I have passed the URL of our WCF Service URL.
- /// <reference path="../angular.js" />
- /// <reference path="../angular.min.js" />
- /// <reference path="../angular-animate.js" />
- /// <reference path="../angular-animate.min.js" />
- /// <reference path="Modules.js" />
- app.service("AngularJs_WCFService", function ($http)
- {
- //Get Order Master Records
- this.GetToyDetails = function ()
- {
- return $http.get("http://localhost:5029/Service1.svc/GetToyDetails/");
- };
- });
Controllers.js: Here we add the reference to the Angular.js JavaScript and our Module.js and Services.js. The same as services, for the controller I have given the name "AngularJs_WCFController".
In the Controller I have performed all the business logic and returned the data from the WCF JSON data to our MVC HTML page.
In the Controller I have performed all the business logic and returned the data from the WCF JSON data to our MVC HTML page.
- Variable declarations:
First I declared all the local variables that need to be used and the current date and store the date using $scope.date.
- Methods:
GetToyDetails()
This method is used to get all the details of Toys from the JSON and bind the result to the main page.
$scope.showImage
- $scope.showImage = function (imageNm, ToyCode, ToyName, ToyPrize,animatval) {
In the image mouse over we get the details and display the data and image in detail view. In this method I have used the $scope.showAnim Boolean value to fade in and fade out the Image in details display.
Controller.js full source code
- /// <reference path="../angular.js" />
- /// <reference path="../angular.min.js" />
- /// <reference path="../angular-animate.js" />
- /// <reference path="../angular-animate.min.js" />
- /// <reference path="Modules.js" />
- /// <reference path="Services.js" />
- app.controller("AngularJs_WCFController", function ($scope,$timeout, $rootScope, $window, AngularJs_WCFService) {
- $scope.date = new Date();
- // To show and Hide the Table to display Character Type Selection and Question
- var firstbool = true;
- $scope.Imagename = "";
- $scope.ToyCode = "";
- $scope.ToyName = "";
- $scope.ToyPrize = "";
- $scope.showAnim = true;
- GetToyDetails();
- //To Get All Records
- function GetToyDetails()
- {
- var promiseGet = AngularJs_WCFService.GetToyDetails();
- promiseGet.then(function (pl) {
- $scope.getToyDetailsDisp = pl.data
- if($scope.getToyDetailsDisp.length>0)
- {
- $scope.Imagename = $scope.getToyDetailsDisp[0].Image_Name;
- $scope.ToyCode = $scope.getToyDetailsDisp[0].Toy_ID;
- $scope.ToyName = $scope.getToyDetailsDisp[0].Toy_Name;
- $scope.ToyPrize = $scope.getToyDetailsDisp[0].Toy_Price;
- }
- else
- {
- $scope.Imagename = "";
- $scope.ToyCode ="";
- $scope.ToyName = "";
- $scope.ToyPrize = "";
- }
- },
- function (errorPl)
- {
- });
- }
- $scope.showImage = function (imageNm, ToyCode, ToyName, ToyPrize,animatval) {
- $scope.Imagename = imageNm;
- $scope.ToyCode = ToyCode;
- $scope.ToyName = ToyName;
- $scope.ToyPrize = ToyPrize;
- if(animatval==1)
- {
- $scope.showAnim = false;
- }
- else
- {
- $scope.showAnim = true;
- }
- }});
So now we have created our AngularJs Module, Controller and Service. So what is next?
Create MVC Control and View to display our result.
Add Controller:
Right-click Controllers then select Add Controller then select MVC 5 Controller –Empty then click Add.

Change the Controller name and here I have given it the name “shanuToysController” and click OK.
Add View: Right-click on the Controller Index and click Add View.

Index View: Name the View “Index”.
In View Design your page and reference of angular.Js, Modules.js, Services.js and Controllers.js.
In AngularJS we use {{ }} to bind or display the data.
Here we can see first I create one table and for that table.
First in the table I used the data-ng-controller="AngularJs_WCFController" and here we can see data-ng-controller will be used to bind the data of the controller to our HTML table.
Create MVC Control and View to display our result.
Add Controller:
Right-click Controllers then select Add Controller then select MVC 5 Controller –Empty then click Add.
Change the Controller name and here I have given it the name “shanuToysController” and click OK.
Add View: Right-click on the Controller Index and click Add View.
Index View: Name the View “Index”.
In View Design your page and reference of angular.Js, Modules.js, Services.js and Controllers.js.
In AngularJS we use {{ }} to bind or display the data.
Here we can see first I create one table and for that table.
First in the table I used the data-ng-controller="AngularJs_WCFController" and here we can see data-ng-controller will be used to bind the data of the controller to our HTML table.
- Data Bind using Data-ng-repeat and added Filter and Order By to the details in order to perform the Filter and Sorting to our display.
- <tbody data-ng-repeat="detail in getToyDetailsDisp | filter:search | orderBy:predicate:reverse" ng-animate="{enter: 'animate-enter', leave: 'animate-leave'}">
Here I have used ng-animate to display the data when loading with fade In animation.
- Filter TextBox as in column headers.
- <input ng-model="search.Toy_ID" style="width:100px">
- <input ng-model="search.Toy_Name" >
Here we can see I have used the TextBox to filter each column by their field name.
- Sort: When the user clicks on Table Heading TD I will sort the appropriate column using the ng-click event
- <td ng-click="predicate = 'Toy_Name'; reverse=!reverse">
- <b>Toy Name</b>
- </td>
- Image Mouse Over and Mouse Event to display the detail image with animation.
- <img src="~/Images/Thumb/{{detail.Image_Name}}" alt="{{detail.Toy_Name}}" ng-mouseover="showImage(detail.Image_Name,detail.Toy_ID,detail.Toy_Name,detail.
- Toy_Price,1)" ng-mouseleave="showImage(detail.Image_Name,detail.Toy_ID,detail.Toy_Name,
- detail.Toy_Price,2)">
In Detail image
- <div >
- <div class="animate-show" ng-show="showAnim">
- <img alt="" src="~/Images/Actual/{{Imagename}}" />
- </div>
- </div>
Complete HTML Code
- <style type="text/css">
- .ng-enter
- {
- -webkit-transition: 1s;
- transition: 1s;
- opacity:0;
- }
- .ng-enter-active
- {
- -webkit-transition: 1s;
- transition: 1s;
- opacity:1;
- }
- .ng-leave
- {
- -webkit-transition: 1s;
- transition: 1s;
- }
- .ng-leave-active
- {
- opacity:0;
- }
- .animate-show
{ - opacity: 1;
- }
- .animate-show.ng-hide-add.ng-hide-add-active,
- .animate-show.ng-hide-remove.ng-hide-remove-active {
- -webkit-transition: all linear 0.5s;
- transition: all linear 0.5s;
- }
- .animate-show.ng-hide {
- opacity: 0;
- }
- </style>
- <html data-ng-app="RESTClientModule">
- @{
- ViewBag.Title = "Angular JS Filters and Sorting";
- }
- <body>
- <img src="~/Images/blank.gif" alt="" width="1" height="10" />
- <table width="99%" style=" border-bottom:3px solid #3273d5;">
- <tr>
- <td width=" 250">
- <table width="99%">
- <tr>
- <td>
- Welcome Mr. {{'SHANU'}} .
- </td>
- </tr>
- </table>
- </td>
- <td class="style1" align="center">
- <h3>Shanu - ANgularJs Filter and Sorting with simple Animation using MVC and WCF Rest Service :)</h3>
- </td>
- <td align="right">
- <div ng-controller="AngularJs_WCFController">
- Today Date is :
- {{date | date:'yyyy-MM-dd'}}
- </div>
- </td>
- </tr>
- </table>
- <img src="~/Images/blank.gif" alt="" width="1" height="10" />
- <table id="tblContainer" data-ng-controller="AngularJs_WCFController" style='width: 99%;table-layout:fixed;'>
- <tr>
- <td >
- <table style=" background-color:#FFFFFF; border: solid 2px #6D7B8D; padding: 5px;width: 99%;table-layout:fixed;" cellpadding="2" cellspacing="2">
- <tr style="height: 30px; background-color:#336699 ; color:#FFFFFF ;border: solid 1px #659EC7;">
- <td >
- Toy Image
- </td>
- <td>
- Toy Details
- </td>
- </tr>
- <tr style="height: 30px; background-color:#FFFFFF ; color:#336699 ;border: solid 1px #659EC7;">
- <td >
- <div >
- <div class="animate-show" ng-show="showAnim">
- <img alt="" src="~/Images/Actual/{{Imagename}}" />
- </div>
- </div>
- </td>
- <td>
- <h3 style="color:#9F000F"> Toy Code : <b>{{ToyCode}} </b></h3><br />
- <h3 style="color:#9F000F"> Toy Name : <b>{{ToyName}} </b></h3><br />
- <h3 style="color:#9F000F"> Toy Price : <b>{{ToyPrize}} </b></h3><br />
- </td>
- </tr>
- </table>
- </td>
- </tr>
- <tr>
- <td>
- <table style=" background-color:#FFFFFF; border: solid 2px #6D7B8D; padding: 5px;width: 99%;table- layout:fixed;" cellpadding="2" cellspacing="2">
- <tr style="height: 30px; background-color:#336699 ; color:#FFFFFF ;border: solid 1px #659EC7;">
- <td width="40" align="center">
- <b>Image</b>
- </td>
- <td width="40" align="center" style="border: solid 1px #FFFFFF; padding: 5px;table-layout:fixed; cursor: pointer;" ng-click="predicate = 'Toy_ID'; reverse=!reverse">
- <b>Toy Code</b>
- </td>
- <td width="120" align="center" style="border: solid 1px #FFFFFF; padding: 5px;table-layout:fixed;cursor: pointer;" ng-click="predicate = 'Toy_Name'; reverse=!reverse">
- <b>Toy Name</b>
- </td>
- <td width="40" align="center" style="border: solid 1px #FFFFFF; padding: 5px;table-layout:fixed;cursor: pointer;" ng-click="predicate = 'Toy_Price'; reverse=!reverse">
- <b>Price</b>
- </td>
- <td width="90" align="center" style="border: solid 1px #FFFFFF; padding: 5px;table-layout:fixed;cursor: pointer;" ng-click="predicate = 'Item_Date'; reverse=!reverse">
- <b>Date</b>
- </td>
- <td width="90" align="center" style="border: solid 1px #FFFFFF; padding: 5px;table-layout:fixed;cursor: pointer;" ng-click="predicate = 'AddedBy'; reverse=!reverse">
- <b>User Name</b>
- </td>
- </tr>
- <tr style="height: 30px; background-color:#336699 ; color:#FFFFFF ;border: solid 1px #659EC7;">
- <td width="40" align="center">
- Filter By ->
- </td>
- <td width="40" style="border: solid 1px #FFFFFF; padding: 5px;table-layout:fixed;">
- <input ng-model="search.Toy_ID" style="width:100px">
- </td>
- <td width="120" align="center" style="border: solid 1px #FFFFFF; padding: 5px;table-layout:fixed;">
- <input ng-model="search.Toy_Name" placeholder="filter Name...">
- </td>
- <td width="40" align="center" style="border: solid 1px #FFFFFF; padding: 5px;table-layout:fixed;">
- </td>
- td width="90" align="center" style="border: solid 1px #FFFFFF; padding: 5px;table-layout:fixed;">
- <input ng-model="search.Item_Date">
- </td>
- <td width="90" align="center" style="border: solid 1px #FFFFFF; padding: 5px;table-layout:fixed;">
- <input ng-model="search.AddedBy">
- </td>
- </tr>
- <tbody data-ng-repeat="detail in getToyDetailsDisp | filter:search | orderBy:predicate:reverse" ng-animate="{enter: 'animate-enter', leave: 'animate-leave'}">
- <tr>
- <td align="center" style="border: solid 1px #659EC7; padding: 5px;table-layout:fixed;">
- <span style="color:#9F000F">
- <img src="~/Images/Thumb/{{detail.Image_Name}}" alt="{{detail.Toy_Name}}" ng-mouseover="showImage(detail.Image_Name,detail.Toy_ID,detail.Toy_Name,detail.Toy_Price,1)"
- ng-mouseleave="showImage(detail.Image_Name,detail.Toy_ID,detail.Toy_Name,detail.Toy_Price,2)">
- </span>
- </td>
- <td style="border: solid 1px #659EC7; padding: 5px;table-layout:fixed;">
- <span style="color:#9F000F">
- {{detail.Toy_ID}}
- </span>
- </td>
- <td style="border: solid 1px #659EC7; padding: 5px;table-layout:fixed;">
- <span style="color:#9F000F">
- {{detail.Toy_Name}}
- </span>
- </td>
- <td align="right" style="border: solid 1px #659EC7; padding: 5px;table-layout:fixed;">
- <span style="color:#9F000F">
- {{detail.Toy_Price}}
- </span>
- </td>
- <td style="border: solid 1px #659EC7; padding: 5px;table-layout:fixed;">
- <span style="color:#9F000F">
- {{detail.Item_Date}}
- </span>
- </td>
- <td style="border: solid 1px #659EC7; padding: 5px;table-layout:fixed;">
- <span style="color:#9F000F">
- {{detail.AddedBy}}
- </span>
- </td>
- </tr>
- </table>
- </td>
- </tr>
- </table>
- <img src="~/Images/blank.gif" alt="" width="1" height="10" />
- </body>
- </html>
- <script src="~/Scripts/angular.js"></script>
- <script src="~/Scripts/angular-animate.js"></script>
- <script src="~/Scripts/angular-animate.min.js"></script>
- <script src="~/Scripts/angular.min.js"></script>
- <script src="~/Scripts/shanuAngularScript/Modules.js"></script>
- <script src="~/Scripts/shanuAngularScript/Services.js"></script>
- <script src="~/Scripts/shanuAngularScript/Controllers.js"></script>
Run your program
Here we can see that when I run the program I first display all the Toy details.

Filter by Toy Name. Here we can see in the Toy Name Filter, I have entered the car and in the table we can see only the toy names that has car.

Next we can see the same preceding result has been sorted by Toy Code in reverse order.

Note
In my application Image folder I have add both a Thumb and Actual image. In Database I have provided the same names as in both folders. If you need to add more photos you can add in both folders and in the database kindly add the image name as in the folder with a new record or update with an existing record.
Supported Browsers: Chrome and Firefox.
Here we can see that when I run the program I first display all the Toy details.
Filter by Toy Name. Here we can see in the Toy Name Filter, I have entered the car and in the table we can see only the toy names that has car.
Next we can see the same preceding result has been sorted by Toy Code in reverse order.
Note
In my application Image folder I have add both a Thumb and Actual image. In Database I have provided the same names as in both folders. If you need to add more photos you can add in both folders and in the database kindly add the image name as in the folder with a new record or update with an existing record.
Supported Browsers: Chrome and Firefox.
kalu singh raoPosted Jul 22, 2016, 2:00 AM
Good one
Syed ShanuPosted Apr 13, 2015, 7:17 AM
Thank You Upendra
Upendra Pratap ShahiPosted Apr 13, 2015, 7:16 AM
nice sir..
Syed ShanuPosted Mar 27, 2015, 2:15 AM
Thank You Gowtham.Authors always need support and encouragement like yours.Feels good.
Gowtham RajamanickamPosted Mar 27, 2015, 1:57 AM
keep up the good work..
Gowtham RajamanickamPosted Mar 27, 2015, 1:57 AM
outstanding...
Syed ShanuPosted Mar 26, 2015, 6:42 PM
Thank You Vithal Wadje
Vithal WadjePosted Mar 26, 2015, 2:20 PM
just outsatnding
Syed ShanuPosted Mar 25, 2015, 4:03 PM
Thank You Sridar Sharma
Shridhar SharmaPosted Mar 25, 2015, 2:06 PM
nice resource to go through.
Syed ShanuPosted Mar 25, 2015, 12:37 AM
Thank You Gowtham
Gowtham RajamanickamPosted Mar 24, 2015, 11:36 PM
Great work...
Syed ShanuPosted Mar 24, 2015, 8:52 AM
Thank You Khargesh
Khargesh RajputPosted Mar 24, 2015, 7:52 AM
nice sir
Syed ShanuPosted Mar 24, 2015, 7:09 AM
Thank You Hamid Khan
Hamid KhanPosted Mar 24, 2015, 6:12 AM
Good Explanation
Syed ShanuPosted Mar 23, 2015, 8:25 PM
Thank You Tom
Tom MohanPosted Mar 23, 2015, 8:21 PM
Good explanation .