

Previously I wrote this same article but with 3 tiers. That was a long process, but here we will not use 3 tiers and instead put alll the code in a single .cs file.
Initial chamber
Step 1
Open your Visual Studio 2010 and create an empty website. Name it gridview_demo.
Step 2
In Solution Explorer you will see your empty website, add a web form and a SQL Server database as in the following.
For Web Form:
gridview_demo (your empty website) then right-click then select Add New Item -> Web Form. Name it gridview_demo.aspx.
For SQL Server Database
gridview_demo (your empty website) then right-click then select Add New Item -> SQL Server Database. Add the database inside the App_Data_folder.
DATABASE CHAMBER
Step 3
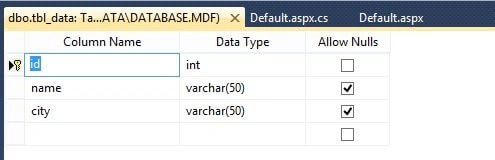
In Server Explorer, click on your database (Database.mdf) then select Tables -> Add New Table. Make the table like this.
Go to your database (Database.mdf) and create a table tbl_Data. Go to the database.mdf, then Table and Add New table. Design your table like the following:
Table tbl_data (don't forget to make ID as IS Identity -- True)
I included a Stored Procedure for the update operation, so if someone wants to know how to make it using a Stored Procedure then they can learn from here.
Sp_updatedata - Database.mdf, the go to Stored Procedure and Add New Stored Procedure.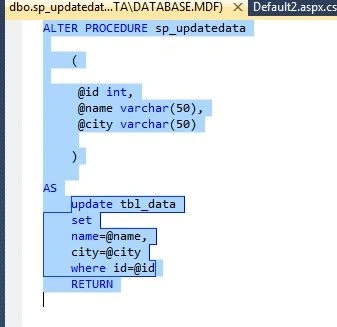
Design chamber
Step 4
Now open your gridview_demo.aspx file, where we create our design for binding and performing create, edit, delete and update operations.
Gridview_demo.aspx
- <%@ Page Language="C#" AutoEventWireup="true" CodeFile="Default2.aspx.cs" Inherits="Default2" %>
- <!DOCTYPE html PUBLIC "-//W3C//DTD XHTML 1.0 Transitional//EN" "http://www.w3.org/TR/xhtml1/DTD/xhtml1-transitional.dtd">
- <html xmlns="http://www.w3.org/1999/xhtml">
- <head runat="server">
- <title></title>
- <style type="text/css">
- .style1
- {
- text-decoration: underline;
- color: #0000FF;
- }
- </style>
- </head>
- <body>
- <form id="form1" runat="server">
- <table style="width:100%;">
- <tr>
- <td class="style1">
- <strong>Edit Update Delete Operation in Gridview</strong></td>
- <td>
- </td>
- <td>
- </td>
- </tr>
- <tr>
- <td>
- <asp:GridView ID="GridView1" runat="server" AutoGenerateColumns="False"
- BackColor="#DEBA84" BorderColor="#DEBA84" BorderStyle="None" BorderWidth="1px"
- CellPadding="3" DataKeyNames="id" AutoGenerateDeleteButton="True"
- AutoGenerateEditButton="True" onrowcancelingedit="GridView1_RowCancelingEdit"
- onrowdeleting="GridView1_RowDeleting" onrowediting="GridView1_RowEditing"
- onrowupdating="GridView1_RowUpdating" CellSpacing="2">
- <Columns>
- <asp:TemplateField HeaderText="Name">
- <EditItemTemplate>
- <asp:TextBox ID="TextBox1" runat="server" Text='<%# Bind("name") %>'></asp:TextBox>
- </EditItemTemplate>
- <ItemTemplate>
- <asp:Label ID="Label1" runat="server" Text='<%# Bind("name") %>'></asp:Label>
- </ItemTemplate>
- </asp:TemplateField>
- <asp:TemplateField HeaderText="City">
- <EditItemTemplate>
- <asp:TextBox ID="TextBox2" runat="server" Text='<%# Bind("city") %>'></asp:TextBox>
- </EditItemTemplate>
- <ItemTemplate>
- <asp:Label ID="Label2" runat="server" Text='<%# Bind("city") %>'></asp:Label>
- </ItemTemplate>
- </asp:TemplateField>
- </Columns>
- <FooterStyle BackColor="#F7DFB5" ForeColor="#8C4510" />
- <HeaderStyle BackColor="#A55129" Font-Bold="True" ForeColor="White" />
- <PagerStyle ForeColor="#8C4510" HorizontalAlign="Center" />
- <RowStyle BackColor="#FFF7E7" ForeColor="#8C4510" />
- <SelectedRowStyle BackColor="#738A9C" Font-Bold="True" ForeColor="White" />
- <SortedAscendingCellStyle BackColor="#FFF1D4" />
- <SortedAscendingHeaderStyle BackColor="#B95C30" />
- <SortedDescendingCellStyle BackColor="#F1E5CE" />
- <SortedDescendingHeaderStyle BackColor="#93451F" />
- </asp:GridView>
- </td>
- <td>
- </td>
- <td>
- </td>
- </tr>
- <tr>
- <td>
- </td>
- <td>
- </td>
- <td>
- </td>
- </tr>
- </table>
- <div>
- </div>
- </form>
- </body>
- </html>
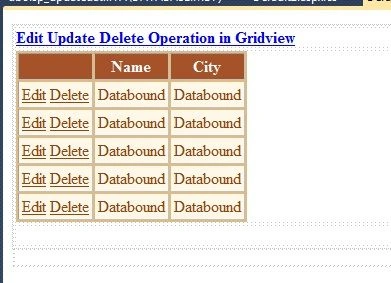
You need to look around this Property in GridView:
- DataKeysName: id
- Auto Generate Delete Button: True
- Auto Generate Edit Button : True
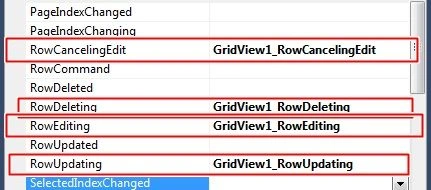
In events (double-click each event shown below to go to the code):
- Row Canceling Edit
- Row Deleting
- Row Editing
- Row Updating
Code chamber
Step 5
Open your gridview_demo.aspx.cs and write some code so that our application works.
Gridview_demo.cs
- using System;
- using System.Collections.Generic;
- using System.Linq;
- using System.Web;
- using System.Web.UI;
- using System.Web.UI.WebControls;
- using System.Data;
- using System.Data.SqlClient;
- public partial class Default2 : System.Web.UI.Page
- {
- protected void Page_Load(object sender, EventArgs e)
- {
- if (!Page.IsPostBack)
- {
- refreshdata();
- }
- }
- public void refreshdata()
- {
- SqlConnection con = new SqlConnection(@"Data Source=.\SQLEXPRESS;AttachDbFilename=|DataDirectory|\Database.mdf;Integrated Security=True;User Instance=True");
- SqlCommand cmd = new SqlCommand("select * from tbl_data", con);
- SqlDataAdapter sda = new SqlDataAdapter(cmd);
- DataTable dt = new DataTable();
- sda.Fill(dt);
- GridView1.DataSource = dt;
- GridView1.DataBind();
- }
- protected void GridView1_RowDeleting(object sender, GridViewDeleteEventArgs e)
- {
- SqlConnection con = new SqlConnection(@"Data Source=.\SQLEXPRESS;AttachDbFilename=|DataDirectory|\Database.mdf;Integrated Security=True;User Instance=True");
- int id = Convert.ToInt16(GridView1.DataKeys[e.RowIndex].Values["id"].ToString());
- con.Open();
- SqlCommand cmd = new SqlCommand("delete from tbl_data where id =@id", con);
- cmd.Parameters.AddWithValue("id", id);
- int i = cmd.ExecuteNonQuery();
- con.Close();
- refreshdata();
- }
- protected void GridView1_RowEditing(object sender, GridViewEditEventArgs e)
- {
- GridView1.EditIndex = e.NewEditIndex;
- refreshdata();
- }
- protected void GridView1_RowCancelingEdit(object sender, GridViewCancelEditEventArgs e)
- {
- GridView1.EditIndex = -1;
- refreshdata();
- }
- protected void GridView1_RowUpdating(object sender, GridViewUpdateEventArgs e)
- {
- SqlConnection con = new SqlConnection(@"Data Source=.\SQLEXPRESS;AttachDbFilename=|DataDirectory|\Database.mdf;Integrated Security=True;User Instance=True");
- TextBox txtname = GridView1.Rows[e.RowIndex].FindControl("TextBox1") as TextBox;
- TextBox txtcity = GridView1.Rows[e.RowIndex].FindControl("TextBox2") as TextBox;
- int id = Convert.ToInt16(GridView1.DataKeys[e.RowIndex].Values["id"].ToString());
- con.Open();
- SqlCommand cmd = new SqlCommand("sp_updatedata", con);
- cmd.CommandType = CommandType.StoredProcedure;
- cmd.Parameters.AddWithValue("name", txtname.Text);
- cmd.Parameters.AddWithValue("city", txtcity.Text);
- cmd.Parameters.AddWithValue("id", id);
- int i = cmd.ExecuteNonQuery();
- con.Close();
- GridView1.EditIndex = -1;
- refreshdata();
- }
- }
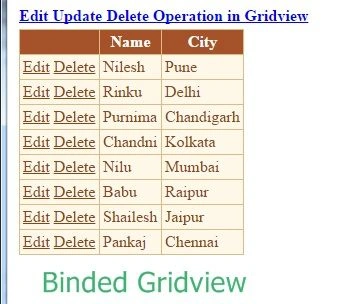
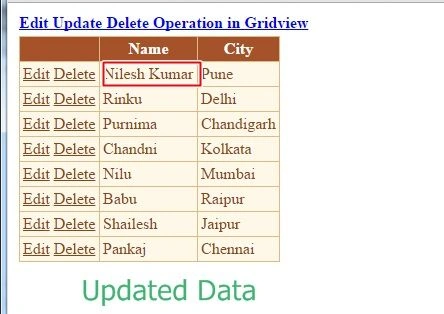
I hope you like it. All controls are working, you can check it out. Thank you for reading.
Tom DePosted Apr 24, 2024, 11:56 AM
In Gridview_demo.cs code-behind file (which is actually named "gridview_demo.aspx.cs") I got an error "The name 'GridView1' does not exist in the current context". Please, help.
JATIN KANNAUJIYAPosted Jul 19, 2022, 10:13 AM
Sir it showing error [index out of range]
Nitin ShakyaPosted Sep 30, 2018, 9:29 PM
<%@ Page Language="C#" AutoEventWireup="true" CodeBehind="Employee.aspx.cs" Inherits="TestSagar1.Employee" %> <!DOCTYPE html> <html xmlns="http://www.w3.org/1999/xhtml"> <head runat="server"> <title></title> <script src="jquery-3.2.1.min.js"></script> <script type="text/javascript"> var idd = 0; $(document).ready(function () { $("th:even").css('background-color', 'blue'); $("th:odd").css("background-color", "grey"); Getshow(); CityGet(); Country(); $("#txtbcode").attr("disabled", true); }); function InsertData() { $.ajax({ url: 'Employee.aspx/Insert', type: 'post', contentType: 'application/json;charset=utf-8', dataType: 'json', data: "{B: '" + $("#txtcperson").val() + "', C: '" + $("#txtbname").val() + "',D: '" + $("#txtemail").val() + "',E: '" + $("#txtsname").val() + "',F: '" + ($("#chkhub").is(':checked') == true ? 1 : 0) + "',G: '" + $("#txtaddress").val() + "',H: '" + ($("#chkvender").is(':checked') == true ? 1 : 0) + "',I: '" + ($("#chkactive").is(':checked') == true ? 1 : 0) + "',J: '" + $("#ddlcity").val() + "',K: '" + $("#txtpin").val() + "',L: '" + $("#txtzone").val() + "',M: '" + idd + "'}", success: function (_dt) { _dt = JSON.parse(_dt.d); $("#txtbcode").val(_dt); alert('operation success'); Getshow(); $("#btnsave").val("Save") }, error: function () { alert('operation error'); }, }); } function EditData(eid) { $.ajax({ url: 'Employee.aspx/Edit', type: 'post', contentType: 'application/json;charset=utf-8', dataType: 'json', data: "{A: '" + eid + "'}", success: function (_dt) { _dt = JSON.parse(_dt.d); $("#txtbname").val(_dt[0].Bname); $("#txtaddress").val(_dt[0].address); $("#txtemail").val(_dt[0].Email); $("#txtsname").val(_dt[0].Sname); $("#txtcperson").val(_dt[0].ContactPerson); $("#txtpin").val(_dt[0].pincode); $("#txtzone").val(_dt[0].Zone); $("#ddlcity").val(_dt[0].city); $("input[type=checkbox][value='"+ _dt[0].active +"']").prop("checked", true); idd = eid; $("#btnsave").val("Update"); }, error: function () { alert('edit error !!'); } }); } function DeleteData(eid) { $.ajax({ url: 'Employee.aspx/Delete', type: 'post', contentType: 'application/json;charset=utf-8', dataType: 'json', data: "{A: '" + eid + "'}", success: function () { alert('Delete success'); Getshow(); }, error: function () { alert('Delete error !!'); } }); } function CityGet() { $.ajax({ url: 'Employee.aspx/City', type: 'post', contentType: 'application/json;charset=utf-8', dataType: 'json', data: "{}", success: function (_dt) { _dt = JSON.parse(_dt.d); for (var i = 0; i < _dt.length; i++) { $("#ddlcity").append($('<option/>').attr("value", _dt[i].cid).text(_dt[i].cname)); } }, error: function () { alert('get country error !!'); } }); } function Country() { $.ajax({ url: 'Employee.aspx/Country', type: 'post', contentType: 'application/json;charset=utf-8', dataType: 'json', data: "{}", success: function (_dt) { _dt = JSON.parse(_dt.d); for (var i = 0; i < _dt.length; i++) { $("#ddlcountry").append($('<option/>').attr("value", _dt[i].cid).text(_dt[i].cname)); } }, error: function () { alert('get city error !!'); } }); } function Getshow() { $.ajax({ url: 'Employee.aspx/Getdata', type: 'post', contentType: 'application/json;charset=utf-8', dataType: 'json', data: "{}", success: function (_dt) { _dt = JSON.parse(_dt.d); $("#tbl").find("tr:gt(0)").remove(); for (var i = 0; i < _dt.length; i++) { $("#tbl").append('<tr><td>' + _dt[i].ContactPerson + '</td> , <td>' + _dt[i].Bname + '</td> <td>' + _dt[i].address + '</td> <td>' + _dt[i].Email + '</td> <td>' + _dt[i].Sname + '</td> <td>' + (_dt[i].vender == "1 " ? "yes" : "NO") + '</td> <td>' + (_dt[i].hub == "1" ? "yes" : "No") + '</td> <td>' + (_dt[i].active == "1" ? "yes" : "no") + '</td> <td>' + _dt[i].cname + '</td> <td>' + _dt[i].pincode + '</td> <td>' + _dt[i].Zone + '</td> <td> <input type="button" id="btnedit" value="Edit" onclick="EditData(' + _dt[i].eid + ')" /> </td> <td> <input type="button" id="btndelete" value="Delete" onclick="DeleteData(' + _dt[i].eid + ')" /> </td> </tr>'); $("btnsave").val("Save"); $("tr:even").css('background-color', 'lightGrey'); $("tr:odd").css("background-color", "Pink"); } }, error: function () { alert('get error !!'); } }); } function Search() { $.ajax({ url: 'Employee.aspx/Search', type: 'post', contentType: 'application/json;charset=utf-8', dataType: 'json', data: "{A: '" + $("#ddlsearch").val() + "',B: '" + $("#txtsearch").val() + "'}", success: function (_dt) { _dt = JSON.parse(_dt.d); $("#tbl").find("tr:gt(0)").remove(); if (_dt != "") { for (var i = 0; i < _dt.length; i++) { $("#tbl").append('<tr><td>' + _dt[i].ContactPerson + '</td> , <td>' + _dt[i].Bname + '</td> <td>' + _dt[i].address + '</td> <td>' + _dt[i].Email + '</td> <td>' + _dt[i].Sname + '</td> <td>' + (_dt[i].vender == "1 " ? "yes" : "NO") + '</td> <td>' + (_dt[i].hub == "1" ? "yes" : "No") + '</td> <td>' + (_dt[i].active == "1" ? "yes" : "no") + '</td> <td>' + _dt[i].cname + '</td> <td>' + _dt[i].pincode + '</td> <td>' + _dt[i].Zone + '</td> <td> <input type="button" id="btnedit" value="Edit" onclick="EditData(' + _dt[i].eid + ')" /> </td> <td> <input type="button" id="btndelete" value="Delete" onclick="DeleteData(' + _dt[i].eid + ')" /> </td> </tr>'); } } else { $("#tbl").find("tr").remove(); } }, error: function () { alert('Search error !!'); } }); } </script> </head> <body> <form id="form1" runat="server"> <div> <table><tr><td>Search:</td> <td><select id="ddlsearch"> <option value="0">--select--</option> <option value="1">City</option> <option value="2">Address</option> <option value="3">Bname</option> <option value="4">Email</option> </select> <input type="text" id="txtsearch" /> <input type="button" id="btnsearch" value="Search" onclick="Search()" /> </td> </tr></table> <table> <tr> <td>Branch Code:</td> <td> <input type="text" id="txtbcode" /> </td> <td>Contact Person:</td> <td> <input type="text" id="txtcperson" /></td> </tr> <tr> <td>Branch Name:</td> <td> <input type="text" id="txtbname" /> </td> <td>Email Id:</td> <td> <input type="text" id="txtemail" /></td> </tr> <tr> <td>Short Name:</td> <td> <input type="text" id="txtsname" /> </td> <td>Hub</td> <td> <input type="checkbox" id="chkhub" /></td> </tr> <tr> <td>Address:</td> <td> <input type="text" id="txtaddress" /> </td> <td>Vender:</td> <td> <input type="checkbox" id="chkvender" /></td> <td>Active:</td> <td> <input type="checkbox" id="chkactive" /></td> </tr> <tr> <td>country: </td> <td> <select id="ddlcountry"> <option>--select--</option> </select> </td> </tr> <tr> <td>City: </td> <td> <select id="ddlcity"> <option>--select--</option> </select> </td> </tr> <tr> <td>Pin Code:</td> <td> <input type="text" id="txtpin" /> </td> </tr> <tr> <td>Zone:</td> <td> <input type="text" id="txtzone" /></td> </tr> <tr> <td></td> <td> <input type="button" id="btnsave" value="Save" onclick="InsertData()" /></td> </tr> </table> <table id="tbl" border="1" > <tr > <th>ContactPerson</th> <th>Employee_Bname</th> <th>Address</th> <th>Email</th> <th>Sname</th> <th>Vender</th> <th>hub</th> <th>Active</th> <th>City</th> <th>Pincode</th> <th>Zone</th> </tr> </table> </div> </form> </body> </html>
Nitin ShakyaPosted Sep 30, 2018, 9:28 PM
Using System;using System.Collections.Generic;using System.Linq; using System.Web; using System.Web.UI; using System.Web.UI.WebControls; using System.Data; using System.Data.SqlClient; using System.Configuration; using System.Web.Services; using Newtonsoft.Json; using Newtonsoft.Json.Linq; namespace TestSagar1 { public partial class Employee : System.Web.UI.Page { protected void Page_Load(object sender, EventArgs e) { } [WebMethod] public static string Insert(string B, string C, string D, string E, int F, string G, int H, int I, int J, string K, string L,int M) { string _dt = ""; SqlConnection con = new SqlConnection(ConfigurationManager.ConnectionStrings["DBCS"].ConnectionString); con.Open(); SqlCommand cmd = new SqlCommand("usp_emp_insert", con); cmd.CommandType = CommandType.StoredProcedure; cmd.Parameters.AddWithValue("@idd", M); cmd.Parameters.AddWithValue("@ContactPerson", B); cmd.Parameters.AddWithValue("@Bname", C); cmd.Parameters.AddWithValue("@Email", D); cmd.Parameters.AddWithValue("@Sname", E); cmd.Parameters.AddWithValue("@hub", F); cmd.Parameters.AddWithValue("@address", G); cmd.Parameters.AddWithValue("@vender", H); cmd.Parameters.AddWithValue("@active", I); cmd.Parameters.AddWithValue("@city", J); cmd.Parameters.AddWithValue("@pincode", K); cmd.Parameters.AddWithValue("@Zone", L); SqlParameter pram = cmd.Parameters.Add("@bcode", SqlDbType.VarChar, 50); pram.Direction = ParameterDirection.Output; cmd.ExecuteNonQuery(); con.Close(); { _dt = cmd.Parameters["@bcode"].Value.ToString(); _dt = JsonConvert.SerializeObject(_dt); } return _dt; } [WebMethod] public static string City() { string _dt = ""; SqlConnection con = new SqlConnection(ConfigurationManager.ConnectionStrings["DBCS"].ConnectionString); con.Open(); SqlCommand cmd = new SqlCommand("usp_city_get", con); cmd.CommandType = CommandType.StoredProcedure; SqlDataAdapter da = new SqlDataAdapter(cmd); DataSet ds = new DataSet(); da.Fill(ds); con.Close(); if(ds.Tables[0].Rows.Count>0) { _dt = JsonConvert.SerializeObject(ds.Tables[0]); } return _dt; } [WebMethod] public static string Country() { string _dt = ""; SqlConnection con = new SqlConnection(ConfigurationManager.ConnectionStrings["DBCS"].ConnectionString); con.Open(); SqlCommand cmd = new SqlCommand("usp_country_get", con); cmd.CommandType = CommandType.StoredProcedure; SqlDataAdapter da = new SqlDataAdapter(cmd); DataSet ds = new DataSet(); da.Fill(ds); con.Close(); if (ds.Tables[0].Rows.Count > 0) { _dt = JsonConvert.SerializeObject(ds.Tables[0]); } return _dt; } [WebMethod] public static void Delete(int A) { SqlConnection con = new SqlConnection(ConfigurationManager.ConnectionStrings["DBCS"].ConnectionString); con.Open(); SqlCommand cmd = new SqlCommand("usp_emp_delete", con); cmd.CommandType = CommandType.StoredProcedure; cmd.Parameters.AddWithValue("@eid", A); cmd.ExecuteNonQuery(); } [WebMethod] public static string Search(int A,string B) { string _dt = ""; SqlConnection con = new SqlConnection(ConfigurationManager.ConnectionStrings["DBCS"].ConnectionString); con.Open(); SqlCommand cmd = new SqlCommand("usp_emp_search", con); cmd.CommandType = CommandType.StoredProcedure; cmd.Parameters.AddWithValue("@ddlsearch", A); cmd.Parameters.AddWithValue("@txtsearch", B); SqlDataAdapter da = new SqlDataAdapter(cmd); DataSet ds = new DataSet(); da.Fill(ds); con.Close(); if (ds.Tables[0].Rows.Count > 0) { _dt = JsonConvert.SerializeObject(ds.Tables[0]); } return _dt; } [WebMethod] public static string Getdata() { string _dt = ""; SqlConnection con = new SqlConnection(ConfigurationManager.ConnectionStrings["DBCS"].ConnectionString); con.Open(); SqlCommand cmd = new SqlCommand("usp_emp_select", con); cmd.CommandType = CommandType.StoredProcedure; SqlDataAdapter da = new SqlDataAdapter(cmd); DataSet ds = new DataSet(); da.Fill(ds); con.Close(); if (ds.Tables[0].Rows.Count > 0) { _dt = JsonConvert.SerializeObject(ds.Tables[0]); } return _dt; } [WebMethod] public static string Edit(int A) { string _dt = ""; SqlConnection con = new SqlConnection(ConfigurationManager.ConnectionStrings["DBCS"].ConnectionString); con.Open(); SqlCommand cmd = new SqlCommand("usp_emp_edit", con); cmd.CommandType = CommandType.StoredProcedure; cmd.Parameters.AddWithValue("@eid", A); SqlDataAdapter da = new SqlDataAdapter(cmd); DataSet ds = new DataSet(); da.Fill(ds); con.Close(); if (ds.Tables[0].Rows.Count > 0) { _dt = JsonConvert.SerializeObject(ds.Tables[0]); } return _dt; } } }
Nitin ShakyaPosted Sep 30, 2018, 12:45 PM
Function FilterListEvoucher() { alert('ok'); $.ajax({ type: "POST", url: "getData.asmx/bindactivelist", data: "{}", contentType: "application/json; charset=utf-8", dataType: "json", success: BindListVoucher1, error: function (xhr, status, error) { } }); } function BindListVoucher1(msg) { alert(msg.d); debugger; var table = ''; var jsonData = msg.d; for (var iCount = 0; iCount < jsonData.length; iCount++) { var row = '<tr>'; row += '<td>' + (iCount + 1) + '</td>'; row += '<td>' + jsonData[iCount].Sponame + '</td>'; row += '<td class="hidden-phone">' + jsonData[iCount].Username + '</td>'; row += '<td class="hidden-phone">' + jsonData[iCount].Name + '</td>'; row += '<td class="hidden-phone">' + jsonData[iCount].active + '</td>'; row += '<td class="hidden-phone">' + jsonData[iCount].package + '</td>'; row += '<td class="hidden-phone"><a href="#">Active</a></td>'; row += '</tr>'; table += row; } $('#repMsg').html(table); $('#example').dataTable().val(table); }
Nitin ShakyaPosted Sep 30, 2018, 12:45 PM
<table class="table table-striped table-bordered table-advance table-hover" id="example"> <thead> <tr style="background-color: #F0F0F0"> <th width="4%"> <i class="icon-user"></i>SL </th> <th class="hidden-phone" width="10%"> <i class=" icon-bookmark"></i>Sponser ID </th> <th width="10%"> <i class="icon-user"></i> UserName </th> <th width="13%"> <i class="icon-user"></i> FullName </th> <th width="10%"> <i class="icon-user"></i> Contact No </th> <th width="10%" class="hidden"> <i class="icon-user"></i> Passport No </th> <th class="hidden-phone" width="6%"> <i class=" icon-share-alt"></i>Package </th> <th class="hidden-phone" width="6%"> <i class=" icon-share-alt"></i>Active </th> </tr> </thead> <tbody id="repMsg"> </tbody> </table>
Nitin ShakyaPosted Sep 30, 2018, 12:44 PM
[WebMethod] public List<Member_Details> unconfirmedtextsearch123(string username, string fromdate, string todate, string actival) { if (fromdate != "") { string[] a1 = fromdate.Split('-'); fromdate = a1[2] + "/" + a1[1] + "/" + a1[0]; } if (todate != "") { string[] a1 = todate.Split('-'); todate = a1[2] + "/" + a1[1] + "/" + a1[0]; } List<Member_Details> mem_details = new List<Member_Details>(); SqlParameter[] param = new SqlParameter[3]; param[0] = new SqlParameter("@loginid", SqlDbType.VarChar, 100); param[0].Value = username; param[1] = new SqlParameter("@regdate_from", SqlDbType.VarChar, 100); param[1].Value = fromdate; param[2] = new SqlParameter("@regdate_to", SqlDbType.VarChar, 100); param[2].Value = todate; param[2] = new SqlParameter("@actival", SqlDbType.VarChar, 100); param[2].Value = actival; sdr = objDUT.GetDataReaderSP(param, "Sp_unconfirmedjoining"); while (sdr.Read()) { Member_Details mdetailss = new Member_Details(); mdetailss.Username = sdr["sname2"].ToString(); mdetailss.Name = sdr["name"].ToString(); mdetailss.Sponame = sdr["sloginid"].ToString(); mdetailss.package = sdr["kitcode"].ToString(); mdetailss.active = sdr["mobile"].ToString(); mdetailss.regno = sdr["regno"].ToString(); mdetailss.Spousername = sdr["confpayno"].ToString(); mem_details.Add(mdetailss); } return mem_details; }
Shakti Singh DulawatPosted Apr 20, 2016, 4:20 AM
Good Job Buddy
Arul RPosted Oct 28, 2015, 5:36 AM
Good one !!!
Neeraj KumarPosted Aug 7, 2015, 7:17 AM
Nice Article
Debasis SahaPosted Aug 7, 2015, 12:55 AM
Nice one...
Santhakumar MunuswamyPosted Aug 6, 2015, 2:05 PM
Nice Article. Thanks for sharing
Gopi ChandPosted Aug 6, 2015, 12:36 PM
Nice effort
RakeshPosted Aug 6, 2015, 10:24 AM
Nice one
Gowtham RajamanickamPosted Aug 6, 2015, 9:43 AM
good one..
Sibeesh VenuPosted Aug 6, 2015, 8:33 AM
Nice Share
Rahul PrajapatPosted Aug 6, 2015, 7:57 AM
Nice article, thanks for sharing
Ankit BansalPosted Aug 6, 2015, 6:24 AM
nice explain...
Jaipal ReddyPosted Aug 6, 2015, 5:33 AM
Good one.
Upendra Pratap ShahiPosted Aug 6, 2015, 5:16 AM
nice one Nilesh Jadav sir
Pankaj Kumar ChoudharyPosted Aug 6, 2015, 5:07 AM
Such a Nice Explain Nilesh Sir.........
Rajeesh MenothPosted Aug 6, 2015, 5:05 AM
Good One...