

We are going to discuss microservice asynchronous communication using the Ocelot API gateway and RabbitMQ Message Queue and containerization of the client application
I request you to read the following blogs for a better understanding of API Gateway and Microservice
- RabbitMQ Message Queue Using .NET Core 6 Web API
- Microservices Implementation With Ocelot Gateway Using .NET Core 6 API And Angular 14
- Asynchronous Communication Between Microservices Using the .NET Core API, RabbitMQ, and Docker
- Implementation And Containerization Of Microservices Using .NET Core 6 And Docker
Agenda
- Implementation of Ocelot API Gateway
- Implementation of Client Application to consume one service
- Containerization using Docker
Prerequisites
- Visual Studio 2022
- .NET Core 6 SDK
- Angular 14
- Node Js
- VS Code
- SQL Server
- Docker Desktop
Create Backend Product Owner and User Service as shown in this article
Update the controllers
ProductController
using Microsoft.AspNetCore.Mvc;
using ProductOwner.Microservice.Model;
using ProductOwner.Microservice.Services;

namespace ProductOwner.Microservice.Controllers
{
    [Route("api/[controller]")]
    [ApiController]
    public class ProductsController : ControllerBase
    {
        private readonly IProductService productService;

        public ProductsController(IProductService _productService)
        {
            productService = _productService;
        }

        [HttpGet]
        public Task<IEnumerable<ProductDetails>> ProductListAsync()
        {
            var productList = productService.GetProductListAsync();
            return productList;

        }
        [HttpGet("{id}")]
        public Task<ProductDetails> GetProductByIdAsync(int Id)
        {
            return productService.GetProductByIdAsync(Id);
        }

        [HttpPost]
        public Task<ProductDetails> AddProductAsync(ProductDetails product)
        {
            var productData = productService.AddProductAsync(product);
            return productData;
        }

        [HttpPost("sendoffer")]
        public bool SendProductOfferAsync(ProductOfferDetail productOfferDetails)
        {
            bool isSent = false;
            if (productOfferDetails != null)
            {
                isSent = productService.SendProductOffer(productOfferDetails);

                return isSent;
            }
            return isSent;
        }
    }
}
UserOffersController
using Microsoft.AspNetCore.Mvc;
using ProductUser.Microservice.Model;
using ProductUser.Microservice.Services;
namespace ProductUser.Microservice.Controllers {
    [Route("api/[controller]")]
    [ApiController]
    public class UserOffersController: ControllerBase {
        private readonly IUserService userService;
        public UserOffersController(IUserService _userService) {
                userService = _userService;
            }
            [HttpGet]
        public Task < IEnumerable < ProductOfferDetail >> ProductListAsync() {
                var productList = userService.GetProductListAsync();
                return productList;
            }
            [HttpGet("{id}")]
        public Task < ProductOfferDetail > GetProductByIdAsync(int Id) {
            return userService.GetProductByIdAsync(Id);
        }
    }
}
Implementation of Ocelot API Gateway
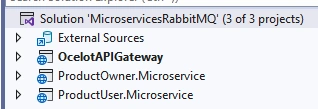
Step 1
Create Ocelot API Gateway Project inside the same solution
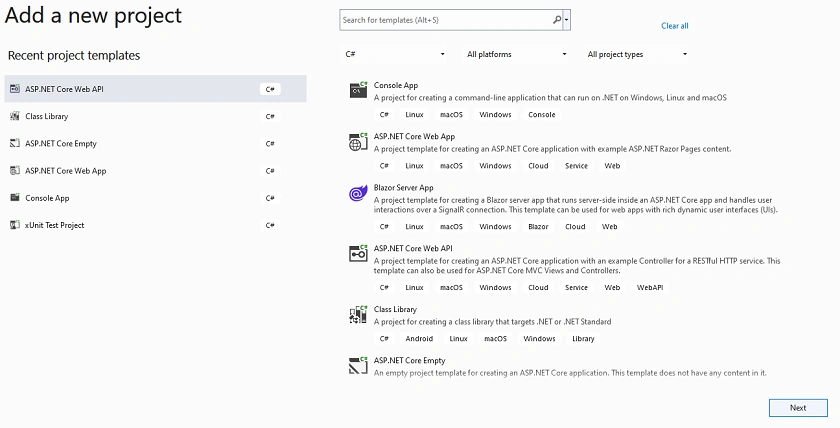
Step 2
Configure your project
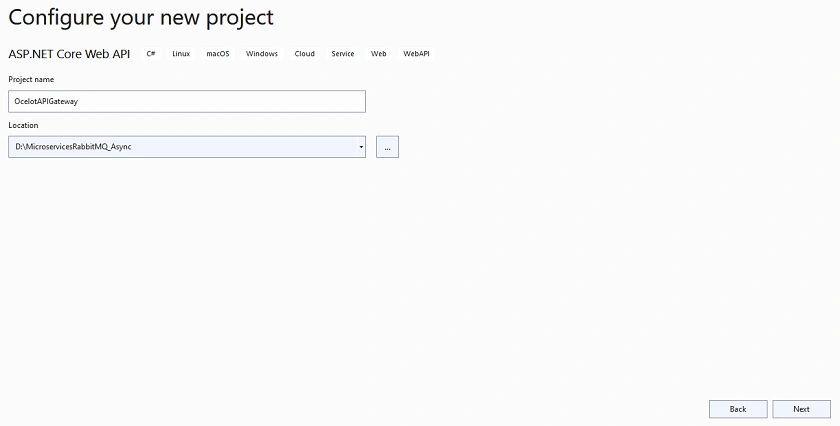
Step 3
Provide additional information about your project
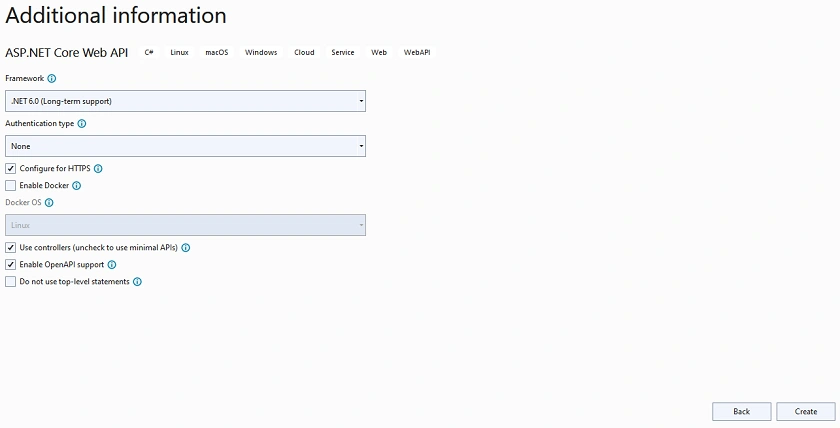
Step 4
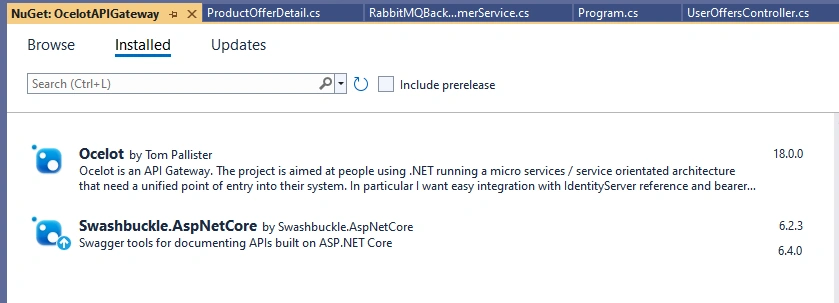
Install the following NuGet Package
Step 5
Configure a few services inside the Program class related to ocelot and CORS Policy
using Ocelot.DependencyInjection;
using Ocelot.Middleware;
var builder = WebApplication.CreateBuilder(args);
// Add services to the container.
builder.Services.AddCors(options => {
    options.AddPolicy("CORSPolicy", builder => builder.AllowAnyOrigin().AllowAnyMethod().AllowAnyHeader());
});
builder.Configuration.AddJsonFile("ocelot.json", optional: false, reloadOnChange: true);
builder.Services.AddOcelot(builder.Configuration);
builder.Services.AddControllers();
// Learn more about configuring Swagger/OpenAPI at https://aka.ms/aspnetcore/swashbuckle
builder.Services.AddEndpointsApiExplorer();
builder.Services.AddSwaggerGen();
var app = builder.Build();
// Configure the HTTP request pipeline.
app.UseSwagger();
app.UseSwaggerUI();
app.UseCors("CORSPolicy");
app.UseHttpsRedirection();
app.UseAuthorization();
app.MapControllers();
await app.UseOcelot();
app.Run();
Step 6
Create an ocelot.json file and put the API’s endpoints and configuration related to that
{
  "GlobalConfiguration": {
    "BaseUrl": "https://localhost:7106/"
  },
  "Routes": [
    {
      "UpstreamPathTemplate": "/gateway/product",
      "UpstreamHttpMethod": [ "Get" ],
      "DownstreamPathTemplate": "/api/products",
      "DownstreamScheme": "http",
      "DownstreamHostAndPorts": [
        {
          "Host": "localhost",
          "Port": 4201
        }
      ]
    },
    {
      "UpstreamPathTemplate": "/gateway/product/{id}",
      "UpstreamHttpMethod": [ "Get" ],
      "DownstreamPathTemplate": "/api/products/{id}",
      "DownstreamScheme": "http",
      "DownstreamHostAndPorts": [
        {
          "Host": "localhost",
          "Port": 4201
        }
      ]
    },
    {
      "UpstreamPathTemplate": "/gateway/product",
      "UpstreamHttpMethod": [ "Post" ],
      "DownstreamPathTemplate": "/api/products",
      "DownstreamScheme": "http",
      "DownstreamHostAndPorts": [
        {
          "Host": "localhost",
          "Port": 4201
        }
      ]
    },
    {
      "UpstreamPathTemplate": "/gateway/product/sendoffer",
      "UpstreamHttpMethod": [ "Post" ],
      "DownstreamPathTemplate": "/api/products/sendoffer",
      "DownstreamScheme": "http",
      "DownstreamHostAndPorts": [
        {
          "Host": "localhost",
          "Port": 4201
        }
      ]
    },
    {
      "UpstreamPathTemplate": "/gateway/offers",
      "UpstreamHttpMethod": [ "Get" ],
      "DownstreamPathTemplate": "/api/useroffers",
      "DownstreamScheme": "http",
      "DownstreamHostAndPorts": [
        {
          "Host": "localhost",
          "Port": 4202
        }
      ]
    },
    {
      "UpstreamPathTemplate": "/gateway/offers/{id}",
      "UpstreamHttpMethod": [ "Get" ],
      "DownstreamPathTemplate": "/api/useroffers/{id}",
      "DownstreamScheme": "http",
      "DownstreamHostAndPorts": [
        {
          "Host": "localhost",
          "Port": 4202
        }
      ]
    }
  ]
}
- The Ocelot file has two sections: one is Global Configuration, which acts as an entry point of our application; and the other is Routes, which is used to define routes of our microservices.
- UpstreamPathTemplate is used to receive client requests and redirects them to the particular microservice.
- UpstreamHttpMethod is used to define HTTP attributes, which helps the gateway to get the type of request.
- DownstreamTemplatePath is the microservice endpoint that takes the request from UpstreamPathTemplate.
- DownstreamScheme defines the scheme of a request.
- DownstreamHostAndPorts defines the hostname and port number of microservices that are present inside the lauchSetting.json file.
Implementation of Client Application to consume one service
Here we consume one microservice for demo purpose
Step 1
Create Angular Application
ng new ClientApplication
Step 2
We use bootstrap in this application. So, use the following command to install bootstrap.
npm install bootstrap
Step 3
Next, add the bootstrap script inside the angular.json file inside the scripts and styles section.
"styles": [
             "src/styles.css",
             "./node_modules/bootstrap/dist/css/bootstrap.min.css"
           ],
           "scripts": [
             "./node_modules/bootstrap/dist/js/bootstrap.min.js"
           ]
Step 4
Create ProductOfferDetail class inside the Model folder.
export class ProductOfferDetail {
    id?: number;
    productID?: number;
    productName?: string;
    productOfferDetails?: string;
}
Step 5
Create the following component
ng g c user
user.component.ts
import { Component, OnInit } from '@angular/core';
import { Observable } from 'rxjs';
import { ProductOfferDetail } from '../Model/ProductOfferDetail';
import { UserService } from '../user.service';

@Component({
    selector: 'app-user',
    templateUrl: './user.component.html',
    styleUrls: ['./user.component.css']
})
export class UserComponent implements OnInit {
    ProductList ? : Observable < ProductOfferDetail[] > ;
    ProductList1 ? : Observable < ProductOfferDetail[] > ;
    constructor(private userService: UserService) {}
    ngOnInit() {
        setTimeout(() => {
            this.getUserList();
        }, 1000);
    }
    getUserList() {
        this.ProductList1 = this.userService.getUserList();
        this.ProductList = this.ProductList1;
    }
}
user.component.html
<nav class="navbar navbar-expand-lg navbar navbar-dark bg-dark">
    <a class="navbar-brand" href="#">Users Application</a>
    <button class="navbar-toggler" type="button" data-toggle="collapse" data-target="#navbarText" aria-controls="navbarText" aria-expanded="false" aria-label="Toggle navigation">
      <span class="navbar-toggler-icon"></span>
    </button>
    <div class="collapse navbar-collapse" id="navbarText">
      <ul class="navbar-nav mr-auto">
        <li class="nav-item active">
          <a class="nav-link" routerLink="/">Home</a>
        </li>
        <li class="nav-item active">
          <a class="nav-link" routerLink="/users">Products</a>
        </li>
      </ul>
    </div>
  </nav>

  <form class="form-horizontal">
      <h1 style="text-align: center;">Microservices Product Application with .NET 6 Web API and Angular 14 </h1>
      <div>
        <div class="alert alert-success" style="text-align: center;"><b>Product List</b></div>
        <div class="table-responsive" style="text-align: center;">
          <table class="table table-striped">
            <thead>
            <tr>
              <th scope="col">#</th>
              <th scope="col">Product ID</th>
              <th scope="col">Product Name</th>
              <th scope="col">Product Offer</th>
            </tr>
          </thead>
          <tbody>
            <tr *ngFor="let product of ProductList | async; index as i">
              <th scope="row">{{ i + 1 }}</th>
              <td>{{product.productID}}</td>
              <td>{{product.productName}}</td>
              <td>{{product.productOfferDetails}}</td>
            </tr>
          </tbody>
          </table>
        </div>
      </div>
    </form>
Homepage Component
ng g c homepage
homepage.component.ts
import { Component, OnInit } from '@angular/core';

@Component({
  selector: 'app-homepage',
  templateUrl: './homepage.component.html',
  styleUrls: ['./homepage.component.css']
})
export class HomepageComponent {
  title: string ="Ocelot Gateway Microservices Demo";
}
homepage.component.html
<nav class="navbar navbar-expand-lg navbar navbar-dark bg-dark">
    <a class="navbar-brand" href="#">{{title}}</a>
    <button class="navbar-toggler" type="button" data-toggle="collapse" data-target="#navbarText" aria-controls="navbarText" aria-expanded="false" aria-label="Toggle navigation">
      <span class="navbar-toggler-icon"></span>
    </button>
    <div class="collapse navbar-collapse" id="navbarText">
      <ul class="navbar-nav mr-auto">
        <li class="nav-item">
            <a class="nav-link" routerLink="/users">Products</a>
          </li>
      </ul>
    </div>
  </nav>
  <h1>Welcome To Programming World!</h1>
Step 6
Next, Create a user service
ng g s user
user.service.ts
import { Injectable } from '@angular/core';
import configurl from '../assets/config/config.json';
import { HttpClient, HttpHeaders } from '@angular/common/http';
import { Observable } from 'rxjs';
import { ProductOfferDetail } from './Model/ProductOfferDetail';

@Injectable({
    providedIn: 'root'
})
export class UserService {
    config = {
        ApiUrl: configurl.apiServer.url,
    };
    constructor(private http: HttpClient) {
        this.getJSON().subscribe((data) => {
            this.config.ApiUrl = data.apiServer.url;
        });
    }
    getUserList(): Observable < ProductOfferDetail[] > {
        return this.http.get < ProductOfferDetail[] > (this.config.ApiUrl + '/offers');
    }
    getUserDetailsById(id: string): Observable < ProductOfferDetail > {
        return this.http.get < ProductOfferDetail > (this.config.ApiUrl + '/offers' + id);
    }
    public getJSON(): Observable < any > {
        return this.http.get('./assets/config/config.json');
    }
}
Step 7
Define routes in an app routing. module file
import { NgModule } from '@angular/core';
import { RouterModule, Routes } from '@angular/router';
import { HomepageComponent } from './homepage/homepage.component';
import { UserComponent } from './user/user.component';

const routes: Routes = [
  { path: '', component: HomepageComponent },
  { path: 'users', component: UserComponent }

];

@NgModule({
  imports: [RouterModule.forRoot(routes)],
  exports: [RouterModule]
})
export class AppRoutingModule { }
Step 8
Configure and define all modules in the app.module.ts
import { NgModule } from '@angular/core';
import { BrowserModule } from '@angular/platform-browser';
import { AppRoutingModule } from './app-routing.module';
import { AppComponent } from './app.component';
import { UserComponent } from './user/user.component';
import { HomepageComponent } from './homepage/homepage.component';
import { HttpClientModule } from '@angular/common/http';

@NgModule({
  declarations: [
    AppComponent,
    UserComponent,
    HomepageComponent
  ],
  imports: [
    BrowserModule,
    AppRoutingModule,
    HttpClientModule
  ],
  providers: [],
  bootstrap: [AppComponent]
})
export class AppModule { }
Step 9
Create a config folder inside the assets folder, and then create a config.json file to define the backend server API URL.
{
    "apiServer": {
      "url": "https://localhost:7106/gateway",
      "version": "v1"
    }
}
Step 10
App Component:
app.component.ts
import { Component } from '@angular/core';

@Component({
  selector: 'app-root',
  templateUrl: './app.component.html',
  styleUrls: ['./app.component.css']
})
export class AppComponent {
  title = 'ProductWebAPP';
}
app.component.html
<router-outlet></router-outlet>
Step 11
Create appEntryPoint.sh file which is used to set the dynamic port configuration
#!/bin/bash
envsubst < /usr/share/nginx/html/assets/config/config.template.json > /usr/share/nginx/html/assets/config/config.json && exec nginx -g 'daemon off;'
Step 12
Next, create nginx-custom.conf file which set some default Nginx server configuration
server {
    listen 80;
    location / {
        root / usr / share / nginx / html;
        index index.html index.htm;
        try_files $uri $uri / /index.html =404;
    }
}
Step 13
Create Dockerfile inside the root directory
### STAGE 1: Build ###
FROM node:16.10-alpine AS build
WORKDIR /usr/src/app
COPY package.json package-lock.json ./
RUN npm install
COPY . .
RUN npm run build
### STAGE 2: Run ###
FROM nginx:1.17.1-alpine
COPY /nginx-custom.conf /etc/nginx/conf.d/default.conf
COPY --from=build /usr/src/app/dist/client-application /usr/share/nginx/html

# Copy the EntryPoint
COPY ./appEntryPoint.sh /
RUN chmod +x appEntryPoint.sh
ENTRYPOINT ["sh","/appEntryPoint.sh"]
CMD ["nginx", "-g", "daemon off;"]
So, here you can see,
- First, we take the node image for our application and set the docker directory, and then copy the package.json file and the remaining data inside the docker directory
- In the second section, we take the Nginx server image and set the default configuration to that
- Lastly, we set the entry point of our application and file which use to set the dynamic port at runtime.
Step 14
Also, Create config.template.json files inside the assets folder and config directory which use to set the backend API URL
{
    "apiServer": {
        "url": "${API_LINK}",
        "version": "v1"
    }
}
Step 15
Build Angular application
ng build --configuration production
Step 16
Create a Docker Compose file inside the root folder where our all projects are present
version: '3.5'
services:
  ProductOwner.Microservice:
   image: ${DOCKER_REGISTRY-}ownerservice:v1
   build:
    context: ./ProductOwner.Microservice
    dockerfile: Dockerfile
   environment:
    - ASPNETCORE_ENVIRONMENT=Production
    - CONNECTIONSTRINGS__DEFAULTCONNECTION=Data Source=192.168.2.1,1433;Initial Catalog=ProductOwnerServiceDB;User Id=sa;Password=database
    - RABBIT_MQ_SERVER=192.168.2.1
    - RABBIT_MQ_USERNAME=guest
    - RABBIT_MQ_PASSWORD=guest
    - RABBITMQSETTINGS__EXCHANGENAME=OfferExchange
    - RABBITMQSETTINGS__EXCHHANGETYPE=direct
    - RABBITMQSETTINGS__QUEUENAME=offer_queue
    - RABBITMQSETTINGS__ROUTEKEY=offer_route
   ports:
    - "4201:80"
  ProductUser.Microservice:
   image: ${DOCKER_REGISTRY-}userservice:v1
   build:
    context: ./ProductUser.Microservice
    dockerfile: Dockerfile
   environment:
    - ASPNETCORE_ENVIRONMENT=Production
    - CONNECTIONSTRINGS__DEFAULTCONNECTION=Data Source=192.168.224.1,1433;Initial Catalog=ProductUserServiceDB;User Id=sa;Password=database
    - RABBIT_MQ_SERVER=192.168.2.1
    - RABBIT_MQ_USERNAME=guest
    - RABBIT_MQ_PASSWORD=guest
    - RABBITMQSETTINGS__EXCHANGENAME=OfferExchange
    - RABBITMQSETTINGS__EXCHHANGETYPE=direct
    - RABBITMQSETTINGS__QUEUENAME=offer_queue
    - RABBITMQSETTINGS__ROUTEKEY=offer_route
   ports:
    - "4202:80"
  Client.Application:
   image: ${DOCKER_REGISTRY-}clientapplication:v1
   build:
    context: ./ClientApplication
    dockerfile: Dockerfile
   environment:
   - API_LINK=https://localhost:7106/gateway
   ports:
   - "4203:80"
- Here you can see that we used the environment section to override the connection string that is present in the appsetting.json file and some environmental variables
- Also, we put our machine IP Address over there in the connection string and port on which our SQL Server is running mode. Because if you put the server’s name, it will show some error while you are navigating your application which is run in a docker container.
- You can get your IP address using the ipconfig command through CMD.
Step 17
Create Docker Image,
docker-compose build
docker-compose up
Step 18
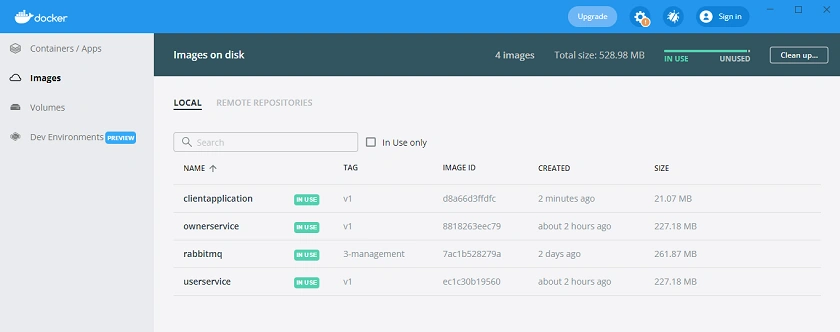
Open docker desktop and inside that, you can see the images which we created
Step 19
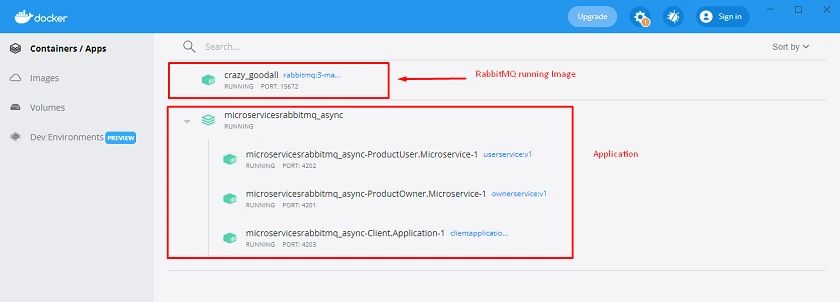
In the container section, you can see images running and with the individual port number
Step 20
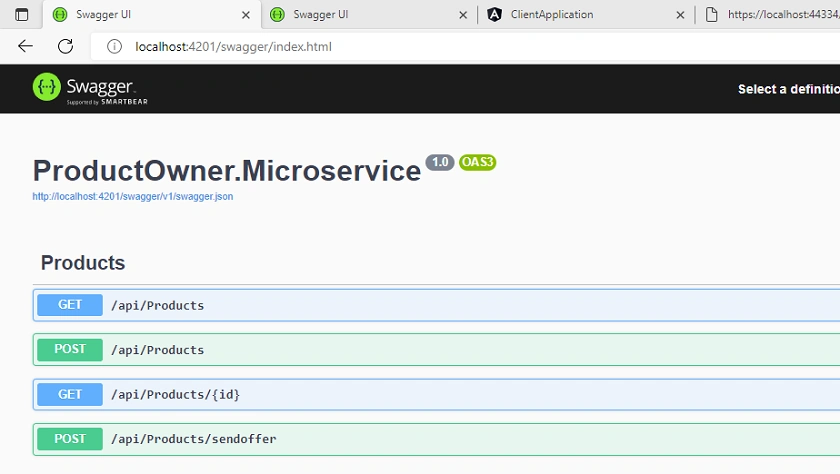
Product Owner Service
http://localhost:4201/swagger/index.html
Send Product Offer
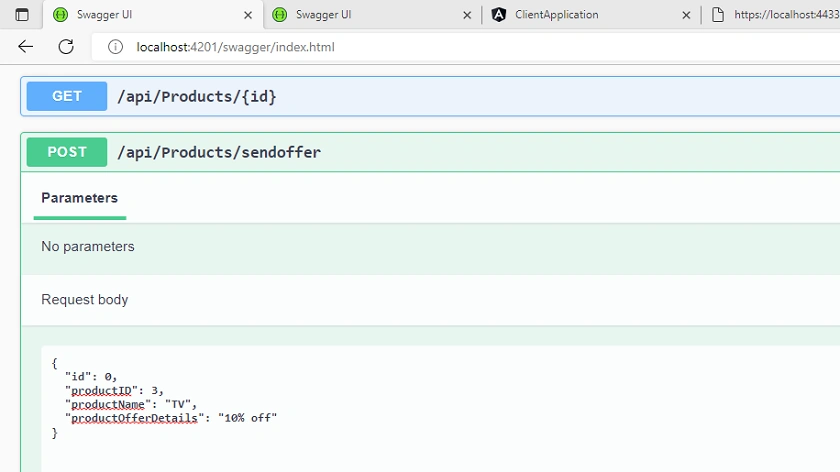
Here we send the product offer and it will be stored inside RabbitMQ after that user consumer service will consume and save inside the database and when you run the client application you can see offer detail with the product
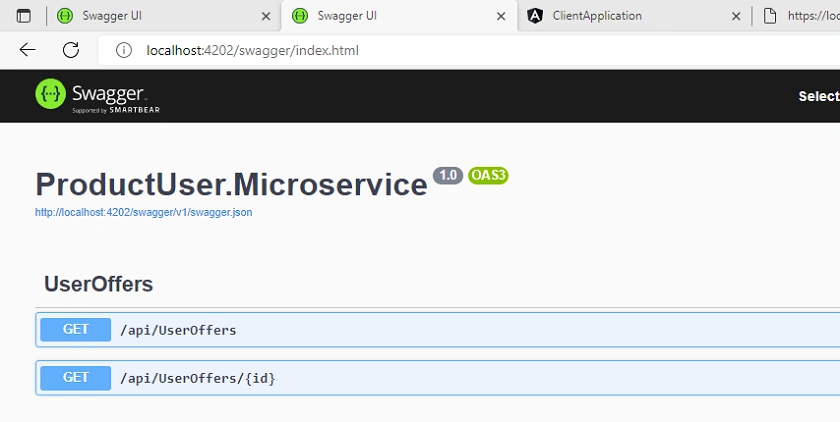
Step 21
Product User Service
http://localhost:4202/swagger/index.html
Step 22
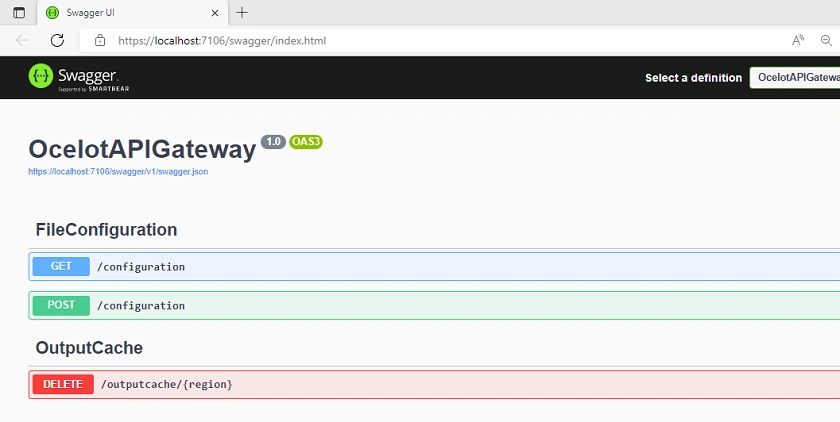
Run Ocelot Gateway Project using Visual Studio
Step 23
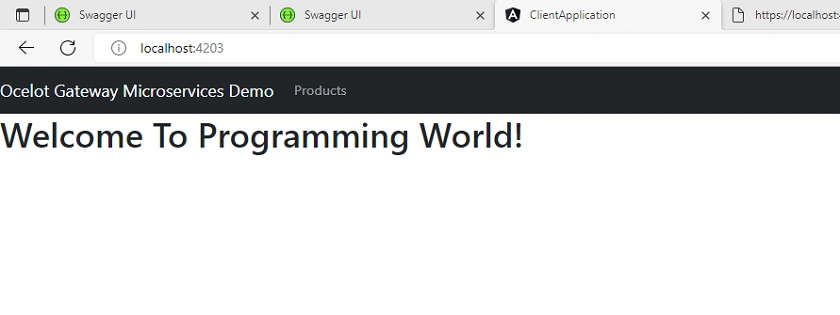
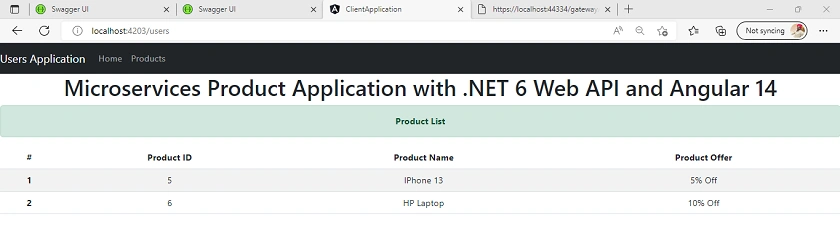
Client Application
http://localhost:4203/
Conclusion
Here we discussed containerization and asynchronous communication between microservices using Ocelot API Gateway and RabbitMQ and step-by-step implementation
Happy Learning!
Hamid KhanPosted Aug 25, 2022, 12:12 PM
Awesome explanation and effort