

Introduction
The most frequent feature requirement in mobile applications is the online and offline feature. In online mode, mobile apps exchange data over networks, using cloud storage.
In offline mode, mobile apps only need to store data in mobile storage locally. With simple unstructured data, such as - user settings, options, and cloud download data, applications can store information inside local files or local database.
This article will show a step by step guide on how to use an SQLite database with a Xamarin.Forms application in iOS, Android, and Windows Universal application. I have seen most of the articles on SQLite implementation but everywhere they use Dependency and creating database in platform specific code.
The sample, shown below, is about Cross Mobile local database in Xamarin.Forms using SQLite with 100% code re-use to all the platforms.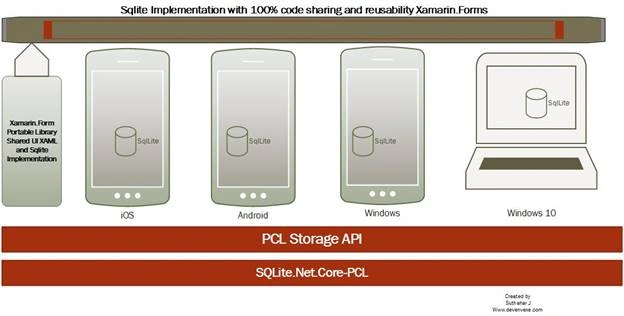
Step 1 Create New Xamarin.Forms Application
Create new Xamarin.Form application using Visual Studio 2015 or Xamarin Studio. You can refer to my previous article for creating new Xamarin.Forms Application.
Step 2 Add SQLite NuGet Package
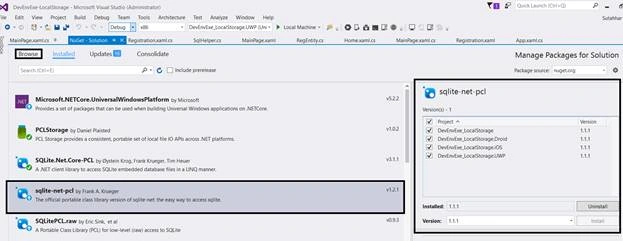
After creating Xamarin.Forms application, you need a managed way to access SQLite database. You need to add a reference to portable SQLite library from our project.
SQLite-net-pcl is on open source and lightweight library for .NET, Mono, and Xamarin applications. It’s available as a NuGet package with the name sqlite-net-pcl .
Right click on Solution - Manage NuGet Package for Solution - Search “Sqlite-net-pcl” - select all platform project - Click on "Install".
Step 3 Add PCLStorage Package
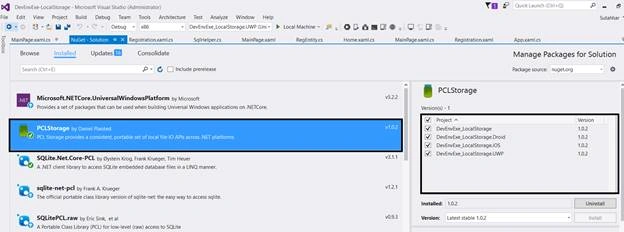
PCL Storage provides a consistent, portable set of local files I/O APIs for .NET, Windows Phone, Windows Store, Xamarin.iOS, Xamarin.Android, and Silverlight. This makes it easier to create cross-platform .NET libraries and apps.
Here, we need to save SQLite database to all the platforms and local storage, so for getting local storage path we are using PCLStorage .
Add PCLStorage Nuget package to all the projects. Right click on Project Solution - Click “Manage NuGet package for Solution “ - Search and select “PCLStorage” - Select all the Projects - Click Install.
Step 4 Create Entity For table
You have created one Data Model Entity with below table column.
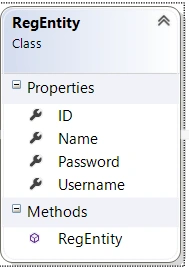
- using SQLite;
- namespace DevEnvExe_LocalStorage
- {
- public class RegEntity
- {
- public RegEntity()
- {
- }
- [PrimaryKey, AutoIncrement]
- public int ID { get; set; }
- public string Name { get; set; }
- public string Username { get; set; }
- public string Password { get; set; }
- }
- }
Create "New class" and add method for SQL connection and Get, Update, Insert, and Delete data.
Right Click Portable Class Library - Add New Item - select Class and name it as “SQLHelper”.
Using directives
You need to add the following using reference from SQLHelper class and what you need in this class are two fields that store the connection string and an object that will be used to implement locks on data operations, to avoid database collisions.
- using SQLite;
- using System.Collections.Generic;
- using System.Linq;
- using PCLStorage;
- namespace DevEnvExe_LocalStorage
- {
- public class SqlHelper
- {
- static object locker = new object();
- SQLiteConnection database;
Sqlite Connection Common for all the platforms. The below code will be used for getting local storage path and creating the Sqlite connection .
- public SQLite.SQLiteConnection GetConnection()
- {
- SQLiteConnection sqlitConnection;
- var sqliteFilename = "Employee.db3";
- IFolder folder = FileSystem.Current.LocalStorage;
- string path = PortablePath.Combine(folder.Path.ToString(), sqliteFilename);
- sqlitConnection = new SQLite.SQLiteConnection(path);
- return sqlitConnection;
- }
Now it’s time to implement the class constructor; the above method will return DBConnection using that creates table in the Sqlite Database
- public SqlHelper()
- {
- database = GetConnection();
- // create the tables
- database.CreateTable<RegEntity>();
- }
The below code is to get all the registered user's details.
- public IEnumerable<RegEntity> GetItems()
- {
- lock (locker)
- {
- return (from i in database.Table<RegEntity>() select i).ToList();
- }
- }
- public RegEntity GetItem(string userName)
- {
- lock (locker)
- {
- return database.Table<RegEntity>().FirstOrDefault(x => x.Username == userName);
- }
- }
The SaveItem method will act as insert and update. if its ID value is 0 it means it will insert the value to sqlite otherwise it will be updated on an item based ID .
- public int SaveItem(RegEntity item)
- {
- lock (locker)
- {
- if (item.ID != 0)
- {
- //Update Item
- database.Update(item);
- return item.ID;
- }
- else
- {
- //Insert item
- return database.Insert(item);
- }
- }
- }
The below code deletes the item based on ID
- public int DeleteItem(int id)
- {
- lock (locker)
- {
- return database.Delete<RegEntity>(id);
- }
- }
I have included all the helper methods for your reference
- using SQLite;
- using System.Collections.Generic;
- using System.Linq;
- using PCLStorage;
- namespace DevEnvExe_LocalStorage
- {
- public class SqlHelper
- {
- static object locker = new object();
- SQLiteConnection database;
- public SqlHelper()
- {
- database = GetConnection();
- // create the tables
- database.CreateTable<RegEntity>();
- }
- public SQLite.SQLiteConnection GetConnection()
- {
- SQLiteConnection sqlitConnection;
- var sqliteFilename = "Employee.db3";
- IFolder folder = FileSystem.Current.LocalStorage;
- string path = PortablePath.Combine(folder.Path.ToString(), sqliteFilename);
- sqlitConnection = new SQLite.SQLiteConnection(path);
- return sqlitConnection;
- }
- public IEnumerable<RegEntity> GetItems()
- {
- lock (locker)
- {
- return (from i in database.Table<RegEntity>() select i).ToList();
- }
- }
- public RegEntity GetItem(string userName)
- {
- lock (locker)
- {
- return database.Table<RegEntity>().FirstOrDefault(x => x.Username == userName);
- }
- }
- public RegEntity GetItem(string userName ,string passWord)
- {
- lock (locker)
- {
- return database.Table<RegEntity>().FirstOrDefault(x => x.Username == userName && x.Password ==passWord);
- }
- }
- public int SaveItem(RegEntity item)
- {
- lock (locker)
- {
- if (item.ID != 0)
- {
- //Update Item
- database.Update(item);
- return item.ID;
- }
- else
- {
- //Insert item
- return database.Insert(item);
- }
- }
- }
- public int DeleteItem(int id)
- {
- lock (locker)
- {
- return database.Delete<RegEntity>(id);
- }
- }
- }
- }
Login page
You can create Login Page as per the below design with two entry boxes and buttons
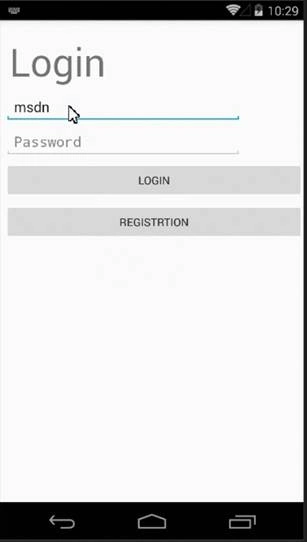
Xaml Design
You can reference the below xaml code and add it in your login page
- <?xml version="1.0" encoding="utf-8" ?>
- <ContentPage xmlns="http://xamarin.com/schemas/2014/forms"
- xmlns:x="http://schemas.microsoft.com/winfx/2009/xaml"
- xmlns:local="clr-namespace:DevEnvExe_LocalStorage"
- x:Class="DevEnvExe_LocalStorage.MainPage"
- Padding="0, 20, 0, 0">
- <Grid>
- <Grid.RowDefinitions>
- <RowDefinition Height="Auto" />
- <RowDefinition Height="Auto" />
- <RowDefinition Height="Auto" />
- <RowDefinition Height="Auto" />
- </Grid.RowDefinitions>
- <Grid.ColumnDefinitions>
- <ColumnDefinition Width="Auto" />
- <ColumnDefinition Width="Auto" />
- <ColumnDefinition Width="300" />
- </Grid.ColumnDefinitions>
- <Label Text="Login" Grid.Row="0" Grid.Column="2" FontSize="50" ></Label>
- <Entry Placeholder="UserID" x:Name="txtuserid" Grid.Row="1" Grid.Column="1" Grid.ColumnSpan="2" ></Entry>
- <Entry IsPassword="True" x:Name="txtpassword" Placeholder="Password" Grid.Row="2" Grid.Column="1" Grid.ColumnSpan="2" ></Entry>
- <StackLayout Grid.Row="3" Grid.Column="1" Grid.ColumnSpan="3">
- <Button Text="Login" Clicked="Click_Login" ></Button>
- <Button Text="Registrtion" Clicked="Click_Reg" ></Button>
- </StackLayout>
- </Grid>
- </ContentPage>
The below code is Login check to see if userid and password already available or not. If it’s not available navigate to Register page otherwise navigate to Edit profile page (Home Page)
- RegEntity userDetail = App.Database.GetItem(txtuserid.Text, txtpassword.Text);
- using System;
- using Xamarin.Forms;
- namespace DevEnvExe_LocalStorage
- {
- public partial class MainPage : ContentPage
- {
- public MainPage()
- {
- InitializeComponent();
- }
- async void Click_Reg(object sender, EventArgs e)
- {
- await Navigation.PushModalAsync(new Registration());
- }
- async void Click_Login(object sender, EventArgs e)
- {
- RegEntity userDetail = App.Database.GetItem(txtuserid.Text, txtpassword.Text);
- if (userDetail != null)
- {
- if (txtuserid.Text != userDetail.Username && txtpassword.Text != userDetail.Password)
- {
- await DisplayAlert("Login", "Login failed .. Please try again ", "OK");
- }
- else
- {
- await DisplayAlert("Registrtion", "Login Success ... Now Edit your profile ", "OK");
- await Navigation.PushModalAsync(new Home(txtuserid.Text));
- }
- }
- else
- {
- await DisplayAlert("Login", "Login failed .. Please try again ", "OK");
- }
- }
- }
- }
You can create Registration Page as per the below design with 3 entry boxes and buttons
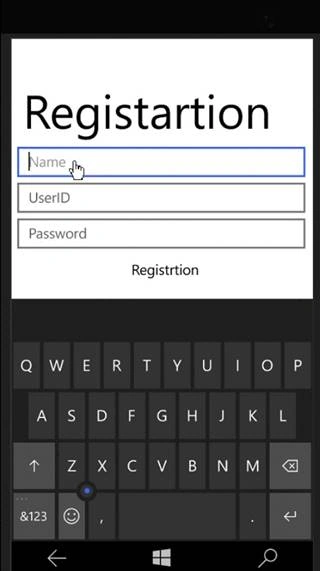
Xaml Design
You can refer to the below xaml code for registration page design
- <?xml version="1.0" encoding="utf-8" ?>
- <ContentPage xmlns="http://xamarin.com/schemas/2014/forms"
- xmlns:x="http://schemas.microsoft.com/winfx/2009/xaml"
- x:Class="DevEnvExe_LocalStorage.Registration"
- Padding="0, 20, 0, 0">
- <Grid>
- <Grid.RowDefinitions>
- <RowDefinition Height="Auto" />
- <RowDefinition Height="Auto" />
- <RowDefinition Height="Auto" />
- <RowDefinition Height="Auto" />
- <RowDefinition Height="Auto" />
- </Grid.RowDefinitions>
- <Grid.ColumnDefinitions>
- <ColumnDefinition Width="Auto" />
- <ColumnDefinition Width="Auto" />
- <ColumnDefinition Width="300" />
- </Grid.ColumnDefinitions>
- <Label Text="Registartion" Grid.Row="0" Grid.Column="2" FontSize="50" ></Label>
- <Entry Placeholder="Name" x:Name="txtname" Grid.Row="1" Grid.Column="1" Grid.ColumnSpan="2" ></Entry>
- <Entry Placeholder="UserID" x:Name="txtuserid" Grid.Row="2" Grid.Column="1" Grid.ColumnSpan="2" ></Entry>
- <Entry IsPassword="True" x:Name="txtpassword" Placeholder="Password" Grid.Row="3" Grid.Column="1" Grid.ColumnSpan="2" ></Entry>
- <StackLayout Grid.Row="4" Grid.Column="1" Grid.ColumnSpan="3">
- <Button Text="Registrtion" Clicked="Click_Reg" ></Button>
- <Button Text="Already Register ... Login " Clicked="Click_Login"></Button>
- </StackLayout>
- </Grid>
- </ContentPage>
The below method will save the user details into SQLite database.
- RegEntity OReg = new RegEntity();
- OReg.Name = txtname.Text;
- OReg.Username = txtuserid.Text;
- OReg.Password = txtpassword.Text;
- int i = App.Database.SaveItem(OReg);
- using System;
- using Xamarin.Forms;
- namespace DevEnvExe_LocalStorage
- {
- public partial class Registration : ContentPage
- {
- public Registration()
- {
- InitializeComponent();
- }
- async void Click_Reg(object sender, EventArgs e)
- {
- if (txtuserid.Text != "")
- {
- RegEntity fileexist = App.Database.GetItem(txtuserid.Text);
- if (fileexist == null)
- {
- if (txtname.Text != "" && txtpassword.Text != "" && txtuserid.Text != "")
- {
- RegEntity OReg = new RegEntity();
- OReg.Name = txtname.Text;
- OReg.Username = txtuserid.Text;
- OReg.Password = txtpassword.Text;
- int i = App.Database.SaveItem(OReg);
- if (i > 0)
- {
- await DisplayAlert("Registrtion", "Registrtion Success ... Login and Edit profile ", "OK");
- await Navigation.PushModalAsync(new MainPage());
- }
- else
- {
- await DisplayAlert("Registrtion", "Registrtion Fail .. Please try again ", "OK");
- }
- }
- }
- else
- {
- await DisplayAlert("Registrtion Failed", "username already exist .. Please try differnt user name ", "OK");
- txtuserid.Text = "";
- txtuserid.Focus();
- }
- }
- }
- async void Click_Login(object sender, EventArgs e)
- {
- await Navigation.PushModalAsync(new MainPage());
- }
- }
- }
You can create edit profile page like below
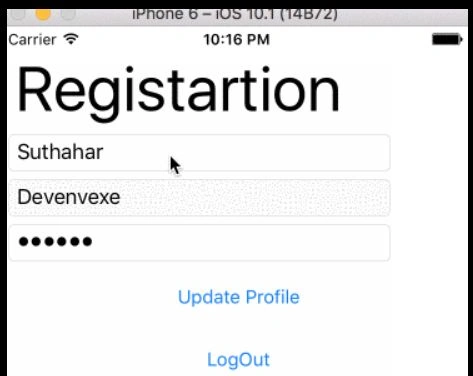
Xaml Design
You can refer to the below code for creating updated profile page
- <?xml version="1.0" encoding="utf-8" ?>
- <ContentPage xmlns="http://xamarin.com/schemas/2014/forms"
- xmlns:x="http://schemas.microsoft.com/winfx/2009/xaml"
- x:Class="DevEnvExe_LocalStorage.Home">
- <Grid>
- <Grid.RowDefinitions>
- <RowDefinition Height="Auto" />
- <RowDefinition Height="Auto" />
- <RowDefinition Height="Auto" />
- <RowDefinition Height="Auto" />
- <RowDefinition Height="Auto" />
- </Grid.RowDefinitions>
- <Grid.ColumnDefinitions>
- <ColumnDefinition Width="Auto" />
- <ColumnDefinition Width="Auto" />
- <ColumnDefinition Width="300" />
- </Grid.ColumnDefinitions>
- <Label Text="Registartion" Grid.Row="0" Grid.Column="2" FontSize="50" ></Label>
- <Entry Placeholder="Name" x:Name="txtname" Grid.Row="1" Grid.Column="1" Grid.ColumnSpan="2" ></Entry>
- <Entry Placeholder="UserID" x:Name="txtuserid" IsEnabled="false" Grid.Row="2" Grid.Column="1" Grid.ColumnSpan="2" ></Entry>
- <Entry IsPassword="True" x:Name="txtpassword" Placeholder="Password" Grid.Row="3" Grid.Column="1" Grid.ColumnSpan="2" ></Entry>
- <StackLayout Grid.Row="4" Grid.Column="1" Grid.ColumnSpan="3">
- <Button Text="Update Profile" Clicked="Click_UpdateProfile" ></Button>
- <Button Text="LogOut" Clicked="Click_Login"></Button>
- </StackLayout>
- </Grid>
- </ContentPage>
The below code gets and updates user details in sqlite database
- using System;
- using Xamarin.Forms;
- namespace DevEnvExe_LocalStorage
- {
- public partial class Home : ContentPage
- {
- public Home(string userId)
- {
- InitializeComponent();
- GetUserDetail(userId);
- }
- RegEntity userDetail;
- public void GetUserDetail(string userId)
- {
- userDetail = App.Database.GetItem(userId);
- txtname.Text = userDetail.Name;
- txtuserid.Text = userDetail.Username;
- txtpassword.Text = userDetail.Password;
- }
- async void Click_UpdateProfile(object sender, EventArgs e)
- {
- int i = -1;
- if (txtname.Text != "" && txtpassword.Text != "" && txtuserid.Text != "")
- {
- userDetail.Name = txtname.Text;
- userDetail.Username = txtuserid.Text;
- userDetail.Password = txtpassword.Text;
- i = App.Database.SaveItem(userDetail);
- }
- if (i < 0)
- {
- await DisplayAlert("Update Profile", "Update Fail .. Please try again ", "OK");
- }
- else
- {
- await DisplayAlert("Update Profile", "Profile update Success . ", "OK");
- }
- }
- async void Click_Login(object sender, EventArgs e)
- {
- await Navigation.PushModalAsync(new MainPage());
- }
- }
- }
Ajay SinghPosted Jun 24, 2022, 11:10 AM
nice article
Garry LodgePosted Jun 16, 2022, 2:10 PM
Great step by step guide, it's just missing a step to access the database via App. To get the App.Database you need to add the below to App.xaml.cs: static SqlHelper database; public static SqlHelper Database { get { if (database == null) { database = new SqlHelper(); } return database; } }
Brendan BrownePosted Jan 24, 2020, 10:10 PM
New App.Database.GetItem() , The type name 'Database' does not exist in the type 'App'. public static SQLHelper Database{get{if (database == null){database = new SQLHelper();}return database;}} is in the app.xaml.cs file. using vs19 with xamarin. Any idea how to get this working?
Emmanuel MuzukutwaPosted Oct 17, 2019, 3:14 AM
Thank you Suthahar. This article really helped me a lot.
Karina DíazPosted Jun 17, 2019, 9:00 AM
Hola tengo un problema con esta linea de c?digo RegEntity userDetail = App.Database.GetItem (txtuserid.Text, txtpassword.Text); Me dice que App no contiene a Database
ravi kumarPosted Jan 5, 2019, 5:03 AM
Hi sir, Nice to Explain ... I have one doubt how to Retrieve All User Data using Sqlite Database
Sanket GuptaPosted Dec 20, 2018, 9:05 AM
RegEntity userDetail = App.Database.GetItem(txtuserid.Text, txtpassword.Text); sir can u explain me the further step
Sanket GuptaPosted Dec 20, 2018, 8:46 AM
RegEntity userDetail = App.Database.GetItem(txtuserid.Text, txtpassword.Text);
Sanket GuptaPosted Dec 19, 2018, 11:10 AM
Reply sir please
Sanket GuptaPosted Dec 19, 2018, 11:08 AM
Sir can you help me how i will do the step 4 steps in visual studio 2017 i have install two packages which you have told in this above topic.how to create a table in visual studio 2017 and perform CRUD operation
amaro tatiPosted Jul 5, 2018, 5:38 AM
Error Severity Code Description Project File Line Suppression StateError The "ResolveLibraryProjectImports" task failed unexpectedly.System.IO.FileNotFoundException: Could not load assembly 'SqliteExemplo, Version=0.0.0.0, Culture=neutral, PublicKeyToken='. Perhaps it doesn't exist in the Mono for Android profile? File name: 'SqliteExemplo.dll' at Java.Interop.Tools.Cecil.DirectoryAssemblyResolver.Resolve(AssemblyNameReference reference, ReaderParameters parameters) at Java.Interop.Tools.Cecil.DirectoryAssemblyResolver.Resolve(String fullName) at Xamarin.Android.Tasks.ResolveLibraryProjectImports.Extract(DirectoryAssemblyResolver res, ICollection`1 jars, ICollection`1 resolvedResourceDirectories, ICollection`1 resolvedAssetDirectories, ICollection`1 resolvedEnvironments) at Xamarin.Android.Tasks.ResolveLibraryProjectImports.Execute() at Microsoft.Build.BackEnd.TaskExecutionHost.Microsoft.Build.BackEnd.ITaskExecutionHost.Execute() at Microsoft.Build.BackEnd.TaskBuilder.<ExecuteInstantiatedTask>d__26.MoveNext() SqliteExemplo.Android
Sreejith SreenivasanPosted Mar 6, 2018, 2:39 AM
Implemented local DB in android and which is working good. When I run it in uwp getting the following exception:Exception thrown: 'System.IO.FileLoadException' in Localdb.dll Exception:>System.IO.FileLoadException: Could not load file or assembly 'SQLite-net, Version=1.4.118.0, Culture=neutral, PublicKeyToken=null'. The located assembly's manifest definition does not match the assembly reference. (Exception from HRESULT: 0x80131040) My Sqlite-net-pcl version is 1.4.118. From the research, I found that this issue occurs because of the current version, so I uninstall 1.4.118 and install 1.3.3 (previous version not current). After installing 1.3.3 also getting the same exception. I am using local machine for testing uwp. Any solution for solving this issue? Thanks in advance
nattar sPosted Mar 2, 2018, 1:58 AM
In your sample, u make the sqlhelper class only for the one table class. if it needs for the different table and takes the value from the table name which is passed in the runtime . how? it is possible
nattar sPosted Feb 21, 2018, 7:23 AM
SqlitConnection = new SQLite.SQLiteConnection(path); in this line it shows the Error CS0234: The type or namespace name 'SQLiteConnection' does not exist in the namespace 'SQLite' (are you missing an assembly reference?) . but i add the sqlite.net.pcl to my pcl and android , ios .. but still it shows the error. Please guide me?
Kumar SundaramPosted Nov 10, 2017, 4:50 AM
Public static SqlHelper database { get { if (database == null) { database = new SqlHelper(); } return database; } } in this line am getting error : Property or indexer 'App.database' cannot be assigned to -- it is read only give me a solution for this
Muhammad Rafi QureshiPosted Sep 25, 2017, 9:19 AM
Hi Suthahar ! this tutorial is very simple and understandable. Please let me know why I am facing this error. System.MissingMethodException: Method 'SQLite.TableQuery`1.FirstOrDefault' not found.
Faraz QureshiPosted Sep 11, 2017, 3:59 PM
App.Database.GetItem() not found
Bonkeri BonkeriPosted Jun 11, 2017, 6:21 AM
It's now working, i test it on Android, and noch i add to the Permissions "use external and internal Storage" and now its working, do we need this Permissions or not?
Bonkeri BonkeriPosted Jun 7, 2017, 6:50 PM
Im getting an error when i try to register a user: An unhandled exception occured. What am i doing wrong?
hariharan srinivasanPosted Jan 21, 2017, 2:27 AM
Very nice article.... thanks a lot...
Ajay SinghPosted Dec 27, 2016, 11:55 PM
Very nice article.. Thank a lot.
C# CornerPosted Dec 27, 2016, 3:54 PM
Thank you very much, good article. I thought that Sqlite is only used for local data storage on the device. You showed us how to Login / Registration an user but is the data stored now on the device or in an Central database ? I would imaging to store this kind of data in an central data base.
Fabio Silva LimaPosted Dec 27, 2016, 11:26 AM
Very good Mr! I also will share something using sqlite ;)