Angular 8 Directives (Day 4)
What is the Directive?
Basic Concept of Directives
In Angular Framework, one of the most important elements is Directives. And if we analyze the directive in brief, then we will discover that the main building block of the Angular 8 framework which is known as Component is basically a directive. So, in a simple word, each and every Angular component is just a directive with a custom HTML template. So, in real word when defining a component as the main building block of Angular application, actually we want to say that directives are the main building blocks of Angular applications.
In general, a directive is a TypeScript based function that executes whenever Angular compiler identified it within the DOM element. Directives are used to provide or generate new HTML based syntax which will extend the power of the UI in an Angular Application. Each directive must have a selector name just like the same as a component – either that name can be from Angular predefined patterns like ng-if or a custom developer-defined name which can be any name but need to indicate the main purpose of the directive. Also, every directive can act as an element or an attribute or a class or a comment in the HTML section.
Why Directives Required?
In Angular Framework, Directives always ensure the high-level of reusability of the UI controls throughout the application. With the help of Directives, we can develop UIs with many movable parts and at the same time, we can streamline the development flow for the engineers. The main reason for using directives in any Angular applications are –
- Reusability – In an Angular application, the directive is a self-sufficient part of the UI. As a developer, we can reuse the directive across the different parts of the application. This is very much useful in any large-scale applications where multiple systems need the same functional elements like search box, date control, etc.
- Readability – Directive provides much more readability for the developers to understand the production functionality and data flow.
- Maintainability – One of the main use of directive in any application is the maintainability. We can easily decouple the directive from the application and replace the old one with a new one directives.
Component vs Directives
The comparison between Component and directives are as below –
| Component | Directives |
| A component is defined with the @Component decorator | A Directive is defined with the @Directives decorator |
| A component is a directive that uses a shadow DOM to create encapsulated visual behavior called a component. Components are typically used to create UI widgets. | Directive mainly used to provide new behavior within the existing DOM elements. |
| With the help of the component, we can break down the application in multiple small parts. | With the help of the directive, we can design any type of reusable component. |
| In the browser DOM, only one component can be activated as a parent component. Other components will act like a child component in that case. | Within a single DOM element, any no of directives can be used. |
| @View decorator or templateUrl template is mandatory in the component. | Directives don’t use View. |
@Directive Metadata
@Directive decorator is used to defining any class as an Angular Directive. We can always define any directive to specify the custom behavior of the elements within the DOM. @Directive() metadata is contained below-mentioned options –
- selector – The selector property is used to identify the directive within the HTML template. Also, with the help of this property, we can initialize the directive from the DOM elements
- inputs - It is used to provide the set of data-bound input properties of the directives.
- outputs – It is used to enumerates any event properties from the directives.
- providers – It is used to inject any provider type like service or components within the directives.
- exportAs – It is used to define the name of the directives which can be used to assign a directive as a variable.
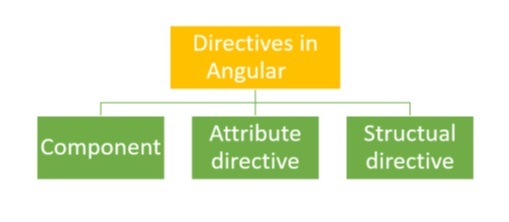
Types of Directives
There are three main types of directives in Angular 8:
- Component – Directives with templates.
- Attribute Directives – Directives that change the behavior of a component or element but don’t affect the template.
- Structural Directives – Directives that change the behavior of a component or element by affecting the template or the DOM decoration of the UI.
What is an Attribute Directive?
Attribute directives are mainly used for changing the appearance or behavior of a component or a native DOM element. Attribute directives actually modify the appearance or behavior of an element. These directives actually act as a simple HTML attribute for any HTML tag. There some inbuild attribute directive is available in the framework like ngModel. But, we can also create any type of custom attribute-based directive as per our requirement. In that case, use the attribute directive selector name as an attribute within the HTML tag in the HTML code section.
In-Built Attribute Directives
Angular 8 provides some inbuilt Attribute directives which can be used to change the style or attributes of the HTML elements in the DOM. Those attribute directives are –
- ngClass - ngClass directive changes the class attribute that is bound to the component or element it's attached to.
- ngStyle - ngStyle is mainly used to modify or change the element’s style attribute. This attribute directive is quite similar to using style metadata in the component class.
What is Structural Directive?
Other types of directives in the Angular framework are the Structural Directive. Structural directives are mainly used to change the design pattern of the UI DOM elements. In HTML, these directives can be used as a template tag. Using this type of directives, we can change the structure of any DOM elements and can redesign or redecorate those DOM elements. In Angular Framework, there are some system generate structural directives is available like ngIf, ngFor and ngSwitch. We can also create any custom structural directive. The most common example of any custom structural directives is components. Since we can consider every component as a structural directive if that component makes some change in the UI DOM elements style or design. All the system generated structural directives have a template name along with some property value that needs to provide when we define that directives in the HTML code.
In-Build Structural Directive
Angular 8 provides below mentioned built-in directives which can be used within a component to change the elements structure or design.
- ngIf
- ngFor
- ngSwitch
Custom Directive
- Import required modules like directives, ElementRef, and renderer from the Angular core library.
- Create a TypeScript class.
- Use the @Directive decorator in the class.
- Set the value of the selector property in the @directive decorator function. The directive will be used, using the selector value on the elements.
- In the constructor of the class, inject ElementRef and the renderer object.
- You need to inject ElementRef in the directive’s constructor to access the DOM element.
- You also need to inject the renderer in the directive’s constructor to work with the DOM’s element style.
- You need to call the renderer’s setElementStyle function. In this function, we need to pass the instance of the current DOM element with the help of ElementRef as a parameter and setting the behavior or property of the current element.
ElementRef- While creating a custom attribute directive, we inject ElementRef in the constructor to access the DOM element. ElementRef provides access to the underlying native element. With the help of ElementRef, we can obtain direct access to the DOM element using its nativeElement property. In that case, ElementRef is behaving just like a service. That’s all we need to set the element’s color using the browser DOM API.
Renderer- While creating a custom attribute directive, we inject Renderer in the constructor to access the DOM element’s style. Actually, we call the renderer’s setElementStyle function. In this function, we pass the current DOM element with the help of the ElementRef object and set the required attribute of the current element.
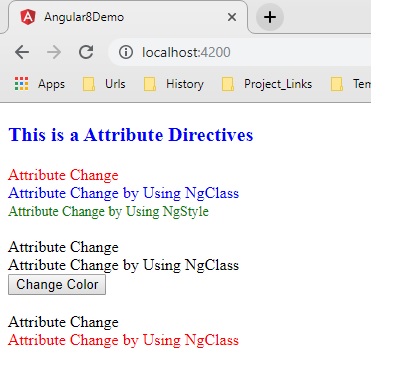
Demo 1: Attribute Directive
Now in this demo, we will demonstrate how to use inbuilt attribute directives in Angular Framework.
app.component.ts
- import { Component } from '@angular/core';
- @Component({
- selector: 'app-root',
- templateUrl: './app.component.html',
- styleUrls : ['./custom.css']
- })
- export class AppComponent {
- showColor: boolean = false;
- constructor() { }
- public changeColor(): void {
- this.showColor = !this.showColor;
- }
- }
- <div>
- <h3>This is a Attribute Directives</h3>
- <span [class.red]="true">Attribute Change</span><br />
- <span [ngClass]="{'blue':true}">Attribute Change by Using NgClass</span><br />
- <span [ngStyle]="{'font-size':'14px','color':'green'}">Attribute Change by Using NgStyle</span>
- <br /><br />
- <span [class.cyan]="showColor">Attribute Change</span><br />
- <span [ngClass]="{'brown':showColor}">Attribute Change by Using NgClass</span><br />
- <input type="button" value="Change Color" (click)="changeColor()" />
- <br /><br />
- <span [class.cyan]="showColor">Attribute Change</span><br />
- <span [ngClass]="{'cyan':showColor, 'red' : !showColor}">Attribute Change by Using NgClass</span><br />
- <br />
- </div>
- .red {color:red;}
- .blue {color:blue}
- .cyan {color : cyan}
- .brown {color : brown}
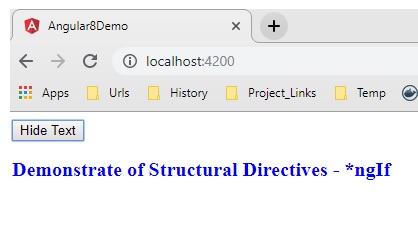
Demo 2: ngIf
Now in this demo, we will explain how to use ngIf in our angular application.
app.component.ts
- import { Component } from '@angular/core';
- @Component({
- selector: 'app-root',
- templateUrl: './app.component.html',
- styleUrls : ['./custom.css']
- })
- export class AppComponent {
- showInfo: boolean = false;
- caption: string = 'Show Text';
- constructor() { }
- public changeData(): void {
- this.showInfo = !this.showInfo;
- if (this.showInfo) {
- this.caption = 'Hide Text';
- }
- else {
- this.caption = 'Show Text';
- }
- }
- }
- <div>
- <input type="button" value="{{caption}}" (click)="changeData()"/>
- <br />
- <h2 *ngIf="showInfo"><span>Demonstrate of Structural Directives - *ngIf</span></h2>
- </div>
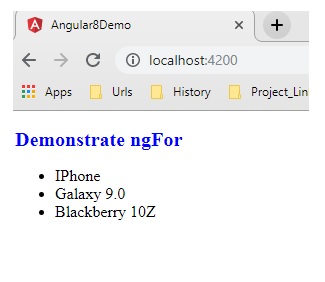
Demo 3: ngFor
Now in this demo, we will explain how to use ngFor in our angular application.
app.component.ts
- import { Component } from '@angular/core';
- @Component({
- selector: 'app-root',
- templateUrl: './app.component.html',
- styleUrls : ['./custom.css']
- })
- export class AppComponent {
- productList: Array<string> = ['IPhone','Galaxy 9.0','Blackberry 10Z'];
- constructor() { }
- }
app.component.html
- <div>
- <h2>Demonstrate ngFor</h2>
- <ul>
- <li *ngFor="let item of productList">
- {{item}}
- </li>
- </ul>
- </div>
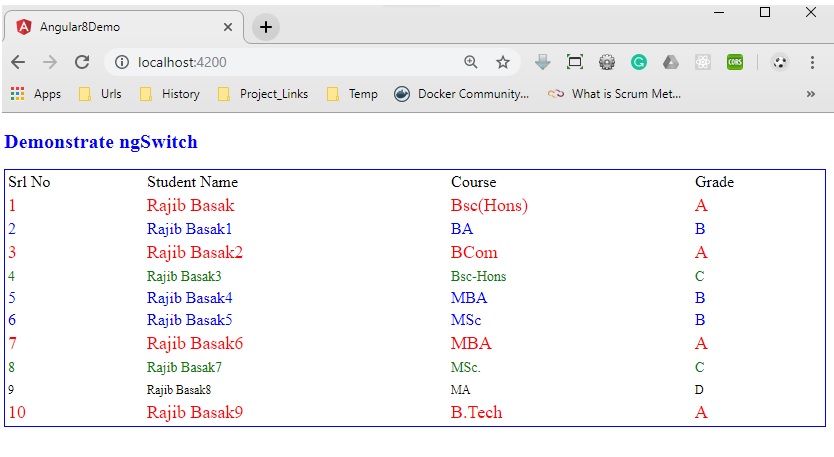
Demo 4: ngSwitch
Now in this demo, we will explain how to use ngSwitch in our angular application.
app.component.ts
- import { Component, OnInit } from '@angular/core';
- @Component({
- selector: 'app-root',
- templateUrl: './app.component.html',
- styleUrls : ['./custom.css']
- })
- export class AppComponent implements OnInit {
- studentList: Array<any> = new Array<any>();
- constructor() { }
- ngOnInit() {
- this.studentList = [
- { SrlNo: 1, Name: 'Rajib Basak', Course: 'Bsc(Hons)', Grade: 'A' },
- { SrlNo: 2, Name: 'Rajib Basak1', Course: 'BA', Grade: 'B' },
- { SrlNo: 3, Name: 'Rajib Basak2', Course: 'BCom', Grade: 'A' },
- { SrlNo: 4, Name: 'Rajib Basak3', Course: 'Bsc-Hons', Grade: 'C' },
- { SrlNo: 5, Name: 'Rajib Basak4', Course: 'MBA', Grade: 'B' },
- { SrlNo: 6, Name: 'Rajib Basak5', Course: 'MSc', Grade: 'B' },
- { SrlNo: 7, Name: 'Rajib Basak6', Course: 'MBA', Grade: 'A' },
- { SrlNo: 8, Name: 'Rajib Basak7', Course: 'MSc.', Grade: 'C' },
- { SrlNo: 9, Name: 'Rajib Basak8', Course: 'MA', Grade: 'D' },
- { SrlNo: 10, Name: 'Rajib Basak9', Course: 'B.Tech', Grade: 'A' }
- ];
- }
- }
- <div>
- <h2>Demonstrate ngSwitch</h2>
- <table style="width:100%;border:solid;border-color:blue;border-width:thin;">
- <thead>
- <tr >
- <td>Srl No</td>
- <td>Student Name</td>
- <td>Course</td>
- <td>Grade</td>
- </tr>
- </thead>
- <tbody>
- <tr *ngFor="let student of studentList;" [ngSwitch]="student.Grade">
- <td>
- <span *ngSwitchCase="'A'" [ngStyle]="{'font-size':'18px','color':'red'}">{{student.SrlNo}}</span>
- <span *ngSwitchCase="'B'" [ngStyle]="{'font-size':'16px','color':'blue'}">{{student.SrlNo}}</span>
- <span *ngSwitchCase="'C'" [ngStyle]="{'font-size':'14px','color':'green'}">{{student.SrlNo}}</span>
- <span *ngSwitchDefault [ngStyle]="{'font-size':'12px','color':'black'}">{{student.SrlNo}}</span>
- </td>
- <td>
- <span *ngSwitchCase="'A'" [ngStyle]="{'font-size':'18px','color':'red'}">{{student.Name}}</span>
- <span *ngSwitchCase="'B'" [ngStyle]="{'font-size':'16px','color':'blue'}">{{student.Name}}</span>
- <span *ngSwitchCase="'C'" [ngStyle]="{'font-size':'14px','color':'green'}">{{student.Name}}</span>
- <span *ngSwitchDefault [ngStyle]="{'font-size':'12px','color':'black'}">{{student.Name}}</span>
- </td>
- <td>
- <span *ngSwitchCase="'A'" [ngStyle]="{'font-size':'18px','color':'red'}">{{student.Course}}</span>
- <span *ngSwitchCase="'B'" [ngStyle]="{'font-size':'16px','color':'blue'}">{{student.Course}}</span>
- <span *ngSwitchCase="'C'" [ngStyle]="{'font-size':'14px','color':'green'}">{{student.Course}}</span>
- <span *ngSwitchDefault [ngStyle]="{'font-size':'12px','color':'black'}">{{student.Course}}</span>
- </td>
- <td>
- <span *ngSwitchCase="'A'" [ngStyle]="{'font-size':'18px','color':'red'}">{{student.Grade}}</span>
- <span *ngSwitchCase="'B'" [ngStyle]="{'font-size':'16px','color':'blue'}">{{student.Grade}}</span>
- <span *ngSwitchCase="'C'" [ngStyle]="{'font-size':'14px','color':'green'}">{{student.Grade}}</span>
- <span *ngSwitchDefault [ngStyle]="{'font-size':'12px','color':'black'}">{{student.Grade}}</span>
- </td>
- </tr>
- </tbody>
- </table>
- </div>
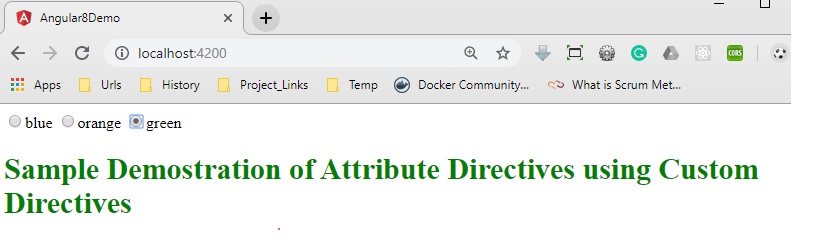
Demo 5: Custom Directive – Color Change
Now, in this demo, we will create a custom attribute based directives which will change the color of the selected text on mouseover. For that, we need to first create the directive below.
app.directive.ts
- import { Directive, ElementRef, Renderer, HostListener, Input } from '@angular/core';
- @Directive({
- selector: '[colorchange]'
- })
- export class ColorChangeDirective {
- private _defaulColor = 'red';
- @Input('colorchange') highlightColor: string;
- constructor(private el: ElementRef, private render: Renderer) {
- }
- @HostListener('mouseenter') onMouseEnter() {
- console.log(this.highlightColor);
- this.changecolor(this.highlightColor || this._defaulColor);
- }
- @HostListener('mouseleave') onMouseLeave() {
- console.log(this.highlightColor);
- this.changecolor(null);
- }
- private changecolor(color: string) {
- this.render.setElementStyle(this.el.nativeElement, 'color', color);
- }
- }
app.component.ts
- import { Component } from '@angular/core';
- @Component({
- selector: 'app-root',
- templateUrl: './app.component.html',
- styleUrls : ['./custom.css']
- })
- export class AppComponent {
- public message: string = 'Sample Demostration of Attribute Directives using Custom Directives';
- public color: string = 'blue';
- }
- <div>
- <input type="radio" name="colors" (click)="color='blue'">blue
- <input type="radio" name="colors" (click)="color='orange'">orange
- <input type="radio" name="colors" (click)="color='green'">green
- </div>
- <h1 [colorchange]="color">{{message}}</h1>
- import { BrowserModule } from '@angular/platform-browser';
- import { NgModule } from '@angular/core';
- import { FormsModule } from '@angular/forms';
- import { AppComponent } from './app.component';
- import { ColorChangeDirective } from './app.directive';
- @NgModule({
- declarations: [
- AppComponent,ColorChangeDirective
- ],
- imports: [
- BrowserModule,FormsModule
- ],
- providers: [],
- bootstrap: [AppComponent]
- })
- export class AppModule { }
Conclusion