Triggers in SQL
Introduction
In the previous chapter, we learned how to work with GROUP BY, WHERE, and HAVING clauses in SQL and how to use them with various options.
In this chapter, we will learn about Trigger in SQL, Types of Triggers, and to use Triggers in SQL with various conditions.
Triggers
- DML (Data manipulation Language)(Insert ,Update ,Delete).
- DDL (Data Definition Language)(Create, Alter, Drop).
- Database Operation such as LOGON, LOGOFF, SERVERERROR, SHUTDOWN, STARTUP.
Now we will understand what is triggers and how it works?
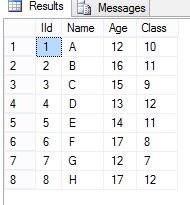
First, create a table as in the following:
- Create Table Student
- (
- IId int Not Null primary key,
- Name Nvarchar(MAX) Not NUll,
- Age Int Not Null,
- Class int not Null
- )
- Insert Into Student
- Select 1,'A',12,10 Union All
- Select 2,'B',16,11 Union All
- Select 3,'C',15,9 Union All
- Select 4,'D',13,12 Union All
- Select 5,'E',14,11 Union All
- Select 6,'F',17,8 Union All
- Select 7,'G',12,7 Union All
- Select 8,'H',17,12
The following is the syntax of triggers,
- CREATE [OR REPLACE ] TRIGGER Trigger_Name
- ON Table_Name
- {BEFORE | AFTER | INSTEAD OF }
- {INSERT [OR] | UPDATE [OR] | DELETE}
- AS
- Begin
- Declaration Part
- {
- }
- Select Part
- {
- // Initialize Variables
- }
- Executable-Code
- EXCEPTION
- Exception-Handling-Code
- END;
Types of DML Triggers
- After Triggers
- Instead Of Triggers
After Triggers
- After Insert
- After Delete
- After Update
After Insert
- Create Trigger My_Trigger On Student
- AFTER Insert
- AS
- Declare @IId int ;
- Declare @Name Nvarchar(50) ;
- Declare @Age Int;
- Declare @Class int;
- Select @IId= Tab.IId From inserted Tab;
- Select @Name= Tab.Name From inserted Tab;
- Select @Age= Tab.Age From inserted Tab;
- Select @Class= Tab.Class From inserted Tab;
- Set @IId=@IId+1;
- Insert Into Student(IId,Name , Age ,Class) Values (@IId,@Name,@Age,@Class)
- Print 'Inserted Successfully'
(1 row(s) affected)
Inserted Successfully
(1 row(s) affected)
Inserted Successfully
(1 row(s) affected)
In the preceding example, we will create a trigger for an insert query so when any data is inserted into the student table, then after the insert query this trigger will be invoked and some desired operation will be done. In the insert trigger, we use the “INSERTED” magic table.
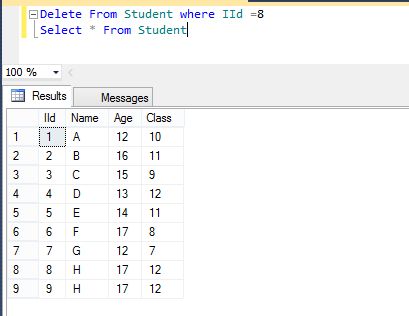
After Delete Triggers are called after any data is deleted from the table.
After Delete
- Create Trigger After_Delete On Student
- AFTER Delete
- AS
- Declare @IId int ;
- Declare @Name Nvarchar(50) ;
- Declare @Age Int;
- Declare @Class int;
- Select @IId= Tab.IId From Deleted Tab;
- Select @Name= Tab.Name From Deleted Tab;
- Select @Age= Tab.Age From Deleted Tab;
- Select @Class= Tab.Class From Deleted Tab;
- if @IId>10
- begin
- Insert Into Student(IId,Name , Age ,Class) Values (@IId,@Name,@Age,@Class)
- Print 'Data Deleted Successfully'
- End
- else
- Begin
- Print 'Data not Deleted Successfully'
- End
Delete from Student Where IId=99
Output
(1 row(s) affected)
Data Deleted Successfully
(1 row(s) affected)
Data Deleted Successfully
(1 row(s) affected)
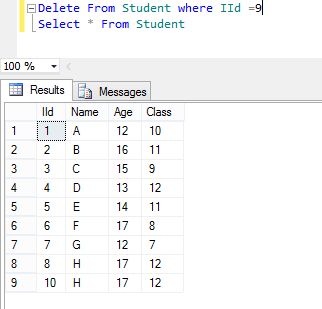
Now we will take another example:
Delete from Student Where IId=9
Output
Data not Deleted Successfully
(0 row(s) affected)
(0 row(s) affected)
In the After Delete trigger we used the “Deleted” magic table. This table contains all the data that was deleted by the query.
An After Update Trigger is called after any type of update is done on the table.
After Update
- Create Trigger After_Update On Student
- AFTER Update
- AS
- Declare @IId int ;
- Declare @Name Nvarchar(50) ;
- Declare @Age Int;
- Declare @Class int;
- Declare @IId1 int ;
- Declare @Name1 Nvarchar(50) ;
- Declare @Age1 Int;
- Declare @Class1 int;
- Select @IId= Tab.IId From Deleted Tab;
- Select @Name= Tab.Name From Deleted Tab;
- Select @Age= Tab.Age From Deleted Tab;
- Select @Class= Tab.Class From Deleted Tab;
- Select @IId1= Tab.IId From inserted Tab;
- Select @Name1= Tab.Name From inserted Tab;
- Select @Age1= Tab.Age From inserted Tab;
- Select @Class1= Tab.Class From inserted Tab;
- Set @IId1=@IId1+1;
- if @IId>10
- begin
- Delete From Student Where IId=@iid
- Insert Into Student(IId,Name , Age ,Class) Values (@IId1,@Name1,@Age1,@Class1)
- Print 'Data Updated Successfully'
- End
- else
- Begin
- Print 'Data not Updated Successfully'
- End
Update Student Set Name='Rahul' , Age=30 where IId=101
Output
(1 row(s) affected)
(1 row(s) affected)
Data Updated Successfully
(1 row(s) affected)
(1 row(s) affected)
Data Updated Successfully
(1 row(s) affected)
The preceding example shows that in an After Update trigger we can use both the “Inserted” and “Deleted” magic tables. The Update query also does two steps, the first is to delete data from the table. In that case, the “Deleted” magic table contains the deleted data and the second step is the insertion of the data into the table. In that step, the “Inserted” magic table contains the inserted data.
So we can use both magic tables in an “After Update” trigger.
These can be used as an interceptor for anything that anyone tries to do on our table or view. This type of trigger fires before SQL Server starts the execution of the action that fired it. We can have an INSTEAD OF insert/update/delete trigger on a table that was successfully executed but does not include the actual insert/update/delete to the table.
Instead of Triggers
Assume we have an Instead Of Trigger for a Delete operation on a table. When any data is deleted from the table then this trigger will execute first but after the execution of this trigger, the data will not delete from the table unless we issue another delete instruction from within the trigger.
Types of Instead Of Triggers
- Instead Of Insert
- Instead Of Update
- Instead Of Delete
Example
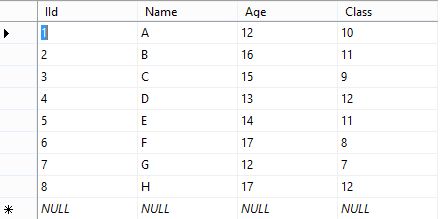
The table before the execution of an “Instead Of Delete”.
 Now we create an “Instead Of Trigger“.
- Create Trigger Insted_Delete On Student
- Instead Of Delete
- as
- begin
- Declare @IId int ;
- Declare @Name Nvarchar(50) ;
- Declare @Age Int;
- Declare @Class int;
- Select @IId= Tab.IId From Deleted Tab;
- Select @Name= Tab.Name From Deleted Tab;
- Select @Age= Tab.Age From Deleted Tab;
- Select @Class= Tab.Class From Deleted Tab;
- Set @IId=@IId+1;
- Insert Into Student(IId,Name , Age ,Class) Values (@IId,@Name,@Age,@Class)
- Print 'Data Updated Successfully'
- End
- Create Trigger Insted_Delete1 On Student
- Instead Of Delete
- as
- begin
- Declare @IId int ;
- Declare @Name Nvarchar(50) ;
- Declare @Age Int;
- Declare @Class int;
- Select @IId= Tab.IId From Deleted Tab;
- Select @Name= Tab.Name From Deleted Tab;
- Select @Age= Tab.Age From Deleted Tab;
- Select @Class= Tab.Class From Deleted Tab;
- Delete From Student Where IId=@IId
- Set @IId=@IId+1;
- Insert Into Student(IId,Name , Age ,Class) Values (@IId,@Name,@Age,@Class)
- Print 'Data Updated Successfully'
- End
Cyclic Cascading in a Trigger
- The first trigger is for an insert as in the following:
- Create Trigger [dbo].[Insert_] On [dbo].[Student]
- For Insert
- as
- begin
- Declare @IId int ;
- Declare @Name Nvarchar(50) ;
- Declare @Age Int;
- Declare @Class int;
- Select @IId= Tab.IId From inserted Tab;
- Select @Name= Tab.Name From inserted Tab;
- Select @Age= Tab.Age From inserted Tab;
- Select @Class= Tab.Class From inserted Tab;
- Update Student set Name=@Name ,Age=@Age where IId=@IId
- Print 'Data Inserted Successfully'
- End
- And the second trigger is for an update as in the following:
- Create Trigger [dbo].[Update_] On [dbo].[Student]
- For Update
- as
- begin
- Declare @IId int ;
- Declare @Name Nvarchar(50) ;
- Declare @Age Int;
- Declare @Class int;
- Select @IId= Tab.IId From inserted Tab;
- Select @Name= Tab.Name From inserted Tab;
- Select @Age= Tab.Age From inserted Tab;
- Select @Class= Tab.Class From inserted Tab;
- Set @IId=@IId+1;
- Insert Into Student(IId,Name , Age ,Class) Values (@IId,@Name,@Age,@Class)
- Print 'Data Updated Successfully'
- End
Insert into Student values(9000,'A',32,5000)
Msg 217, Level 16, State 1, Procedure Update_, Line 15
Maximum stored procedure, function, trigger, or view nesting level exceeded (limit 32).
Maximum stored procedure, function, trigger, or view nesting level exceeded (limit 32).
Note
During the creation of a trigger, we must be sure to remove such a condition because this cyclic situation continues and will enter into an infinite loop that will crash the database.
Summary
In this chapter, we learned about what is Trigger in SQL and how to use Triggers in SQL with various options.
Author

Pankaj Kumar Choudhary
0
26.6k
13.6m