Introduction to CSS
Introduction
In the last chapter, we have discussed the HTML in detail. In this chapter, we will learn the basics of CSS - Cascading Stylesheet with an example and coding. Apart from these, many other facts are discussed about CSS, which will help to build a professional Web application with Django Framework in Python.
CSS stands for Cascading Style Sheet
- CSS describes how HTML elements are displayed on a page.
- Styling can be affecting many things -- colors, fonts, sizes, borders, and many more properties of HTML.
- While you can define styling inside of an HTML file, it is much more common to separate .css file and then link it to the HTML file.
The basic syntax of a CSS is,
Syntax
selected tag{
property: value;
}
Example
- h1{
- color:blue;
- }
Different ways to apply colors in CSS
- Using a color name like Blue, Green, Purple, Pink, etc, we can apply color in the CSS file.
- A developer can use the color name or HTML RGB color code or HEX code.
eg. #085401 is the green shade, which will define the red, green and blue colors
- Using F, C, B, E, and 0-zero are the different shades that will help to mix colors and create a color combination.
eg. #FF00FF is the Magenta color.
- One more, rgba (red, green, blue, alpha) defines the transparent and opaque in the form of 0 and 1 respectively. The alpha value is between 0 and 1 only.
eg. rgba (8,84,1,0.5) it is the light green shade, from the actual dark green color.
We can try any of these options to apply color to the particular tag value.
After creating an HTML file, we have to apply the styling with the help of the CSS file.
The CSS file is linked with HTML <link> tag, where href attribute contains the value of the path of the CSS file.
Selector
- The selector, in general, is used to target the HTML element that we want to style.
- We can use "ids" to target a single element. We can use "classes" to target a group of elements.
- We can also use a combination of the selector tags to target a certain combination of elements. (JSON Sibling)
- We can use a class name with .-Dot while approaching styling class elements.
Ex.
- .firstclass{
- color: blue;
- }
Here, "firstclass" is the div class name in the HTML file. A class can be attached to multiple elements.
We can use ids with the #-hashtag sign.
Ex.
- #signleout{
- color: pink;
- text-decoration: line-through;
- }
Here, "singleout" is the id name for another tag <p>. An id is attached to a single element.
Another very uncommon selector is *-asterisk for every element on the page. With applying this selector all the selection is overwriting and only performs the styling which is included in *.
Ex.
- *{
- color: black;
- }
JSON Selector
A concatenation of elements performs the styling to the web page elements using arithmetic operators.
Ex.
- h3 + ul {
- border: 4px solid black;
- }
here, <h3> is a parent tag which has <ul> tag.
Let's learn all these features in this following example:
By default, our HTML page seems like this,

With performing different CSS basic concepts on this page it will look like this,
Check this image below,
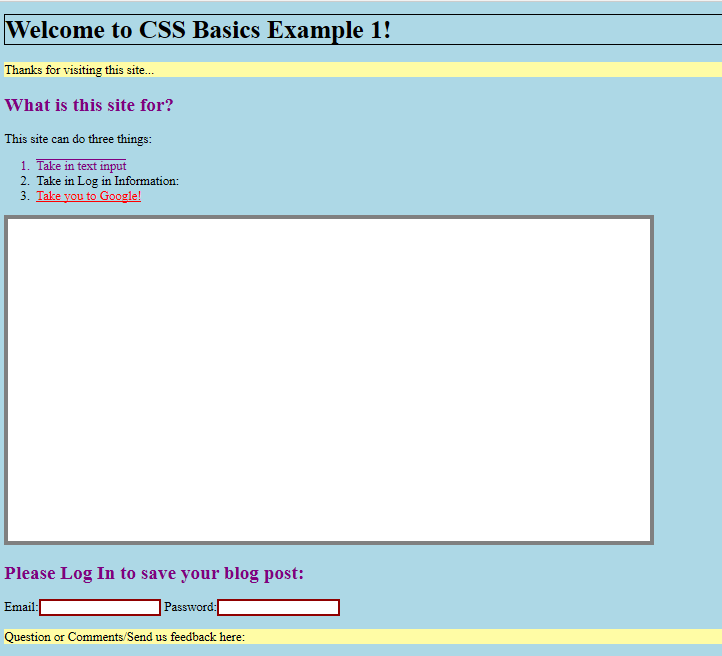
We can see there are different stylings on this page element.
We will create a normal HTML file.
- <!DOCTYPE html>
- <html lang="en" dir="ltr">
- <head>
- <meta charset="utf-8">
- <title>CSS Basic Example 1</title>
- <link rel="stylesheet" href="basiccssfile.css">
- </head>
- <body>
- <h1> Welcome to CSS Basics Example 1! </h1>
- <div class="">
- <p> Thanks for visiting this site...</p>
- </div>
- <h2>What is this site for?</h2>
- <p>This site can do three things:</p>
- <ol>
- <li id='itemone'>Take in text input</li>
- <li>Take in Log in Information:</li>
- <li>
- <a href="https://www.google.com">Take you to Google! </a>
- </li>
- </ol>
- <div class="blogtext">
- <textarea name="name" id="textblog"></textarea>
- </div>
- <h2>Please Log In to save your blog post:</h2>
- <form class="" action="index.html" method="post">
- <p>
- <label for="">Email:</label>
- <input type="email" name="" value="">
- <label for="">Password:
- <input type="password" name="" value="">
- </label>
- </p>
- <div class="">
- <p> Question or Comments/Send us feedback here:</p>
- </div>
- </form>
- </body>
- </html>
Now we will perform the differnt tasks in CSS files,
Check this CSS file,
- /* Task1: Give the body element of a site light blue background set to pink using HEX code: */
- body {
- background - color: #ADD8E6;
- }
- /*Task2: Change h1 t ohave 1px solid black border*/
- h1 {
- border: 1 px solid black;
- }
- /*Task3: Makes all h2 element to colour purple*/
- h2 {
- color: purple;
- }
- /*Task4: Make all input boxes have a 2px solid dark red border(using with RGB)*/
- input {
- border: 2 px solid rgb(144, 0, 0)
- }
- /*Task5: Make yellow background to <p> elements inside all <div> elements(using HEX code)*/
- div p {
- background: #fffca5
- }
- /*Task6: there is a textarea element having the id textblog, give it
- * A 5px solid gray border
- *A widht of 800px and height of 400px */
- #textblog {
- border: 5 px solid gray;
- width: 800 px;
- height: 400 px;
- }
- /*Task7: There is a link Google on the page make it Red*/
- a {
- color: red;
- }
- /*Task8: MAke the element with id="itemone" have an overlined text-decorstion and be the color purple.*/
- #itemone {
- text - decoration: overline;
- color: purple;
- }
Try to perform these tasks yourself.
Summary
In the next chapter, you will learn different properties of fonts like size, weight, text-alignment, etc.
Author

Dipa Mehta
152
12.6k
545k