Arduino Demo: Obstacle Detection System
Introduction
Obstacle Detection System
Prerequisites for developing this system
Hardware requirements
| Hardwares | Nos |
| Arduino UNO | 1 |
| Obstacle detection sensor | 1 |
| 10k ohm potentiometer | 1 |
| LCD crystal display | 1 |
| 220-ohm resistor | 1 |
| Breadboard | 1 |
| Connecting wires | - |
Software requirements
-
Arduino IDE (For uploading code to Arduino Microcontroller)
In this experiment, we can do three stages of work for creating a digital room thermometer
1. Connect all hardware
2. Write & upload code to Arduino board
3. Test our developed system
Stage 1 [Connecting all hardware]
Step 1
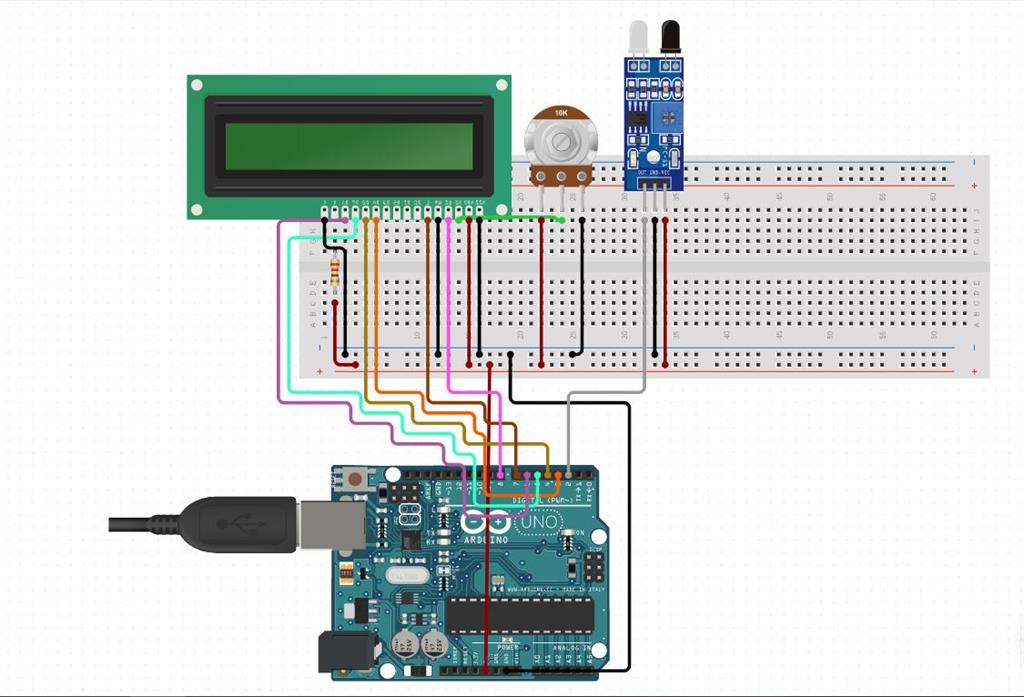
First, we can connect the LCD crystal display with the Arduino UNO board using Jumper wires. I am using a breadboard to extend power terminals for making this system.
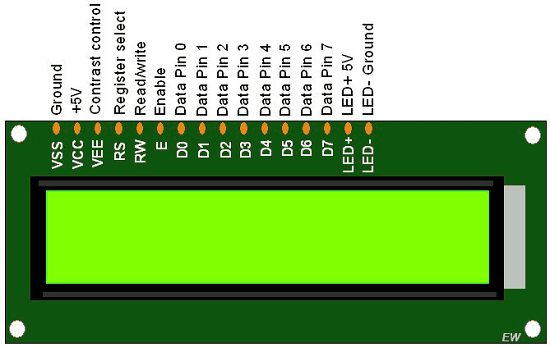
Refer to the below LCD crystal pin diagram for making an easy connection with Arduino.
Place a 10K ohm potentiometer near the LCD crystal display. It can adjust the contrast of the LCD screen and create a power connection from Arduino +5V and GND right and left end of the potentiometer. Make a connection from the center terminal of the potentiometer to VEE (contrast control) LCD crystal display. (Refer to the connection diagram)
Pin Configuration
Arduino Breadboard LCD Crystal Display
- Pin 3 ---------------------------------------------------------------------------> Data pin 4
- Pin 4 ---------------------------------------------------------------------------> Data pin 5
- Pin 5 ---------------------------------------------------------------------------> Data pin 6
- Pin 6 ----------------------------------------------------------------------------> Data pin 7
- Pin 8 ----------------------------------------------------------------------------> Register select
- Pin 7 ----------------------------------------------------------------------------> Enable
- + 5V -----------------> Potentiometer Right Terminal-------------------->Potentiometer Centre terminal ----> VEE (Contrast Control) LCD crystal
- +5V ---------------------------> 220-ohm Resistor ------------------------> LED +5V pin [LCD Crystal]
- GND ----------------------------------------------------------------------------->Potentiometer Left terminal, Ground pin & LED - Ground pin [Connect to both pin]
Step 2
Next, connect obstacle detection sensor to Arduino board as per the below pin Configuration.
Pin Configuration
Obstacle detection sensor Arduino
- Vcc ---------------------------------------------------------------------> +5V
- Signal -------------------------------------------------------------------> Pin2
- GND ---------------------------------------------------------------------> GND
Stage 2 [Write & upload code to Arduino]
In this step, write code for Arduino using the Arduino IDE.
-
Download Arduino software using this link here.
-
Install and open an Arduino IDE in your PC/Laptop
-
Connect your Arduino board to your computer using a USB data cable
-
Copy and paste the below code into the Arduino IDE
- #include "LiquidCrystal.h"
- #define SEN_PIN 2
- #define LCD_PIN_RS 8
- #define LCD_PIN_E 7
- #define LCD_PIN_DB4 3
- #define LCD_PIN_DB5 4
- #define LCD_PIN_DB6 5
- #define LCD_PIN_DB7 6
- LiquidCrystal lcd(LCD_PIN_RS,LCD_PIN_E,LCD_PIN_DB4,LCD_PIN_DB5,LCD_PIN_DB6,LCD_PIN_DB7);
- void setup() {
- Serial.begin(9600);
- lcd.begin(16, 2);
- lcd.print("C#corner");
- lcd.setCursor(0,1);
- lcd.print("Obstacle Detection");
- delay(2000);
- pinMode(SEN_PIN,INPUT);
- }
- void loop() {
- if (digitalRead(SEN_PIN)== LOW) {
- lcd.clear();
- lcd.setCursor(0,0);
- lcd.print("Obstacle Detected");
- }
- else
- {
- lcd.clear();
- lcd.setCursor(0,0);
- lcd.print("No obstacle detected ");
- }
- delay(200);
- }
Save and upload this code to the Arduino UNO board. After the code upload is completed, the device can start to detect an obstacle from your way.
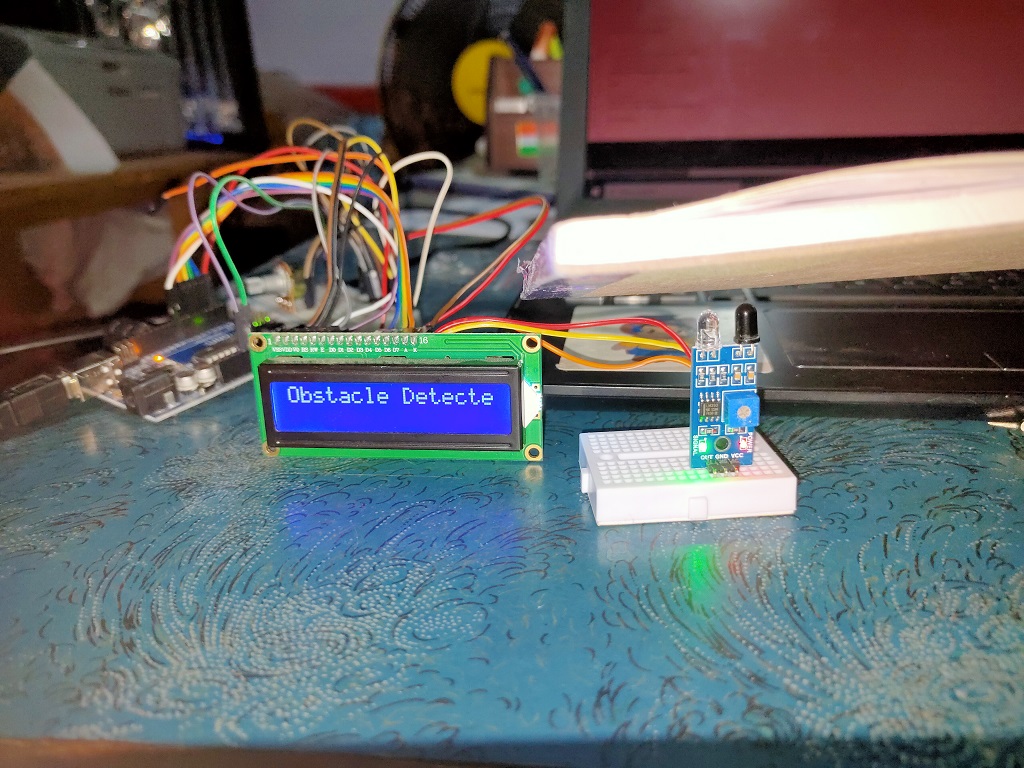
Stage 3 [Test our developed system]
Our developed obstacle detection system can detect an obstacle successfully.
In this chapter, you learned how to create an Obstacle Detection System using Arduino UNO R3.
That’s all for this chapter. I hope you enjoyed reading!!
Author

Naveenkumar Paramasivam
274
6k
709.6k