Flutter REST API
Introduction
In this article, we will learn how to integrate REST API in a Flutter app. As we know that nowadays, almost all the apps use remote data using APIs, this article will be a crucial part for any developer who wants to make their future in Flutter. So, let’s understand step by step how to integrate REST API in Flutter.
We are using an HTTP plugin for calling REST API from the app. HTTP will provide get, post, put, and read methods to send and receive data from remote locations.
We have used dummy REST API Sample URL for this article. You can use your project API.
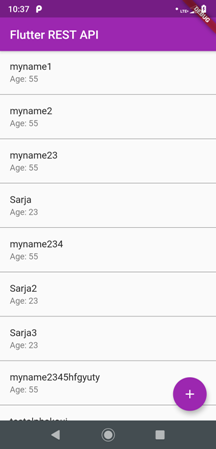
Output
Step 1
The first and most basic step is to create a new application in Flutter. If you are a beginner in Flutter, then you can check my blog Create a first app in Flutter. I have created an app named as “flutter_rest_api”.
Open the pubspec.yaml file in your project and add the following dependencies into it.
- dependencies:
- flutter:
- sdk: flutter
- cupertino_icons: ^0.1.2
- http: ^0.12.0+2
Step 3
Create a new file named as “rest_api.dart” for configuring the REST API URL and functions for sending and receiving the data. Following is the programming implementation for REST API in the app.
- import 'dart:convert';
- import 'package:http/http.dart' as http;
- class URLS {
- static const String BASE_URL = 'http://dummy.restapiexample.com/api/v1';
- }
- class ApiService {
- static Future<List<dynamic>> getEmployees() async {
- // RESPONSE JSON :
- // [{
- // "id": "1",
- // "employee_name": "",
- // "employee_salary": "0",
- // "employee_age": "0",
- // "profile_image": ""
- // }]
- final response = await http.get('${URLS.BASE_URL}/employees');
- if (response.statusCode == 200) {
- return json.decode(response.body);
- } else {
- return null;
- }
- }
- static Future<bool> addEmployee(body) async {
- // BODY
- // {
- // "name": "test",
- // "age": "23"
- // }
- final response = await http.post('${URLS.BASE_URL}/create', body: body);
- if (response.statusCode == 200) {
- return true;
- } else {
- return false;
- }
- }
- }
Step 4
Now, we will consume the REST API methods in our app. We have created a widget to display all the employees' list. Open main.dart and implement the following code.
- import 'package:flutter/material.dart';
- import 'package:flutter_rest_api/rest_api.dart';
- void main() => runApp(MyApp());
- class MyApp extends StatelessWidget {
- @override
- Widget build(BuildContext context) {
- return MaterialApp(
- theme: ThemeData(
- primarySwatch: Colors.purple,
- ),
- home: EmployeePage(),
- );
- }
- }
- class EmployeePage extends StatefulWidget {
- @override
- _EmployeePageState createState() => _EmployeePageState();
- }
- class _EmployeePageState extends State<EmployeePage> {
- @override
- Widget build(BuildContext context) {
- return Scaffold(
- appBar: AppBar(
- title: Text('Flutter REST API'),
- ),
- body: FutureBuilder(
- future: ApiService.getEmployees(),
- builder: (context, snapshot) {
- final employees = snapshot.data;
- if (snapshot.connectionState == ConnectionState.done) {
- return ListView.separated(
- separatorBuilder: (context, index) {
- return Divider(
- height: 2,
- color: Colors.black,
- );
- },
- itemBuilder: (context, index) {
- return ListTile(
- title: Text(employees[index]['employee_name']),
- subtitle: Text('Age: ${employees[index]['employee_age']}'),
- );
- },
- itemCount: employees.length,
- );
- }
- return Center(
- child: CircularProgressIndicator(),
- );
- },
- ),
- floatingActionButton: FloatingActionButton(
- onPressed: () {
- Navigator.push(
- context,
- MaterialPageRoute(
- builder: (context) => AddNewEmployeePage(),
- ),
- );
- },
- tooltip: 'Increment',
- child: Icon(Icons.add),
- ),
- );
- }
- }
Step 5
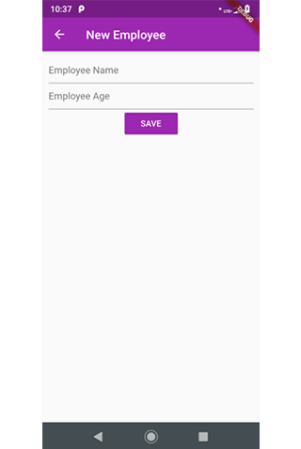
To add a new employee, we have created another page called AddNewEmployeePage, which will add a new employee to the list. Following is the implementation; for that I have created a widget in main.dart file.
- class AddNewEmployeePage extends StatefulWidget {
- AddNewEmployeePage({Key key}) : super(key: key);
- _AddNewEmployeePageState createState() => _AddNewEmployeePageState();
- }
- class _AddNewEmployeePageState extends State<AddNewEmployeePage> {
- final _employeeNameController = TextEditingController();
- final _employeeAge = TextEditingController();
- @override
- Widget build(BuildContext context) {
- return Scaffold(
- appBar: AppBar(
- title: Text('New Employee'),
- ),
- body: Center(
- child: Padding(
- padding: EdgeInsets.all(10),
- child: Column(
- children: <Widget>[
- TextField(
- controller: _employeeNameController,
- decoration: InputDecoration(hintText: 'Employee Name'),
- ),
- TextField(
- controller: _employeeAge,
- decoration: InputDecoration(hintText: 'Employee Age'),
- keyboardType: TextInputType.number,
- ),
- RaisedButton(
- child: Text(
- 'SAVE',
- style: TextStyle(
- color: Colors.white,
- ),
- ),
- color: Colors.purple,
- onPressed: () {
- final body = {
- "name": _employeeNameController.text,
- "age": _employeeAge.text,
- };
- ApiService.addEmployee(body).then((success) {
- if (success) {
- showDialog(
- builder: (context) => AlertDialog(
- title: Text('Employee has been added!!!'),
- actions: <Widget>[
- FlatButton(
- onPressed: () {
- Navigator.pop(context);
- _employeeNameController.text = '';
- _employeeAge.text = '';
- },
- child: Text('OK'),
- )
- ],
- ),
- context: context,
- );
- return;
- }else{
- showDialog(
- builder: (context) => AlertDialog(
- title: Text('Error Adding Employee!!!'),
- actions: <Widget>[
- FlatButton(
- onPressed: () {
- Navigator.pop(context);
- },
- child: Text('OK'),
- )
- ],
- ),
- context: context,
- );
- return;
- }
- });
- },
- )
- ],
- ),
- ),
- ),
- );
- }
- }
Step 6
Great, you are done with Flutter REST API integration. Run this project in device or emulator and check the output.
Conclusion
In this article, we have learned how to implement the REST API in Flutter. We have used get and post methods of HTTP plugin.
Author

Parth Patel
0
7k
1.7m