Portal And Error Boundaries In React
Introduction
In the previous article, we learned about Memo and Refs in React. We also learned forwarding Ref in React. In this article, we will learn about React Portal and Error Boundary and how it can be used in React.
Portal
A React Portal is a way of binding an element outside of its component hierarchy, in a separate component. The name Portal represents that an element can be set anywhere in the DOM tree that’s outside of the normal React components tree. The concept of Portal is added after version 16.0 in React.
React provides an API to create portal named ReactDOM.createPortal() that accepts 2 parameters, the first parameter is an element which needs to be rendered and the second element is the DOM element in which it needs to be rendered. Portals are mostly used for implementing, Tooltip, Modals, Global message notifications, hovercards, chat widgets, and Floating menus. For Portal, we can return strings, numbers, components, React portals or an array of children.
Event Bubbling through React Portals
As React portal can be anywhere outside of DOM tree but it will act like a React child in all other ways, despite the fact that a child is a portal, it will still exist in the React tree regardless of its position in the DOM tree. So, if we want to trigger any event from the Portal, it will propagate to ancestors in the containing tree, even if those elements are not ancestors of the DOM tree.
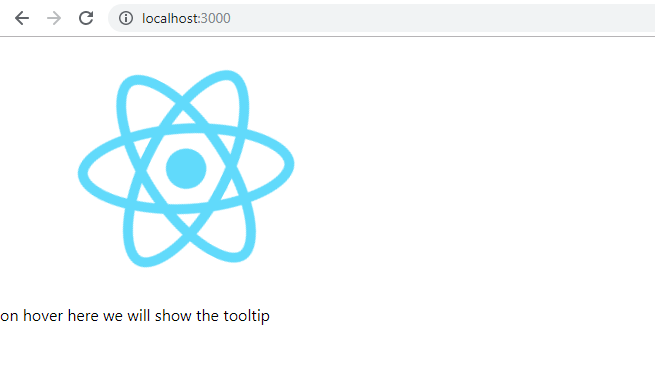
Let’s look at the demo that will display tooltip using Portal.
- import React, { Component } from 'react'
- class Tooltip extends Component {
- constructor(props) {
- super(props)
- this.state = { hover: false }
- }
- handleMouseIn() {
- this.setState({ hover: true })
- }
- handleMouseOut() {
- this.setState({ hover: false })
- }
- render() {
- const tooltipStyle = {
- display: this.state.hover ? 'block' : 'none'
- }
- return (
- <div>
- <div onMouseOver={this.handleMouseIn.bind(this)} onMouseOut={this.handleMouseOut.bind(this)}>on hover here we will show the tooltip</div>
- <div>
- <div style={tooltipStyle}>this is the tooltip!!</div>
- </div>
- </div>
- );
- }
- }
- export default Tooltip
Now, use the Tooltip component in the App component.
- import React from 'react';
- import logo from './logo.svg';
- import './App.css';
- import Tooltip from "./components/Tooltip"
- function App() {
- return (
- <div>
- <header>
- <img src={logo} className="App-logo" alt="logo" />
- </header>
- <div>
- <Tooltip>Hello World !</Tooltip>
- </div>
- </div>
- );
- }
- export default App;
The output will be displayed as below.
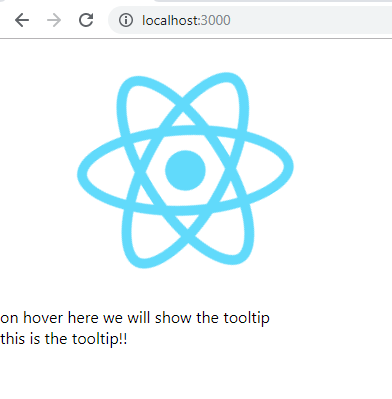
So, in this way, we can also customize a component for extra functionalities like creating models, Tooltip, etc.
Error Boundary
In React, there is a concept for Error Boundary that prevents the errors being thrown to the user. So, if any error occurs, this will display a user-friendly view. This Error Boundary component is a component that catches JavaScript errors from their child component trees, log those errors, and display a fallback UI in place of the component tree crashed errors thrown by the application. Error Boundaries catch errors during rendering, in lifecycle methods, and in constructor inside the whole trees. Error Boundaries are created as a class boundary when any one or both of these methods are defined - static getDerievedStateFromError() or componentDidCatch().
The above 2 error methods are used to catch error UI and log error information respectively.
static getDerievedStateFromError()
This method is invoked after an error is thrown by the child component. It gets the error thrown by the child component as a parameter and it should return the value to update state.
The below code is a basic syntax to use Error Boundary.
- import React,{Component} from 'react';
- class ErrorBoundary extends Component{
- constructor(props) {
- super(props)
- this.state = {
- hasError : false
- }
- }
- static getDerivedStateFromError(error){
- return {hasError:true};
- }
- render(){
- if(this.state.hasError){
- return <h2>Error Occurred</h2>
- }
- return this.props.children;
- }
- }
- export default ErrorBoundary
As the getDerievedFromState() method is called during the render phase just to set the state in React, so it does not involve any side effects. So, for that, we need to use the componentDidCatch() method.
componentDidCatch()
This method is used to log error information thrown during the getDerievedFromState() method.
Syntax - componentDidCatch(error,info)
- import React,{Component} from 'react';
- class ErrorBoundary extends Component{
- constructor(props) {
- super(props)
- this.state = {
- hasError : false
- }
- }
- static getDerivedStateFromError(error){
- return {hasError:true};
- }
- componentDidCatch(error,info){
- // Any reporting Service of custom code to set state
- }
- render(){
- if(this.state.hasError){
- return <h2>Error Occurred</h2>
- }
- return this.props.children;
- }
- }
- export default ErrorBoundary
The lifecycle is invoked when an error is thrown from a child component. It takes 2 parameters.
error - The error that was thrown
Info - An object with ComponentStack key containing information about which component threw the error.
componentDidCatch() is called during commit phase, so side effects are permitted and used for logging errors.
Some important point to keep in mind while using Error Boundary,
- Error boundaries do not catch error in below cases,
- Thrown in error boundary itself.
- Event handlers
- for Async Code
- Server Side rendering
- Only class components can be error boundaries
- Error boundaries work like javascript `catch {}` block, but just for a component.
Let’s see a demo for Error Boundary.
ErrorBoundary.js
- import React,{Component} from 'react';
- class ErrorBoundary extends Component{
- constructor(props) {
- super(props)
- this.state = {
- hasError : false
- }
- }
- static getDerivedStateFromError(error){
- return {hasError:true};
- }
- componentDidCatch(error,info){
- this.setState({
- hasError:true
- })
- }
- render(){
- if(this.state.hasError){
- return <h2>Error Occured</h2>
- }
- return this.props.children;
- }
- }
- export default ErrorBoundary
Just change a method name to generate error in Tooltip.js
- import React, { Component } from 'react'
- class Tooltip extends Component {
- constructor(props) {
- super(props)
- this.state = { hover: false }
- }
- handleMouseIn() {
- this.setState({ hover: true })
- }
- handleMouseOut() {
- this.setState({ hover: false })
- }
- render() {
- const tooltipStyle = {
- display: this.state.hover ? 'block' : 'none'
- }
- return (
- <div>
- <div onMouseOver={this.handleMouseIn.bind(this)} onMouseOut={this.handleMouseOut1.bind(this)}>on hover here we will show the tooltip</div>
- <div>
- <div style={tooltipStyle}>this is the tooltip!!</div>
- </div>
- </div>
- );
- }
- }
- export default Tooltip
Now in App.js file
- import React from 'react';
- import logo from './logo.svg';
- import './App.css';
- import Tooltip from "./components/Tooltip"
- import ErrorBoundary from "./components/ErrorBoundary"
- function App() {
- return (
- <ErrorBoundary>
- <div>
- <header>
- <img src={logo} className="App-logo" alt="logo" />
- </header>
- <div>
- <Tooltip>Hello World !</Tooltip>
- </div>
- </div>
- </ErrorBoundary>
- );
- }
- export default App;
The output will be displayed as below,
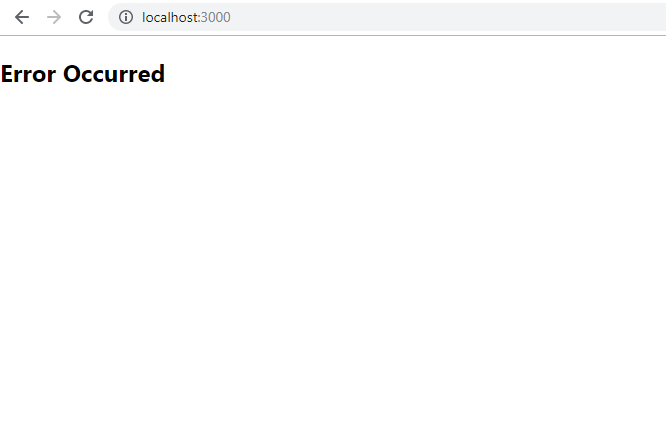
Here you will note a change. After displaying the above screen just after a few seconds error page is displayed again as below,
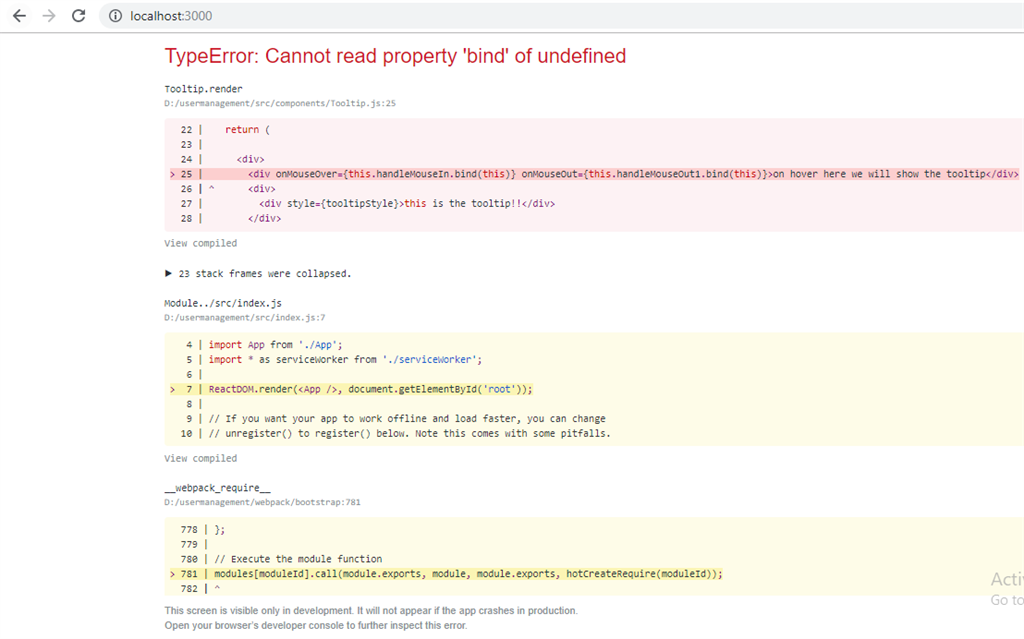
This is because in development phase Error Boundaries do not override error overlay. Which may not happen in the production phase. To resolve this issue you can add below code in your CSS file.
- iframe {
- display: none;
- }
Then, the text or image you want to display using the error boundary will remain on browser's screen.
Summary
In this article, we have learned about Portals and Error Boundary in React. And how it can be implemented in React Js. You can download source code attached along with this article. In the next article, we will learn in detail about the concept and usage of Higher-Order Components (HOCs) in React.
Next in this series >> Higher Order Component in React
Author

Priyanka Jain
0
9.6k
927.6k